How to Build a LeRobot StarAI Robotic Arm and Complete a Custom Grasping Task
Product Introduction
- Open source and easy for secondary development
This series of servo products is provided by FashionStar Technology. It is an open-source 6+1 DOF robotic arm solution designed for secondary development. - Supports LeRobot platform integration
It is designed for integration with the LeRobot platform. The platform provides PyTorch models, datasets, and tools for imitation learning on real-world robot tasks, including data collection, simulation, training, and deployment. - Rich learning resources
It provides comprehensive open-source learning resources, including environment setup, installation and configuration, and custom grasping task examples to help users get started quickly and develop robotic applications. - Compatible with Nvidia platforms
Deployment is supported through the reComputer Mini J4012 Orin NX 16GB platform.
Features
- No assembly required: ready to use out of the box and ready for the AI era.
- 6+1 DOF structure with a 470 mm reach for flexible manipulation.
- Equipped with two all-metal brushless bus servo units for stable drive and easy handling of a 300 g payload.
- Intelligent parallel gripper with a maximum opening of 66 mm and modular fingertips for precise grasping.
- Exclusive hover control system. Press with a fingertip and the Leader Arm stops steadily in any posture.
Specifications
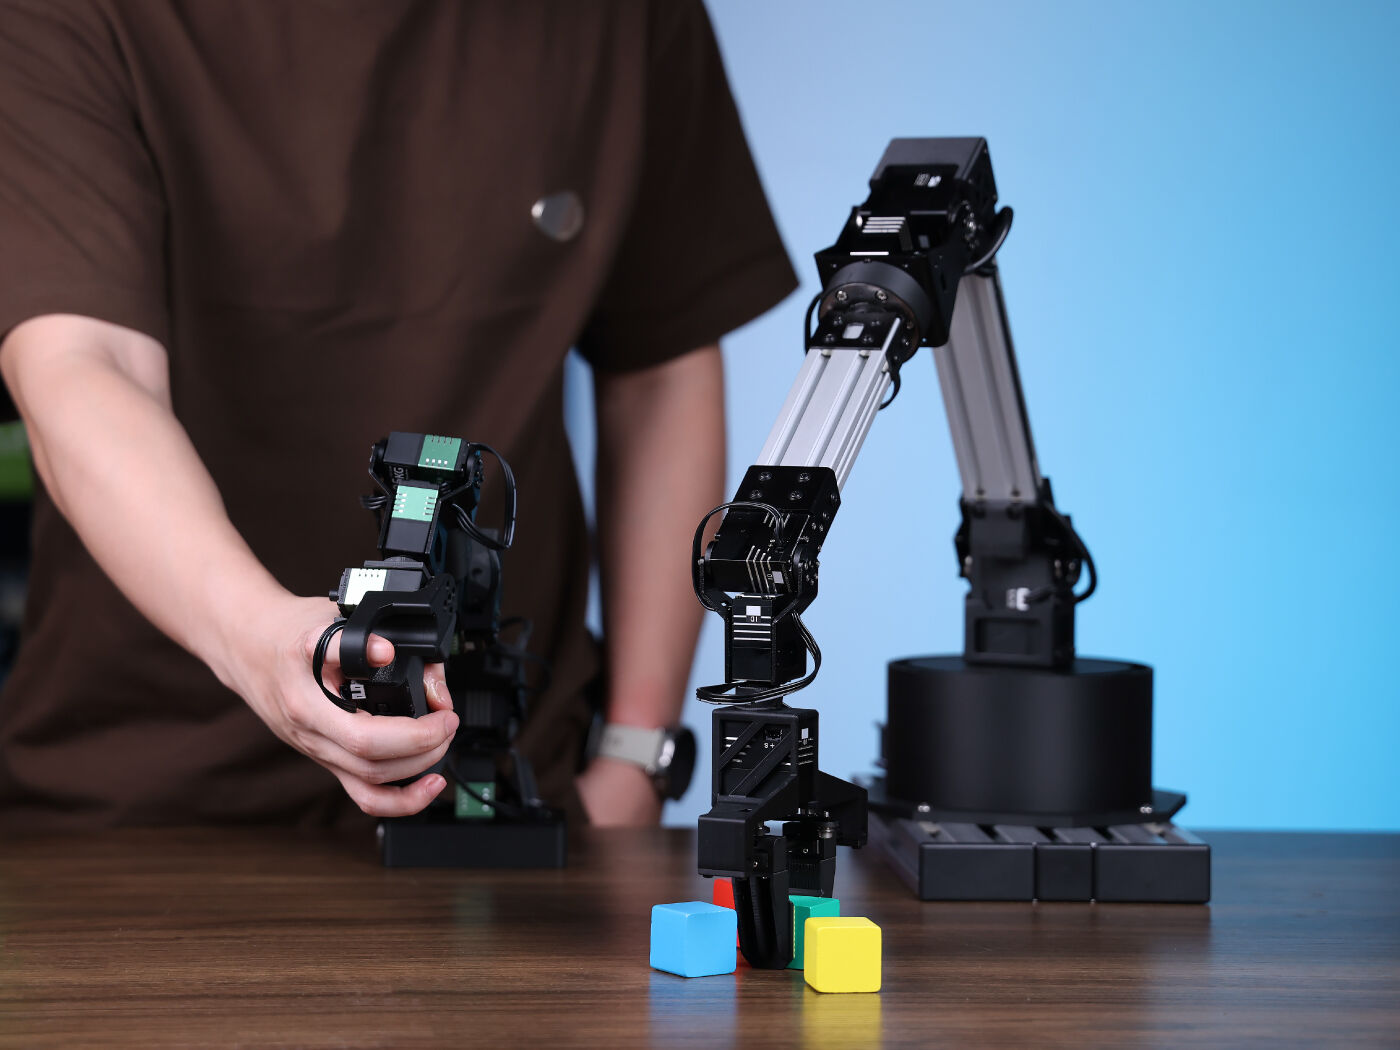
| Item | Follower Arm | Viola | Leader Arm | Violin |
|---|---|---|
| Degrees of Freedom | 6+1 | 6+1 |
| Reach | 470mm | 470mm |
| Span | 940mm | 940mm |
| Repeatability | 2mm | - |
| Working Payload | 300g (with 70% Reach) | - |
| Servos | RX8-U50H-M x2 RA8-U25H-M x4 RA8-U26H-M x1 |
RX8-U50H-M x2 RA8-U25H-M x4 RA8-U26H-M x1 |
| Parallel Gripper Kit | √ | - |
| Wrist Rotate | Yes | Yes |
| Hold at any Position | Yes | Yes (with handle button) |
| Wrist Camera Mount | √ | - |
| Works with LeRobot | √ | √ |
| Works with ROS 2 | √ | / |
| Works with MoveIt | √ | / |
| Works with Gazebo | √ | / |
| Communication Hub | UC-01 | UC-01 |
| Power Supply | 12v/120w | 12v/120w |
For more information about servo products, visit the following links.
Initial Environment Setup
For Ubuntu X86:
- Ubuntu 22.04
- CUDA 12+
- Python 3.10
- Torch 2.6
Installation and Configuration
Install LeRobot
Install PyTorch, Torchvision, and related environments according to your CUDA version.
-
Install Miniconda. For Jetson:
wget https://repo.anaconda.com/miniconda/Miniconda3-latest-Linux-aarch64.sh
chmod +x Miniconda3-latest-Linux-aarch64.sh
./Miniconda3-latest-Linux-aarch64.sh
source ~/.bashrc
Or, for X86 Ubuntu 22.04:
mkdir -p ~/miniconda3 cd miniconda3 wget https://repo.anaconda.com/miniconda/Miniconda3-latest-Linux-x86_64.sh -O ~/miniconda3/miniconda.sh bash ~/miniconda3/miniconda.sh -b -u -p ~/miniconda3 rm ~/miniconda3/miniconda.sh source ~/miniconda3/bin/activate conda init --all -
Create and activate a new conda environment for LeRobot.
conda create -y -n lerobot python=3.10 && conda activate lerobot -
Clone the LeRobot repository:
git clone https://github.com/servodevelop/lerobot.git -
When using Miniconda, install ffmpeg in the environment:
conda install ffmpeg -c conda-forgeThis usually installs ffmpeg 7.x built with the libsvtav1 encoder for your platform. If libsvtav1 is not supported, which you can check with ffmpeg -encoders, you can:
- Explicitly install ffmpeg 7.x on all platforms:
conda install ffmpeg=7.1.1 -c conda-forge -
Install LeRobot:
cd ~/lerobot && pip install -e .For Jetson Jetpack devices, make sure Pytorch-gpu and Torchvision have been installed according to step 5 in this tutorial before running this step:
conda install -y -c conda-forge "opencv>=4.10.0.84" # 通过 conda 安装 OpenCV 和其他依赖,仅适用于 Jetson Jetpack 6.0+ conda remove opencv # 卸载 OpenCV pip3 install opencv-python==4.10.0.84 # 使用 pip3 安装指定版本 OpenCV conda install -y -c conda-forge ffmpeg conda uninstall numpy pip3 install numpy==1.26.0 # 该版本需与 torchvision 兼容 -
Install FashionStar motor dependencies:
pip install lerobot_teleoperator_violin #使用 pip 安装violin pip install lerobot_robot_viola #使用 pip 安装viola -
Check PyTorch and Torchvision.
Because installing the LeRobot environment through pip may uninstall the original PyTorch and Torchvision and install CPU versions, check it in Python:
import torch
print(torch.cuda.is_available())
If the output is False, reinstall PyTorch and Torchvision according to the official tutorial.
Wiring
https://github.com/user-attachments/assets/56130bd9-21ee-4ae4-9cac-3817ac4d659f
Arm Port Settings
Enter the following command in the terminal to find the port numbers corresponding to the two robotic arms:
lerobot-find-port
For example:
- Example output when identifying the Leader port, such as
/dev/tty.usbmodem575E0031751on macOS or/dev/ttyUSB0on Linux. - Example output when identifying the Follower port, such as
/dev/tty.usbmodem575E0032081on macOS or/dev/ttyUSB1on Linux.
Note
If ttyUSB0 serial port information cannot be detected, try the following steps.
List all USB ports.
lsusb

After successful recognition, view ttyusb information.
sudo dmesg | grep ttyUSB

The last line indicates disconnection because brltty is occupying this USB device number. Remove it to solve the problem.
sudo apt remove brltty

Finally, grant permissions.
sudo chmod 777 /dev/ttyUSB*
Calibration
If this is the first calibration, rotate each joint left and right to its limit position.
If this is recalibration, enter the letter c as prompted by the command and press Enter.
The following are reference values. In most cases, the real limit values are within ±10° of these references.
| Servo ID | Lower Angle Reference | Upper Angle Reference | Note |
|---|---|---|---|
| motor_0 | -180° | 180° | Rotate to the limit |
| motor_1 | -90° | 90° | Rotate to the limit |
| motor_2 | -90° | 90° | Rotate to the limit |
| motor_3 | -180° | 180° | No physical limit; rotate to the upper and lower angle reference values |
| motor_4 | -90° | 90° | Rotate to the limit |
| motor_5 | -180° | 180° | No physical limit; rotate to the upper and lower angle reference values |
| motor_6 | 0° | 100° | Rotate to the limit |
leader
Tip
Connect the leader to /dev/ttyUSB0, or modify the command below.
lerobot-calibrate --teleop.type=lerobot_teleoperator_violin --teleop.port=/dev/ttyUSB0 --teleop.id=my_awesome_staraiviolin_arm
follower
Tip
Connect the follower to /dev/ttyUSB1, or modify the command below.
lerobot-calibrate --robot.type=lerobot_robot_viola --robot.port=/dev/ttyUSB1 --robot.id=my_awesome_staraiviola_arm
Teleoperation
https://github.com/user-attachments/assets/23b3aa00-9889-48d3-ae2c-00ad50595e0a
Move the arm to the standby position shown in the image.
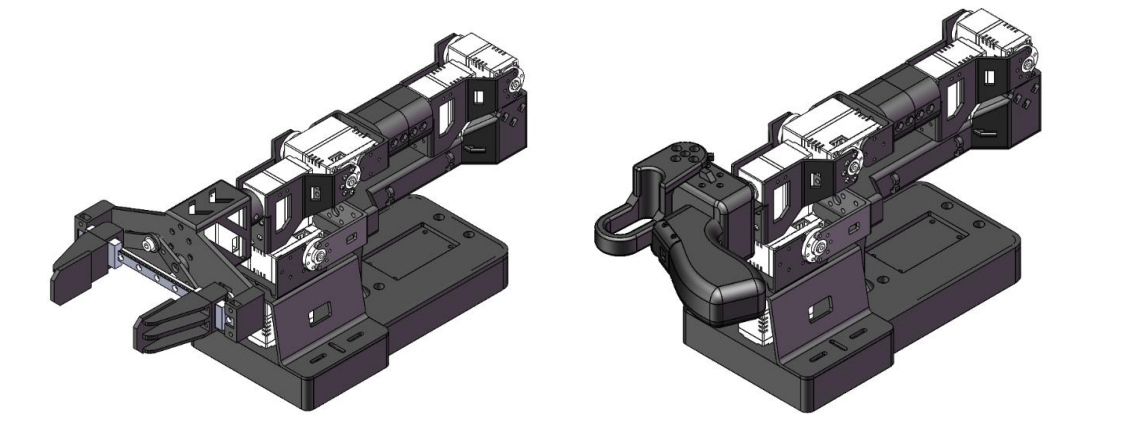
You are ready to teleoperate your robot without cameras. Run the following simple script:
lerobot-teleoperate \
    --robot.type=lerobot_robot_viola \
    --robot.port=/dev/ttyUSB1 \
    --robot.id=my_awesome_staraiviola_arm \
    --teleop.type=lerobot_teleoperator_violin \
    --teleop.port=/dev/ttyUSB0 \
    --teleop.id=my_awesome_staraiviolin_arm
The teleoperation command automatically detects the following:
- Any missing calibration and starts the calibration process.
- The robot and teleoperation device, then starts teleoperation.
After the program starts, the hover button remains active.
Add Cameras
https://github.com/user-attachments/assets/82650b56-96be-4151-9260-2ed6ab8b133f
After plugging in two USB cameras, run the following script to check the camera port numbers. Avoid connecting cameras through a USB hub, because a slow hub may prevent image data from being read.
lerobot-find-cameras opencv # or realsense for Intel Realsense cameras
The terminal prints the following information. In my laptop example, the laptop cameras are Camera0 and Camera1, and the index_or_path values are 2 and 4.
--- Detected Cameras ---
Camera #0:
  Name: OpenCV Camera @ /dev/video2
  Type: OpenCV
  Id: /dev/video2
  Backend api: V4L2
  Default stream profile:
    Format: 0.0
    Width: 640
    Height: 480
    Fps: 30.0
--------------------
Camera #1:
  Name: OpenCV Camera @ /dev/video4
  Type: OpenCV
  Id: /dev/video4
  Backend api: V4L2
  Default stream profile:
    Format: 0.0
    Width: 640
    Height: 360
    Fps: 30.0
--------------------

Finalizing image saving...
Image capture finished. Images saved to outputs/captured_images
After confirming the external cameras, replace the camera information below with your camera information so the camera view can be displayed on the computer during teleoperation:
lerobot-teleoperate \
    --robot.type=lerobot_robot_viola \
    --robot.port=/dev/ttyUSB1 \
    --robot.id=my_awesome_staraiviola_arm \
    --robot.cameras="{ front: {type: opencv, index_or_path: 2, width: 640, height: 480, fps: 30}}" \
    --teleop.type=lerobot_teleoperator_violin \
    --teleop.port=/dev/ttyUSB0 \
    --teleop.id=my_awesome_staraiviolin_arm \
    --display_data=true
# new
# lerobot-teleoperate \
#     --robot.type=lerobot_robot_viola \
#     --robot.port=/dev/ttyUSB1 \
#     --robot.id=my_awesome_staraiviola_arm \
#     --robot.cameras="{ front: {type: opencv, index_or_path: 2, width: 640, height: 480, fps: 30, fourcc: "MJPG"}}" \
#     --teleop.type=lerobot_teleoperator_violin \
#     --teleop.port=/dev/ttyUSB0 \
#     --teleop.id=my_awesome_staraiviolin_arm \
#     --display_data=true
Dataset Creation and Collection
https://github.com/user-attachments/assets/8bb25714-783a-4f29-83dd-58b457aed80c
Tip
If you want to use Hugging Face Hub features to upload your dataset, refer to the following official article. This tutorial does not cover that part.
Once you are familiar with teleoperation, you can start your first dataset.
Record 10 episodes:
lerobot-record \
    --robot.type=lerobot_robot_viola \
    --robot.port=/dev/ttyUSB1 \
    --robot.id=my_awesome_staraiviola_arm \
    --robot.cameras="{ up: {type: opencv, index_or_path: /dev/video2, width: 640, height: 480, fps: 30},front: {type: opencv, index_or_path: /dev/video4, width: 640, height: 480, fps: 30}}" \
    --teleop.type=lerobot_teleoperator_violin \
    --teleop.port=/dev/ttyUSB0 \
    --teleop.id=my_awesome_staraiviolin_arm \
    --display_data=true \
    --dataset.repo_id=starai/record-test \
    --dataset.episode_time_s=30 \
    --dataset.reset_time_s=30 \
    --dataset.num_episodes=10 \
    --dataset.push_to_hub=False \
    --dataset.single_task="Grab the black cube"
Recording Features
- record provides a set of tools for capturing and managing data during robot operation.
1. Data Storage
- Data is stored in
LeRobotDatasetformat and is written to disk during recording.
2. Checkpoints and Resume
- Checkpoints are automatically created during recording.
- If a problem occurs, you can resume by rerunning the same command. When resuming recording, set the value to the number of additional episodes to record, not the target total number of episodes in the dataset.
--resume=true--dataset.num_episodes - To record from scratch, manually delete the dataset directory.
3. Recording Parameters
Use command-line parameters to configure the data recording flow:
--dataset.episode_time_s=60: duration of each data recording episode (default: 60 seconds).
--dataset.reset_time_s=60: environment reset duration after each episode (default: 60 seconds).
--dataset.num_episodes=50: total number of episodes to record (default: 50).
4. Keyboard Controls During Recording
Use keyboard shortcuts to control the data recording flow:
- Press Right Arrow (→): stop the current episode or reset period early, then move to the next one.
- Press Left Arrow (←): cancel the current episode and record it again.
- Press ESC: stop the session immediately, encode videos, and upload the dataset.
Tip
On Linux, if the left/right arrow keys and Esc key do not work during data recording, make sure the $DISPLAY environment variable is set. See the pynput limitations.
Once you are familiar with data recording, you can create a larger dataset for training. A good starter task is to grasp an object from different positions and place it in a bin. We recommend recording at least 50 episodes, 10 for each location. Keep the camera fixed and keep grasping behavior consistent throughout recording. Also make sure the object being manipulated is visible in the camera. A good rule of thumb is that you should be able to complete the task yourself by looking only at the camera image.
Replay an Episode
Replay a recorded action to test the repeatability of robot motion.
lerobot-replay \
    --robot.type=lerobot_robot_viola \
    --robot.port=/dev/ttyUSB1 \
    --robot.id=my_awesome_staraiviola_arm \
    --dataset.repo_id=starai/record-test \
    --dataset.episode=1 # choose the episode you want to replay
Training
To train a policy that controls your robot, here is an example command:
lerobot-train \
  --dataset.repo_id=starai/record-test \
  --policy.type=act \
  --output_dir=outputs/train/act_viola_test \
  --job_name=act_viola_test \
  --policy.device=cuda \
  --wandb.enable=False \
  --policy.repo_id=starai/my_policy
- The dataset is provided as a parameter.
dataset.repo_id=starai/record-test - The policy configuration is loaded from
configuration_act.py. This policy automatically adapts to the motor states, motor actions, and number of cameras saved in your dataset.policy.type=actlaptopphone - We provide Weights & Biases for visualizing training graphs. This is optional, but if you use it, make sure you have logged in by running
wandb.enable=truewandb login.
To resume training from a checkpoint:
lerobot-train \
  --config_path=outputs/train/act_viola_test/checkpoints/last/pretrained_model/train_config.json \
  --resume=true
Run Inference and Evaluate
Run the following command to record 10 evaluation episodes:
lerobot-record  \
  --robot.type=lerobot_robot_viola \
  --robot.port=/dev/ttyUSB1 \
  --robot.cameras="{ up: {type: opencv, index_or_path: /dev/video2, width: 640, height: 480, fps: 30},front: {type: opencv, index_or_path: /dev/video4, width: 640, height: 480, fps: 30}}" \
  --robot.id=my_awesome_staraiviola_arm \
  --display_data=false \
  --dataset.repo_id=starai/eval_record-test \
  --dataset.single_task="Put lego brick into the transparent box" \
  --policy.path=outputs/train/act_viola_test/checkpoints/last/pretrained_model
  # <- Teleop optional if you want to teleoperate in between episodes \
  # --teleop.type=lerobot_teleoperator_violin \
  # --teleop.port=/dev/ttyUSB0 \
  # --teleop.id=my_awesome_leader_arm \
FAQ
-
If you use this tutorial, please git clone the GitHub repository recommended in this document:
https://github.com/servodevelop/lerobot.git. -
If teleoperation works normally but teleoperation with Camera cannot display the image interface, refer to this page.
-
If a libtiff issue occurs during dataset teleoperation, update the libtiff version.
conda install libtiff==4.5.0 #for Ubuntu 22.04 is libtiff==4.5.1
-
After installing LeRobot, the GPU version of PyTorch may be automatically uninstalled, so install torch-gpu manually if needed.
-
For Jetson, install Pytorch and Torchvsion before running
conda install -y -c conda-forge ffmpeg, otherwise torchvision compilation may have an ffmpeg version mismatch. -
Training 50 ACT data episodes takes about 6 hours on an 8 GB RTX 3060 laptop, and about 2-3 hours on computers with RTX 4090 or A100.
-
During data collection, keep the camera position, camera angle, and ambient lighting stable. Reduce unstable backgrounds and pedestrians in the camera view, otherwise large environment differences during deployment may prevent the robotic arm from grasping normally.
-
Make sure the num-episodes value in the data collection command is sufficient. Do not pause manually midway, because the dataset mean and variance are calculated only after data collection finishes, and these values are necessary for training.
-
If the program reports that USB camera image data cannot be read, make sure the USB camera is not connected through a hub. The USB camera must be connected directly to the device to ensure fast image transmission.
References
Seeed Studio English Wiki: How to use the SO10xArm robotic arm in Lerobot | Seeed Studio Wiki
Huggingface Project: Lerobot
Huggingface: LeRobot
ACT or ALOHA: Learning Fine-Grained Bimanual Manipulation with Low-Cost Hardware
VQ-BeT: VQ-BeT: Behavior Generation with Latent Actions
Diffusion Policy: Diffusion Policy
TD-MPC: TD-MPC