Pidadapter - Cello Robotic Arm Tuning Tool
| Version | Supported Environment | Entry |
|---|---|---|
| v2026.02.14 | Windows, macOS, Linux | Open Web configuration Tool |
Overview
Pidadapter is a Cello robotic arm tuning tool developed by Fashion Star. It is used to connect to and configure the robotic arm serial port parameters, and provides different power modes for different usage scenarios.
Features
Device Connection
- serial port Connection: connect to the robotic arm serial port through the browser.
- Recommended Browser: Chrome or Edge.
Power Mode Optimization
Three power modes are provided and can be selected according to the actual application scenario:
Light Load Mode (Compliant Anti-Jitter)
- Applicable scenario: no-load operation.
- Feature: optimizes low-speed motion jitter and provides a compliant motion experience.
- Advantage: smoother movement with reduced vibration.
Standard Mode (Balanced General Use)
- Applicable scenario: routine operation.
- Feature: balances force output and smoothness.
- Advantage: achieves the best balance between force and motion smoothness.
Heavy Load Mode (High Rigidity)
- Applicable scenario: large end-load operation.
- Feature: increases upper-arm rigidity.
- Advantage: provides stronger support and keeps the load stable.
Caution
- Do not power off or unplug the data cable while writing parameters.
- Keep the power supply stable during parameter updates.
- Any interruption may damage the servo configuration.
Detailed Operation Flow
Step 1: Open the Tool Page
- Open the web configuration tool
- After the page loads, the main interface is displayed.
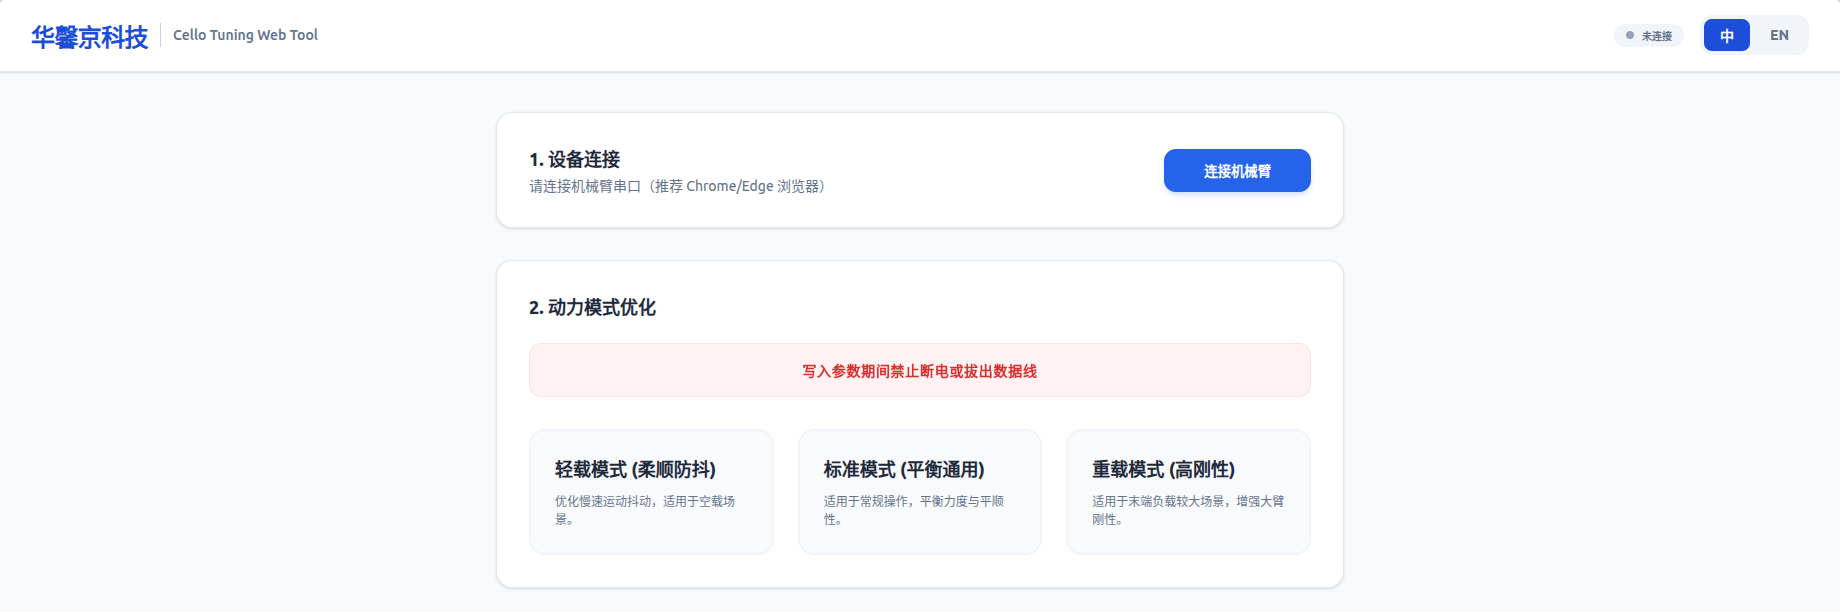
Step 2: Connect the Robotic Arm
-
Find the connection button
- The top of the page shows the "1. Device Connection" area.
- Click the blue "Connect Robotic Arm" button.
-
serial port Selection
- The browser opens a serial port device selection dialog.
- Select the serial port device corresponding to your robotic arm from the drop-down list.
- The port name is usually
/dev/ttyUSB*(Linux/macOS) orCOM*(Windows).
-
Confirm the connection
- Click the "Connect" button.
- Wait for the connection to be established.
- After connection succeeds, the status changes from "DISCONNECTED" to "CONNECTED".
Step 3: Select the Appropriate Power Mode
Select a mode according to your actual use scenario:
| Scenario | Recommended Mode | Reason |
|---|---|---|
| Robotic arm running without payload | Light Load Mode | Reduces jitter and makes motion more compliant |
| Routine operation (moderate load) | Standard Mode | Balances performance and stability |
| Heavy-load operation | Heavy Load Mode | Increases rigidity and prevents deformation |
Operation Steps:
-
Select a mode
- Select the required power mode, then click the button after the blue highlight
[ ]appears.
- Select the required power mode, then click the button after the blue highlight
-
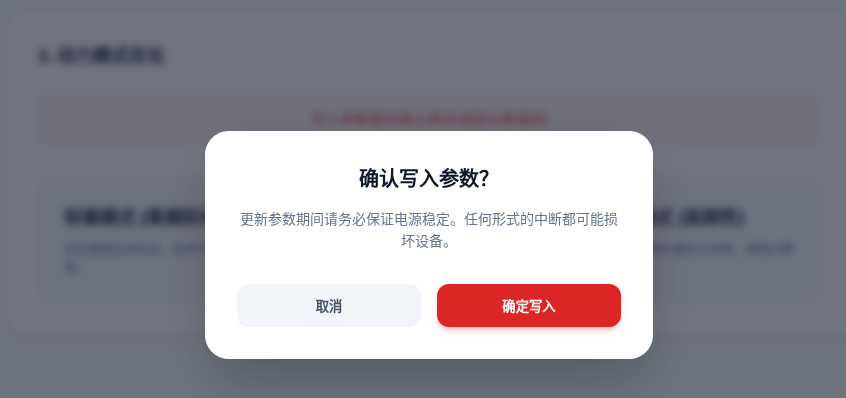
Confirm write
- The page opens a confirmation dialog: "Confirm writing parameters?"
- Dialog note: Keep the power supply stable during parameter updates. Any interruption may damage the servo configuration.
-
Safety check
- Confirm stable power connection
- Confirm the robotic arm data cable is not loose
- Confirm there is no nearby power interruption risk
-
Execute write
- Click the "Confirm Write" button.
- Or click "Cancel" to abort.
-
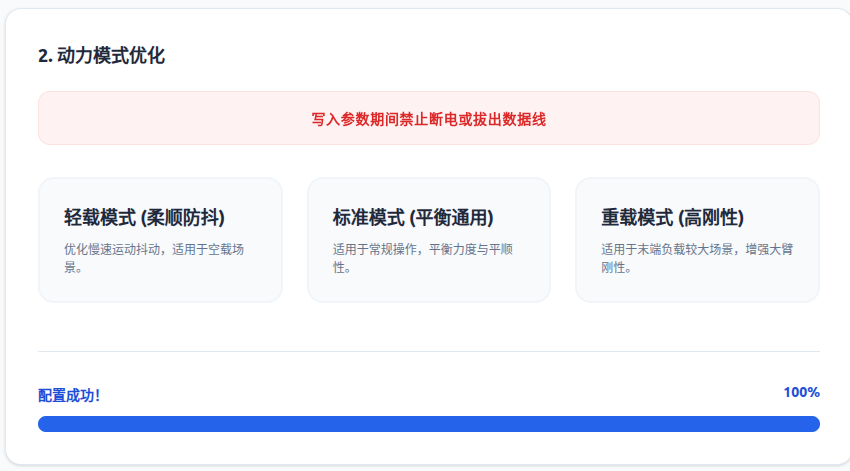
Monitor progress
- The page shows the progress bar: "Ready... 0%".
- The progress bar increases gradually from 0% to 100%.
- During this process, do not power off or unplug cables.
-
Finish writing
- The page shows "Configuration Successful".
- The robotic arm parameters have been updated to the new mode.
- You can start using the robotic arm.
FAQs and Troubleshooting
Cannot connect to the robotic arm.
- Possible causes:
- The browser does not support Web Serial API.
- The serial port device is not recognized.
- Solutions:
- Use the latest Chrome or Edge browser.
- Check the robotic arm power supply and USB cable connection.
- Try another USB port.
- Unplug and reconnect the robotic arm USB cable.
Connection disconnects immediately after connecting.
- Possible causes:
- USB driver issue.
- Insufficient serial port permission.
- Solutions:
- On Linux/macOS, try running
sudo chmod 666 /dev/ttyUSB*. - Check firewall settings.
- Try running the browser with administrator privileges.
- On Linux/macOS, try running
Parameter write failed.
- Possible causes:
- Unstable power supply.
- Loose data cable.
- The robotic arm did not start normally.
- Solutions:
- Check whether the power supply is stable.
- Ensure the data cable is firmly connected.
- Restart the robotic arm and try again.
Troubleshooting Checklist
Before operation, confirm the following items:
☐ The robotic arm is powered on and running normally.
☐ The USB data cable is firmly connected.
☐ The serial port device is recognized.
☐ The network connection is normal.
☐ The power supply is stable.
☐ The environment has no risk of power interruption.