Bus Servo SDK User Manual (C++)
| 版本 | GitHub | 开发资源包 |
|---|---|---|
| v1.2026.0214 |  |
点击下载 |
1. Overview
This SDK includes:
- Instructions for setting up the Windows environment for using bus servo
- Instructions for setting up the Ubuntu environment for using bus servo
- This SDK is developed based on the UART/RS-485 Communication Protocol for Fashion Star bus servo. It provides C++ APIs and supports the full range of servo models.
- A lightweight CSerialPort dependency library
1.1 PC Configuration Software Software
The PC configuration software software can configuration bus servo and test the functions of bus servo.
-
PC configuration software Software: FashionStar UART bus servo PC configuration software Software
-
User guide: bus servo PC configuration software Software User Guide
Reference links: https://fashionstar.com.hk/wiki/software/servo/pc-config-software/, https://fashionstar.com.hk/wiki/software/servo/pc-config-software/
1.2 Figures
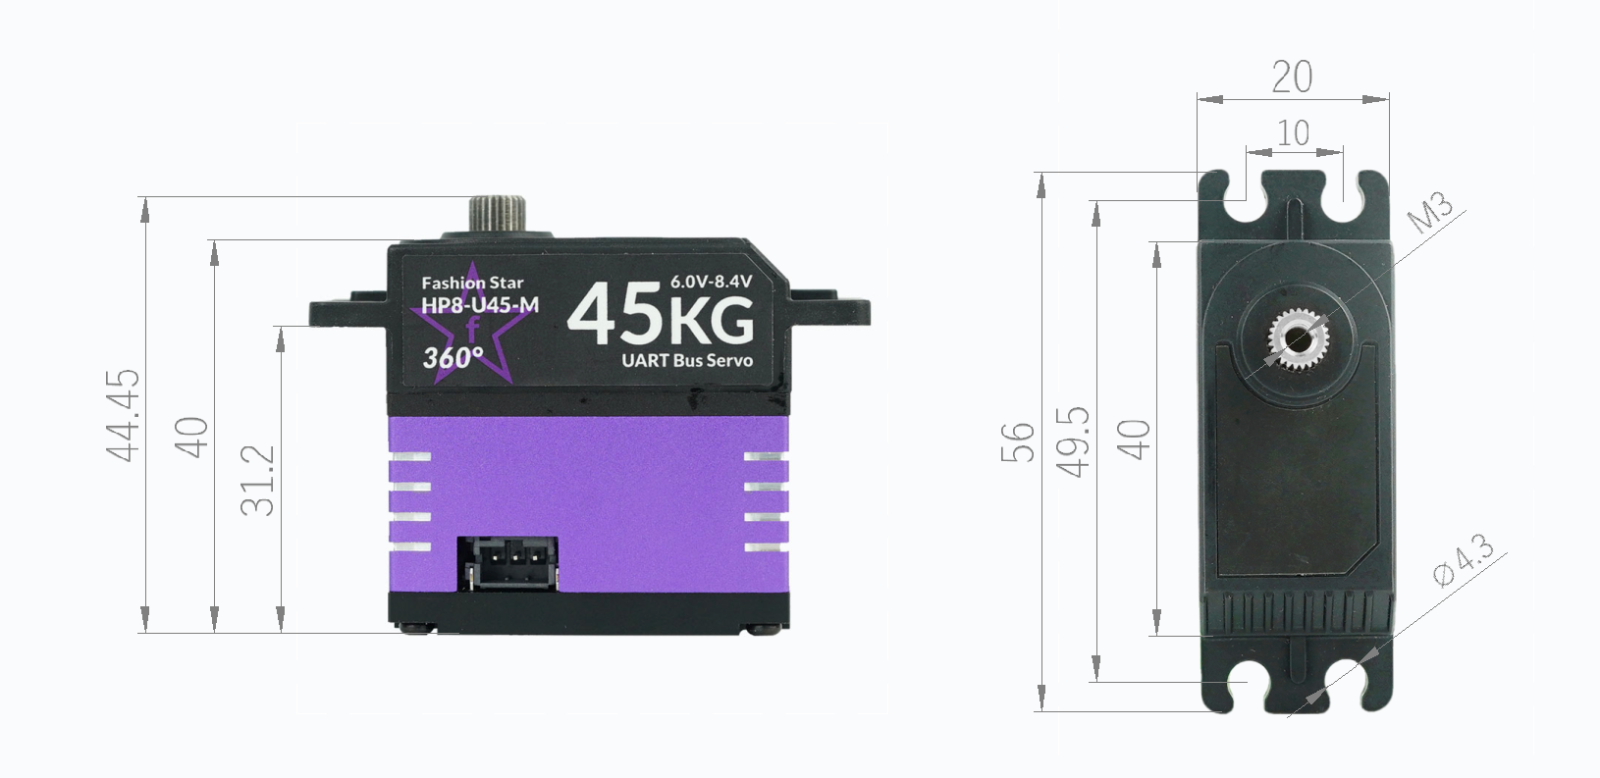
HP8-U45-M bus servo
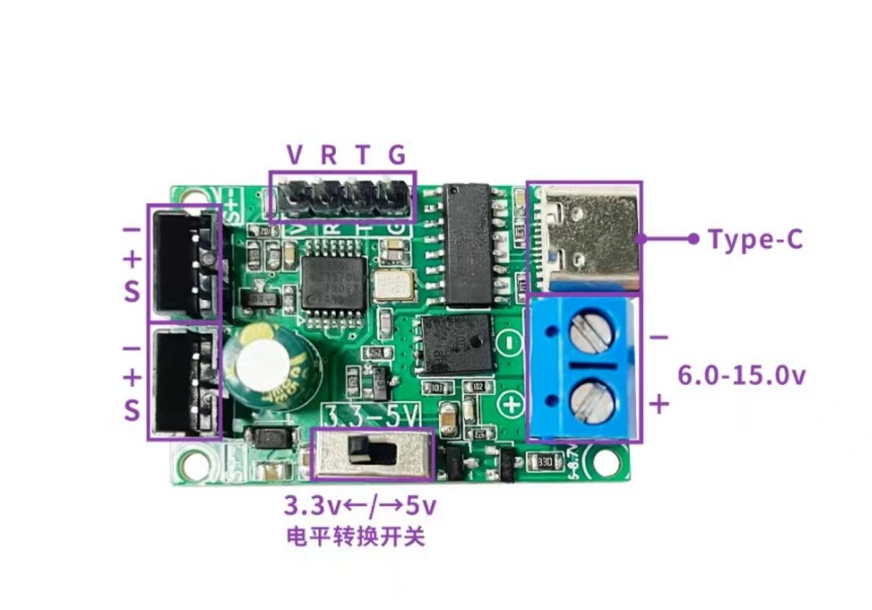
bus servo adapter board UC-01
2. Wiring Instructions
- Install the USB-to-TTL module driver.
- Connect the TTL/USB configuration adapter board UC-01 to the controller, bus servo, and power supply.
3. Setting Up the Bus Servo Environment on Ubuntu
3.1 Install CMake
Run the command:
sudo apt install cmake
3.2 Install CSerialPort
For FashionStar bus servo, the communication layer uses the CSerialPort library. Compile and install it before use. Click the link for details in the GitHub repository. Reference: https://github.com/itas109/CSerialPort
The SDK download package includes a lightweight version of the CSerialPort library.
- In the terminal, enter the
fashionstar-uart-servo-cpp/dependency/CSerialPortdirectory. - Run the following commands in order:
mkdir build
cd build
cmake ..
make
sudo make install
Installation Log
The log shows that the library files are finally installed in the /usr/local directory.
kyle@turing:~/Project/fashionstar-uart-servo-cpp/dependency/CSerialPort/build$
sudo make install
[100%] Built target libcserialport
Install the project...
-- Install configuration: "Release"
-- Up-to-date: /usr/local/include/CSerialPort
-- Up-to-date: /usr/local/include/CSerialPort/SerialPortInfoUnixBase.h
-- Up-to-date: /usr/local/include/CSerialPort/SerialPort_global.h
-- Up-to-date: /usr/local/include/CSerialPort/SerialPortUnixBase.h
-- Up-to-date: /usr/local/include/CSerialPort/SerialPortBase.h
-- Up-to-date: /usr/local/include/CSerialPort/SerialPort.h
-- Up-to-date: /usr/local/include/CSerialPort/osplatformutil.h
-- Up-to-date: /usr/local/include/CSerialPort/SerialPortInfo.h
-- Up-to-date: /usr/local/include/CSerialPort/SerialPortInfoBase.h
-- Up-to-date: /usr/local/include/CSerialPort/sigslot.h
-- Up-to-date: /usr/local/include/CSerialPort/SerialPortInfoWinBase.h
-- Up-to-date: /usr/local/include/CSerialPort/SerialPortWinBase.h
-- Up-to-date: /usr/local/lib/libcserialport.so
-- Installing: /usr/local/lib/cmake/CSerialPort/cserialport-config.cmake
3.3 Install the FashionStar Bus Servo Library
- In the terminal, enter the
fashionstar-uart-servo-cppdirectory. - Run the following commands in order:
mkdir build
cd build
cmake ..
make
sudo make install
Installation Log
kyle@turing:~/Project/fashionstar-uart-servo-cpp/build$ sudo make install
[sudo] password for kyle:
[100%] Built target fsuartservo
Install the project...
-- Install configuration: ""
-- Installing: /usr/local/lib/libfsuartservo.so
-- Set runtime path of "/usr/local/lib/libfsuartservo.so" to ""
-- Installing:
/usr/local/include/FashionStar/UServo/FashionStar_UartServoProtocol.h
-- Installing: /usr/local/include/FashionStar/UServo/FashionStar_UartServo.h
4. Setting Up the Bus Servo Environment on Windows
Configuring the C++ development environment on Windows is somewhat complicated and involves several configuration steps and technical details.
4.1 Install mingw-w64, make, and cmake
There are already many online tutorials for this step, so it is not repeated here.
4.2 Install CSerialPort
For FashionStar bus servo, the communication layer uses the CSerialPort library. Compile and install it before use. Click the link for details in the GitHub repository. Reference: https://github.com/itas109/CSerialPort
The SDK download package includes a lightweight version of the CSerialPort library.
-
In the terminal, enter the
fashionstar-uart-servo-cpp/dependency/CSerialPortdirectory. -
Run the following commands in order:
mkdir build
cd build
# Replace the content in `CMAKE_INSTALL_PREFIX` with your own C++ library installation path.
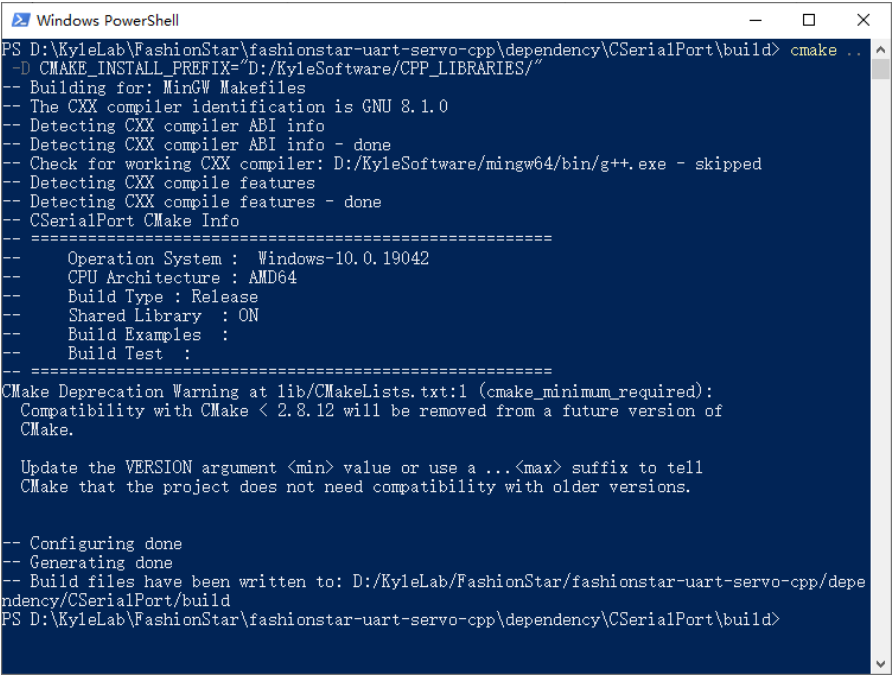
cmake .. -D CMAKE_INSTALL_PREFIX="D:/KyleSoftware/CPP_LIBRARIES/"
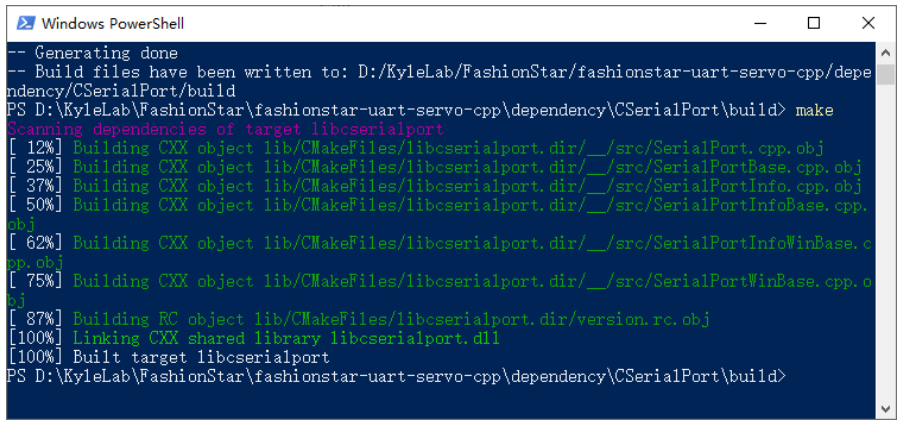
make
sudo make install
Installation Log
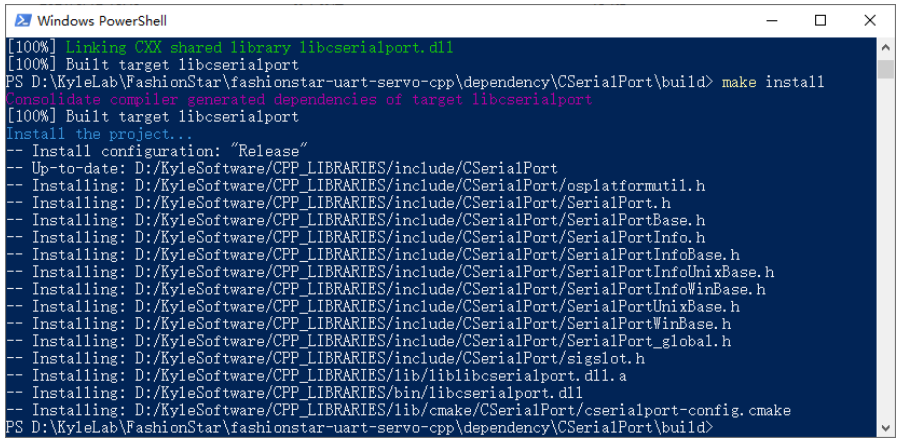
4.3 Install the FashionStar Bus Servo Library
- Modify the CMAKE configuration file
CMakeLists.txt.
cmake_minimum_required(VERSION 3.00)
# 设置工程名称, 设定版本
project(UART_DEMO VERSION 1.0)
# 动态链接库的安装路径
if(CMAKE_HOST_WIN32)
# Windows
# 注意事项:这里需要改成自己的Windows下的动态链接库的安装路径
# <<<<<<<<<<<<<<<<<<<<<<<<<<< 改这里
SET(CMAKE_INSTALL_PREFIX "D:/KyleSoftware/CPP_LIBRARIES/")
elseif(CMAKE_HOST_UNIX)
# Linux
# 注意事项: Linux下,CMake默认会将库安装到/usr/local, 需要注意的是,安装的时候需要sudo
权限
# sudo make install
SET(CMAKE_INSTALL_PREFIX "/usr/local/")
endif()
# 添加依赖的.h文件路径(即hello.h所在的文件夹)
include_directories(${CMAKE_INSTALL_PREFIX}/include include)
# 添加link文件夹
link_directories(${CMAKE_INSTALL_PREFIX}/bin)
# 构建源码文件
add_subdirectory(src)
-
Open the
fashionstar-uart-servo-cppdirectory in the terminal. -
Run the following commands in order:
mkdir build
cd build
cmake ..
make
sudo make install
Installation Log
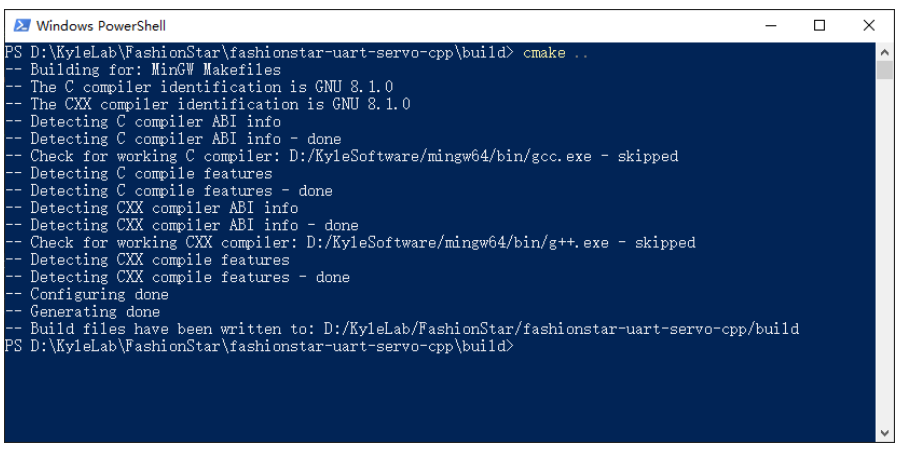
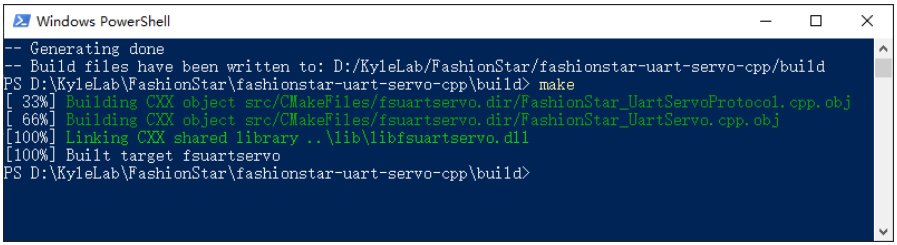
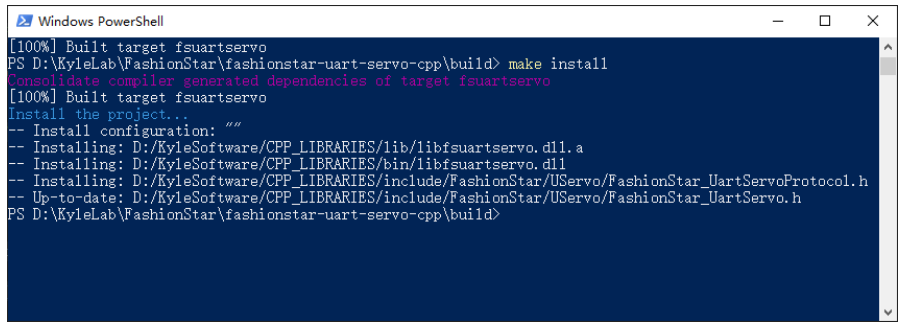
5. How to Run Example Code
The fashionstar-uart-servo-cpp-sdk/example folder contains several independent example projects. Each example is independent.
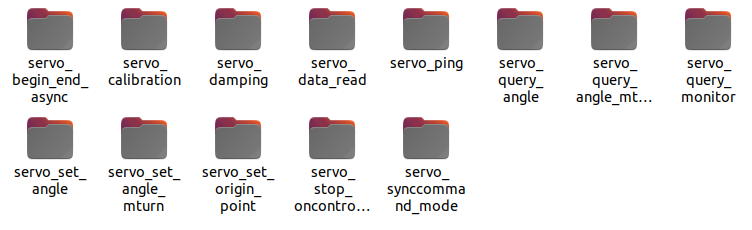
Take the servo communication check example servo_ping as an example:
- Modify the UC-01 port name and servo ID in the
servo_ping.cppsource file.
// 总线伺服舵机配置
// 设置串口总线Servo转接板的端口号
#ifdef _WIN32
#define SERVO_PORT_NAME "COM8"          // Windows下端口号名称 COM{}
#else
#define SERVO_PORT_NAME "/dev/ttyUSB0"  // Linux下端口号名称 /dev/ttyUSB{}
#endif
#define SERVO_ID 0                      // 舵机ID号
-
In the terminal, enter the
fashionstar-uart-servo-cpp-sdk/example/servo_pingdirectory. -
Run the following commands in order:
mkdir build
cd build
cmake ..
make

sudo ldconfig #更新

./servo_ping
# windows环境下为 .\servo_ping.exe
- The runtime log shows whether servo #0 is connected.
Servo ID = 0 , is offline
Servo ID = 0 , is online
Servo ID = 0 , is online
6. Creating and Initializing a Servo Object
Import dependencies:
// 标准库
#include <iostream>

// 导入串口通信库的头文件
#include "CSerialPort/SerialPort.h"
// 导入总线伺服舵机库的头文件
#include "FashionStar/UServo/FashionStar_UartServoProtocol.h"
#include "FashionStar/UServo/FashionStar_UartServo.h"
FashionStar_UartServoProtocol: handles the underlying communication protocol logic of the servo, such as data frame transmission/reception and data checksum.
FashionStar_UartServo: the SDK for the servo, a higher-level wrapper above the protocol layer.
Use the namespace:
using namespace std;
using namespace fsuservo;
Configure the port name corresponding to the bus servo adapter board:
// 总线伺服舵机配置
// 设置串口总线Servo转接板的端口号
#ifdef _WIN32
#define SERVO_PORT_NAME "COM8"          // Windows下端口号名称 COM{}
#else
#define SERVO_PORT_NAME "/dev/ttyUSB0"  // Linux下端口号名称 /dev/ttyUSB{}
#endif
#define SERVO_ID 0                      // 舵机ID号
Create a bus servo communication protocol object FSUS_Protocol. The default baud rate is 115200.
// 创建协议对象
FSUS_Protocol protocol(SERVO_PORT_NAME, FSUS_DEFAULT_BAUDRATE);
Create a FSUS_Servo servo object. When creating it, pass in the servo ID and the pointer to the communication protocol object &protocol.
The ID range of the servo is `0-254
#define SERVO_ID 0 //舵机ID号
// 创建一个舵机对象
FSUS_Servo servo0(SERVO_ID, &protocol);
7. Servo Communication Check
To check whether the servo is online, use the communication check command.
-
If the servo with the specified ID exists and is online, the servo sends a response packet after receiving the communication check command.
-
If the servo with the specified ID does not exist or is offline, no servo sends a response packet.
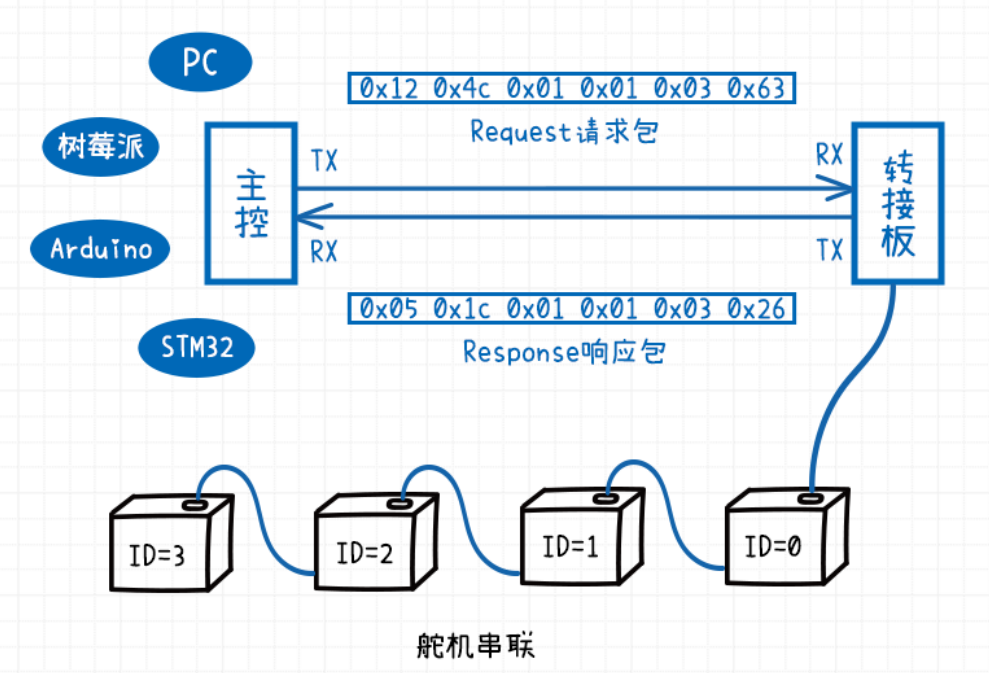
7.1 ping
Used for servo communication detection to determine whether the servo is online.
Function Prototype
bool FSUS_Servo::ping()
Usage Example
bool is_online = servo0.ping();
7.2 Example - Communication Check
Function Overview
Continuously send communication check commands to servo #0, and print prompt information to the log output serial port according to the response from servo #0.
Example Source Code
servo_ping.cpp
/*
 * 舵机通讯检测
 * --------------------------
 * 作者: 深圳市华馨京科技有限公司
 * 网站:https://fashionstar.com.hk/
 * 更新时间: 2024/08/5
 **/

#include <iostream>

#include "CSerialPort/SerialPort.h"
#include "FashionStar/UServo/FashionStar_UartServoProtocol.h"
#include "FashionStar/UServo/FashionStar_UartServo.h"

// 总线伺服舵机配置
// 设置总线伺服Servo转接板的端口号
#ifdef _WIN32
#define SERVO_PORT_NAME "COM8"          // Windows下端口号名称 COM{}
#else
#define SERVO_PORT_NAME "/dev/ttyUSB0"  // Linux下端口号名称 /dev/ttyUSB{}
#endif
#define SERVO_ID 0                      // 舵机ID号

using namespace std;
using namespace fsuservo;

// 创建协议对象
FSUS_Protocol protocol(SERVO_PORT_NAME, FSUS_DEFAULT_BAUDRATE);
// 创建一个舵机对象
FSUS_Servo servo0(SERVO_ID, &protocol);

int main(){
    cout << "Example Uart Servo Ping" << endl;

    while(true){
        // 通信检测
        bool is_online = servo0.ping();
        // 打印日志
        cout << "Servo ID = " << SERVO_ID << " , is ";
        if (is_online){
            cout << "online" << endl;
        }else{
            cout << "offline" << endl;
        }
        // 延时1s
        protocol.delay_ms(1000);
    }

}
8. Single-Turn Angle Control
|
Notes:
|
8.1 setRawAngle
Basic angle control
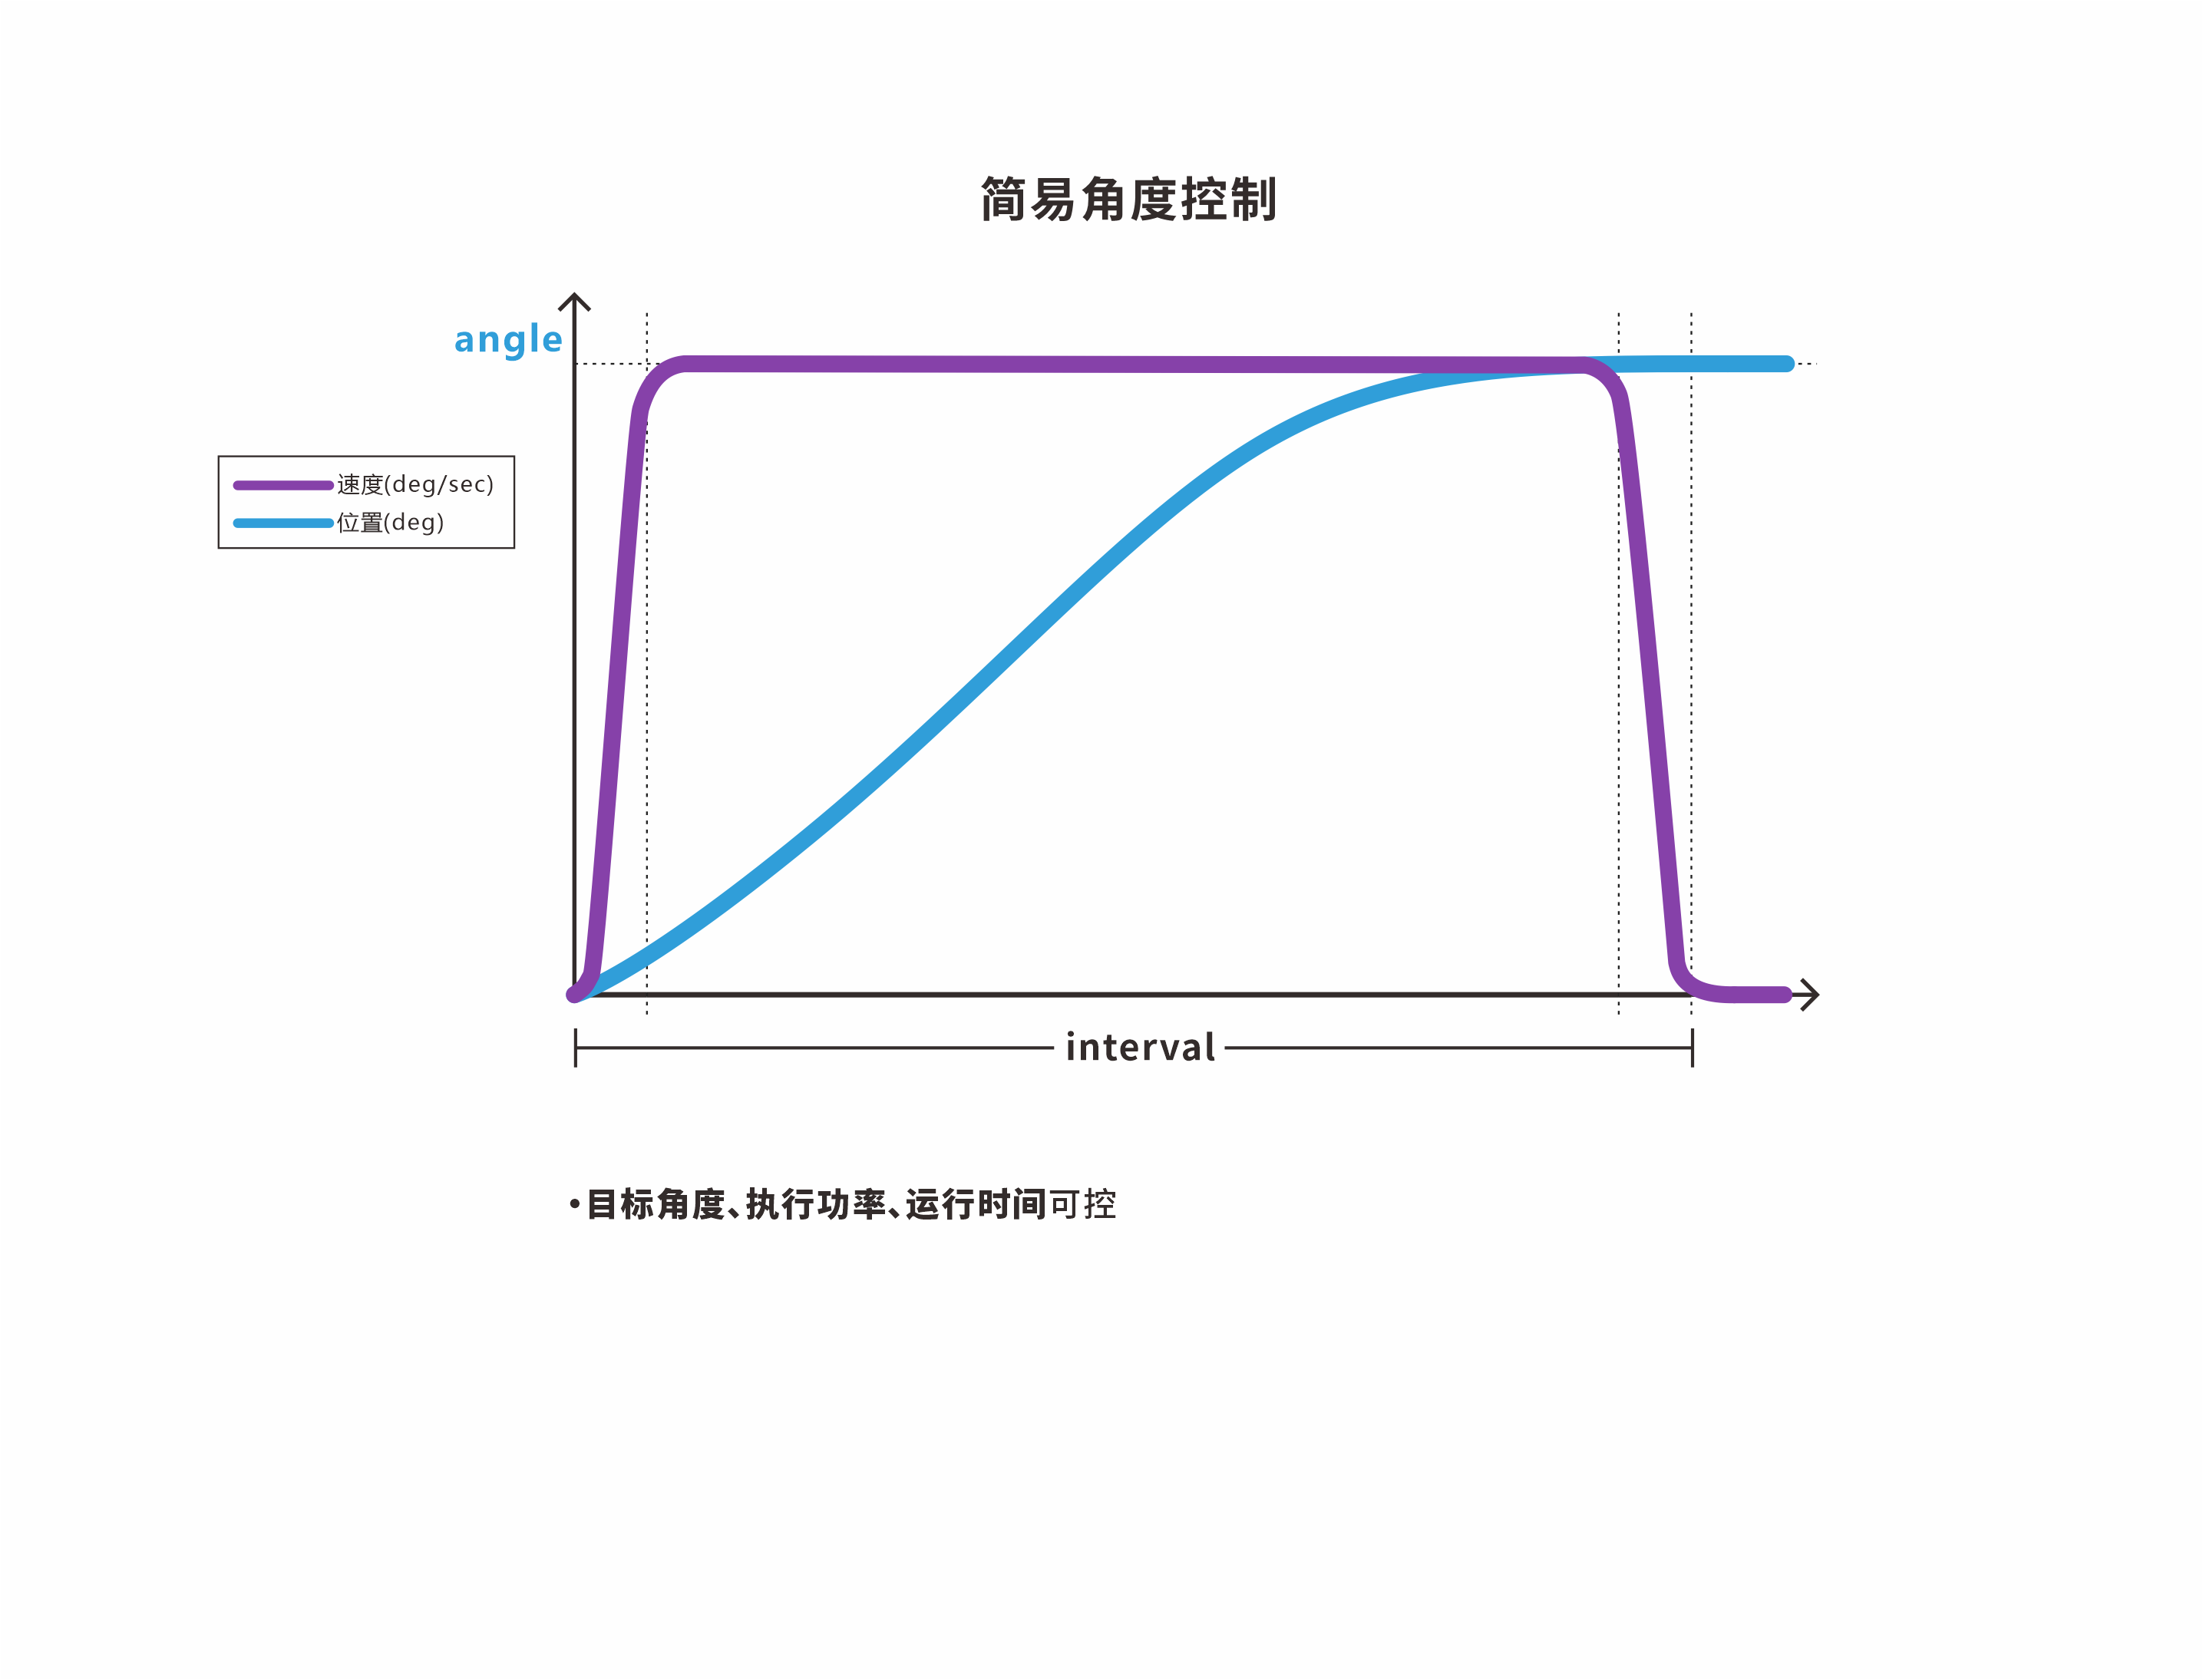
Function Prototype
/* 控制舵机的角度,interval和power为设定值 */
void FSUS_Servo::setRawAngle(FSUS_SERVO_ANGLE_T rawAngle, FSUS_INTERVAL_T interval, FSUS_POWER_T power)
/* 控制舵机的角度,interval为设定值,power为默认值 */
void FSUS_Servo::setRawAngle(FSUS_SERVO_ANGLE_T rawAngle, FSUS_INTERVAL_T interval)
/* 控制舵机的角度,interval和power为默认值 */
void FSUS_Servo::setRawAngle(FSUS_SERVO_ANGLE_T rawAngle)
rawAngle: target angle of the Servo, in °interval: runtime of the Servo, in mspower: execution power of the Servo, in mW
Usage Example
//对应3种重载函数
servo0.setRawAngle(90.0,2000,0);  // 控制舵机的角度,interval和power为设定值
servo0.setRawAngle(90.0,2000);  // 控制舵机的角度,interval为设定值,power为默认值
servo0.setRawAngle(90.0);  // 控制舵机的角度,interval和power为默认值
8.2 setRawAngleByInterval
Angle control with acceleration/deceleration (specified interval)
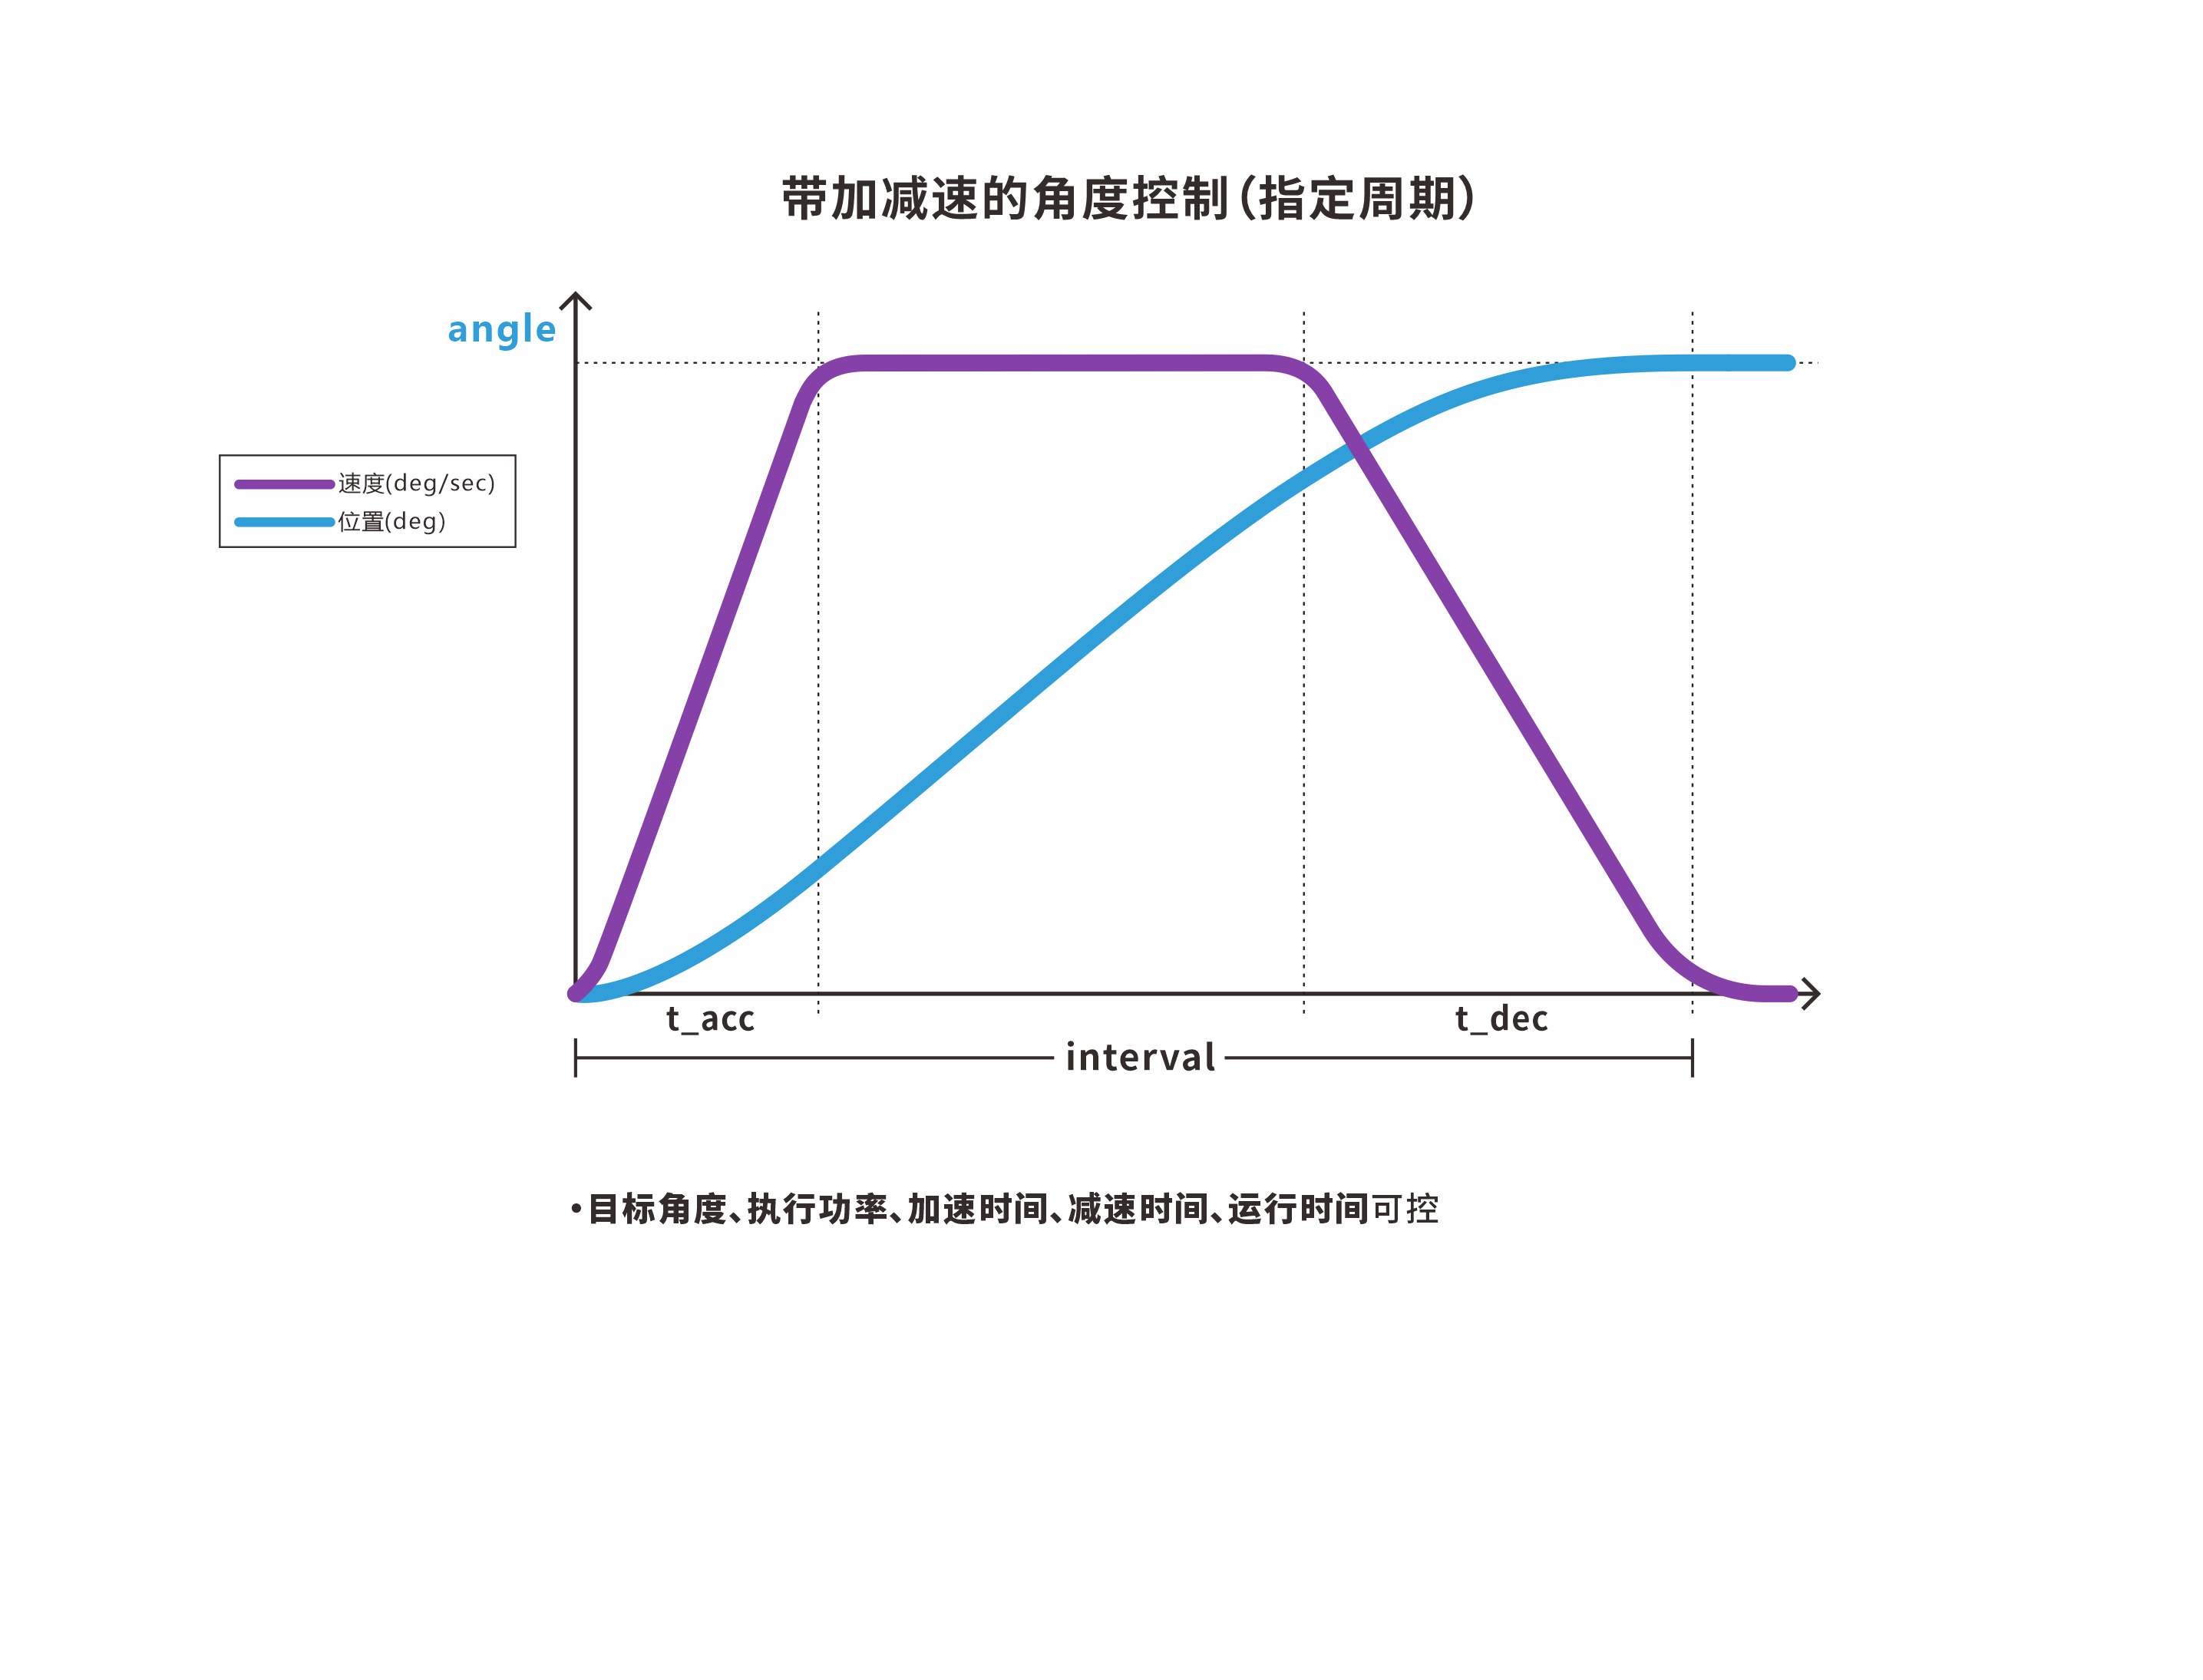
Function Prototype
// 带加减速的角度控制(指定周期)
void FSUS_Servo::setRawAngleByInterval(FSUS_SERVO_ANGLE_T rawAngle, FSUS_INTERVAL_T interval, FSUS_INTERVAL_T t_acc, FSUS_INTERVAL_T t_dec, FSUS_POWER_T power)
rawAngle: target angle of the Servo, in °interval: runtime of the Servo, in mst_acc: time from start to constant speed for the Servo, in ms; minimum value > 20t_dec: deceleration time when the Servo approaches the target angle, in ms; minimum value > 20power: execution power of the Servo, in mV; default is 0
Usage Example
FSUS_INTERVAL_T interval;  // 运行周期 单位ms
FSUS_INTERVAL_T t_acc;     // 加速时间 单位ms
FSUS_INTERVAL_T t_dec;     // 减速时间 单位ms

interval = 1000;
t_acc = 100;
t_dec = 100;
servo0.setRawAngleByInterval(90, interval, t_acc, t_dec, 0);
8.3 setRawAngleByVelocity
Angle control with acceleration/deceleration (specified speed)
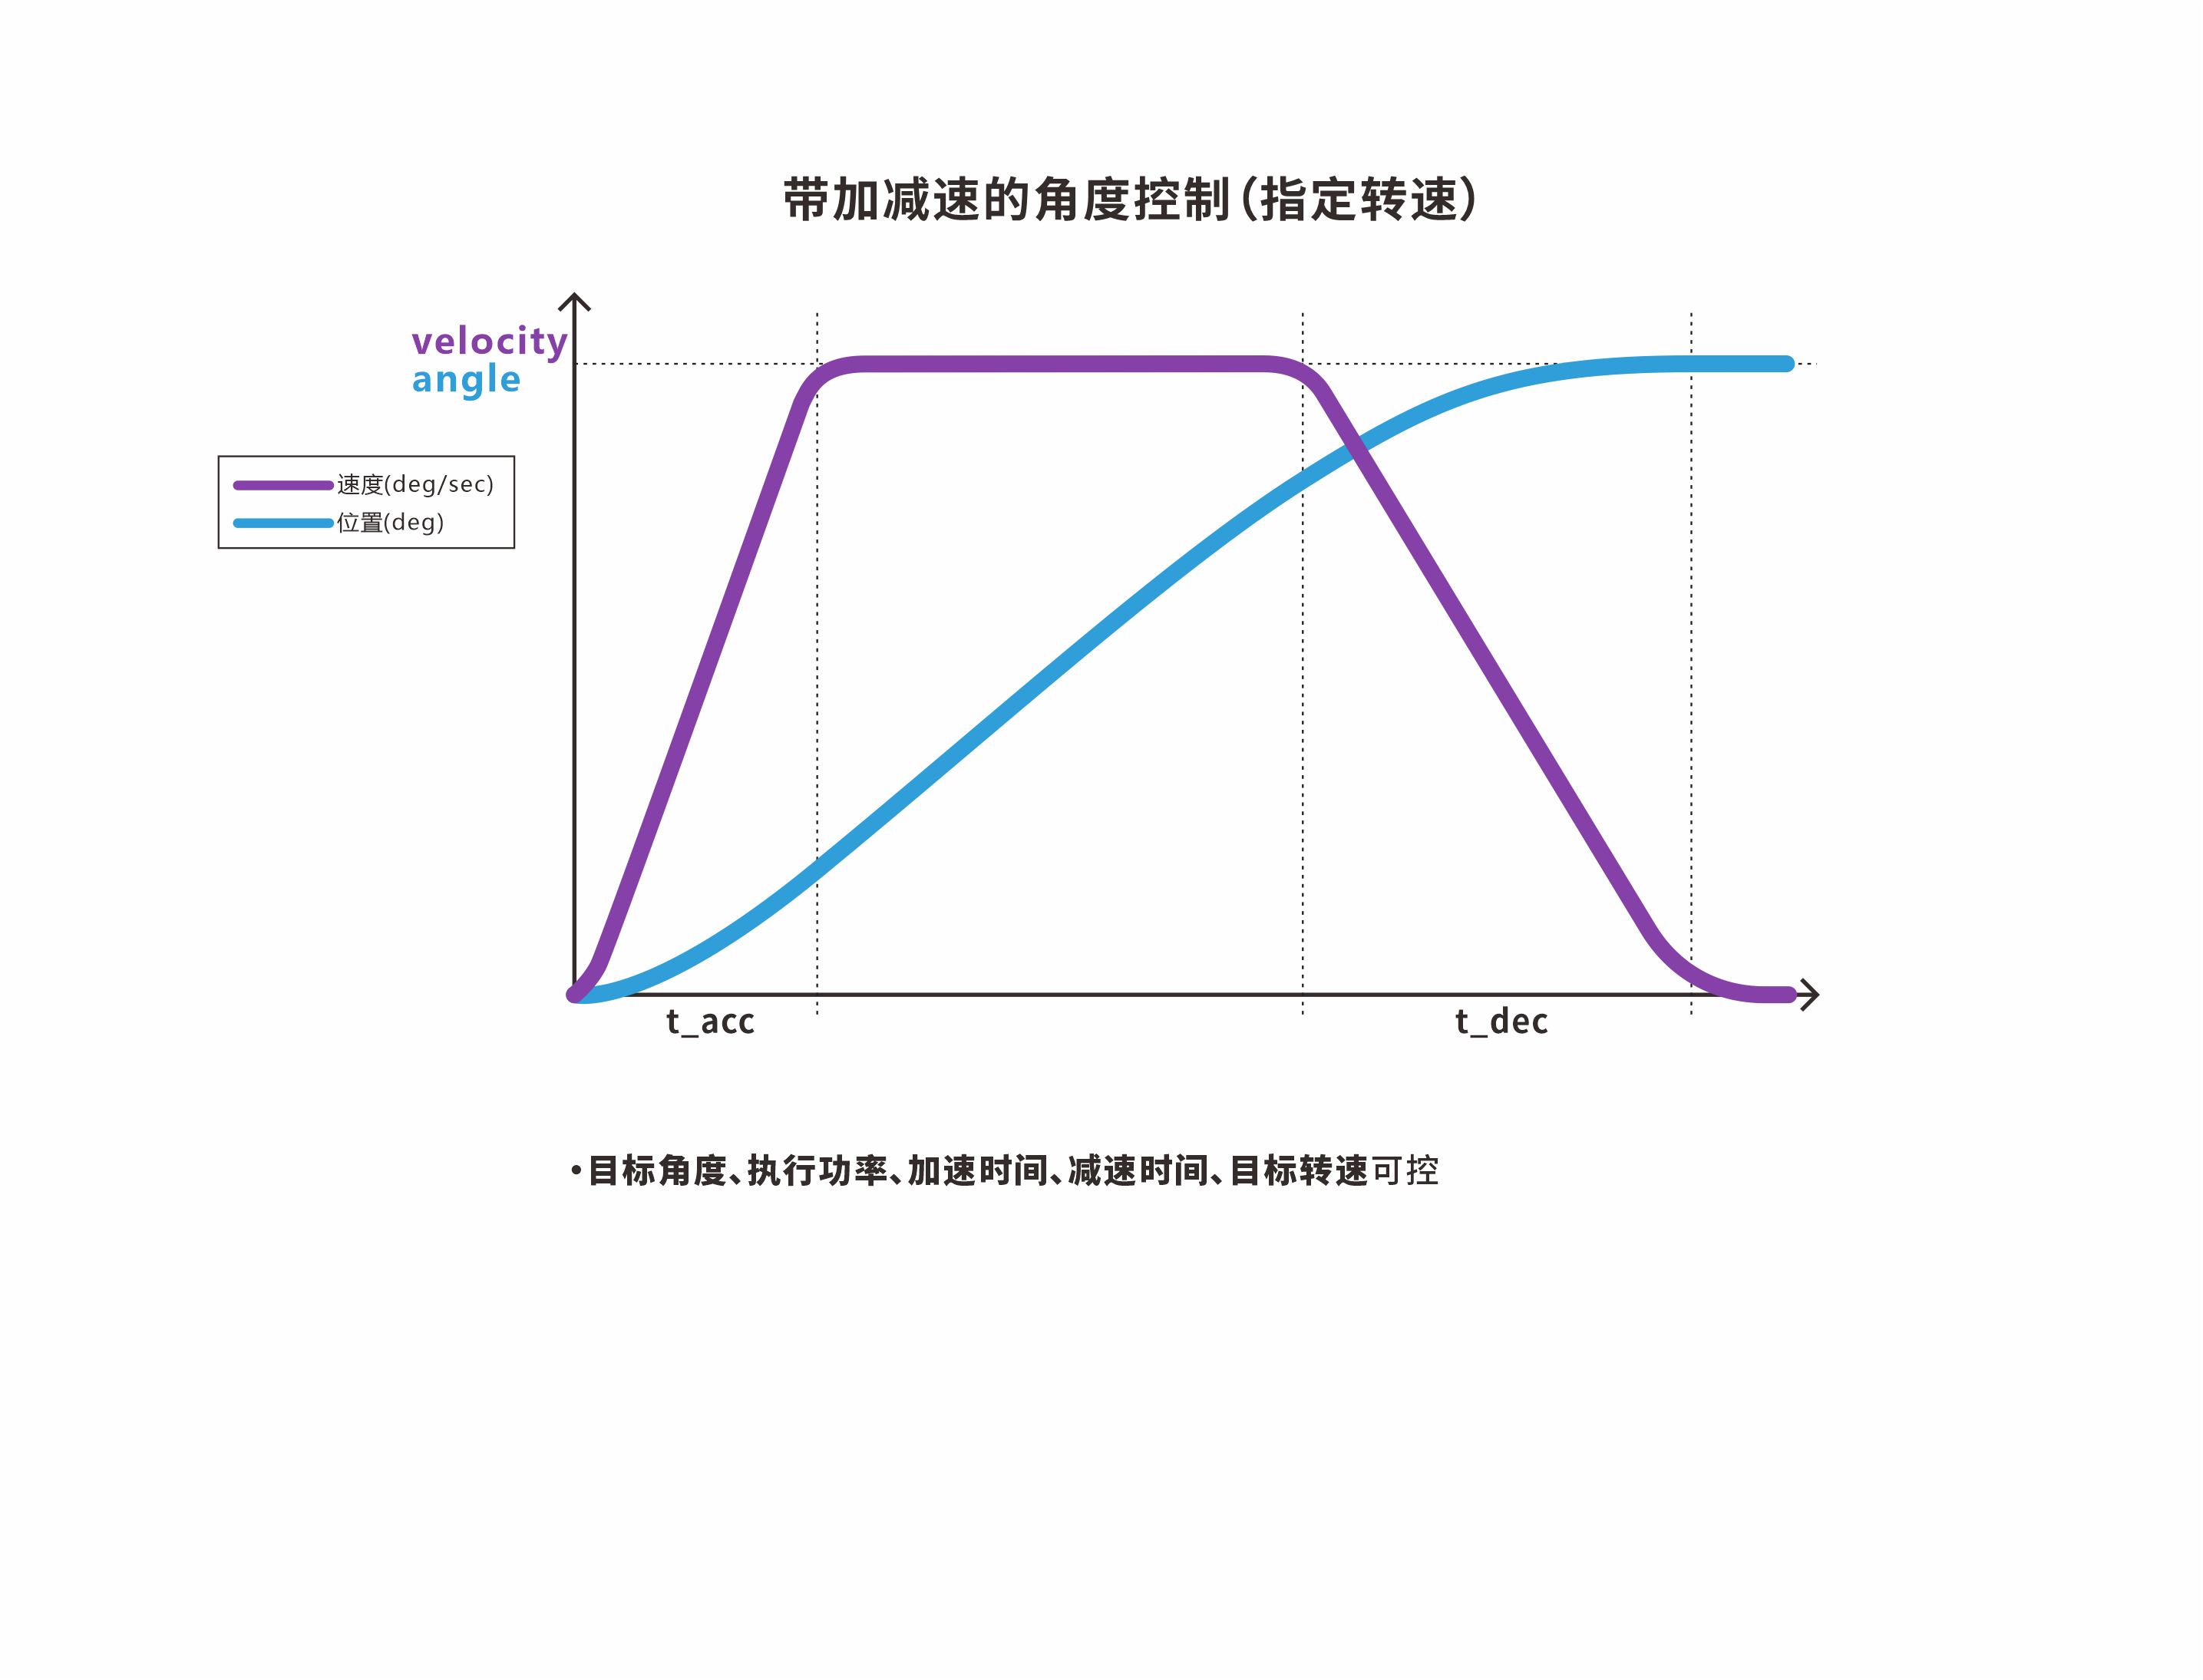
Function Prototype
// 带加减速的角度控制(指定转速)
void FSUS_Servo::setRawAngleByVelocity(FSUS_SERVO_ANGLE_T rawAngle, FSUS_SERVO_SPEED_T velocity, FSUS_INTERVAL_T t_acc, FSUS_INTERVAL_T t_dec, FSUS_POWER_T power)
rawAngle: target angle of the Servo, in °velocity: target speed of the Servo, in °/st_acc: time from start to constant speed for the Servo, in ms; minimum value > 20t_dec: deceleration time when the Servo approaches the target angle, in ms; minimum value > 20power: execution power of the Servo, in mV; default is 0
Usage Example
FSUS_SERVO_SPEED_T velocity;// 目标转速 单位°/s
FSUS_INTERVAL_T t_acc;     // 加速时间 单位ms
FSUS_INTERVAL_T t_dec;     // 减速时间 单位ms

velocity = 200.0;
t_acc = 100;
t_dec = 100;
servo0.setRawAngleByVelocity(-90, velocity, t_acc, t_dec, 0);
8.4 queryRawAngle
Query the current single-turn angle of the servo, send an angle query command to the servo, and assign the angle value to the curAngle property of the servo object.
Function Prototype
FSUS_SERVO_ANGLE_T FSUS_Servo::queryRawAngle()
Usage Example
- Example 1
float curAngle = uservo.queryRawAngle();
- Example 2
// 舵机角度查询 (更新角度)
uservo.queryRawAngle();
// 通过curRawAngle访问当前的真实角度
//uservo.curRawAngle
8.5 isStop
Determine whether the servo is rotating or stationary. When executed, this function first queries the current angle of the servo, then returns whether the difference from the target angle targetAngle is smaller than the control deadband.
Function Prototype
bool FSUS_Servo::isStop()
- Return value:
truemeans the servo has reached the target angle and stopped rotating;falsemeans the servo has not reached the target angle and is still rotating.
Usage Example
uservo.isStop();
8.6 Example - Servo Single-Turn Angle Readback
Function Overview
Read the single-turn angle of servo #0 and print it.
Example Source Code
servo_query_angle.cpp
/*
 * 舵机单圈角度回读
 * --------------------------
 * 作者: 深圳市华馨京科技有限公司
 * 网站:https://fashionstar.com.hk/
 * 更新时间: 2024/08/05
 **/
#include <iostream>

#include "CSerialPort/SerialPort.h"
#include "FashionStar/UServo/FashionStar_UartServoProtocol.h"
#include "FashionStar/UServo/FashionStar_UartServo.h"

// 总线伺服舵机配置
// 设置总线伺服Servo转接板的端口号
#ifdef _WIN32
#define SERVO_PORT_NAME "COM8"          // Windows下端口号名称 COM{}
#else
#define SERVO_PORT_NAME "/dev/ttyUSB0"  // Linux下端口号名称 /dev/ttyUSB{}
#endif
#define SERVO_ID 0                      // 舵机ID号
#define DAMPING_POWER 800       // 阻尼模式的功率

using namespace std;
using namespace fsuservo;

// 创建协议对象
FSUS_Protocol protocol(SERVO_PORT_NAME, FSUS_DEFAULT_BAUDRATE);
// 创建一个舵机对象
FSUS_Servo servo0(SERVO_ID, &protocol);

int main(){
    // 打印例程信息
    cout << "Query Servo Angle" << endl;
    // 设置舵机为阻尼模式
    // servo0.setDamping(DAMPING_POWER);

    while(true){
        // 查询(更新)舵机角度
        servo0.queryRawAngle();
        // 输出查询信息
        cout << "Servo Angle: " <<  servo0.curRawAngle << endl;
        // 延时1s
        protocol.delay_ms(1000);
    }

}
8.7 Example - Single-Turn Angle Control Demo
Function Overview
Test control of the servo angle. This example demonstrates three APIs for controlling servo angle. After each angle control command is executed, it calls the current angle query API to obtain the real-time angle.
- Basic angle control + current angle query
- Angle control with acceleration/deceleration (specified interval)
- Angle control with acceleration/deceleration (specified speed) + current angle query
Example Source Code
servo_set_angle.cpp
/*
 * 单圈角度控制功能演示
 * --------------------------
 * 作者: 深圳市华馨京科技有限公司
 * 网站:https://fashionstar.com.hk/
 * 更新时间: 2024/08/05
 */
#include <iostream>

#include "CSerialPort/SerialPort.h"
#include "FashionStar/UServo/FashionStar_UartServoProtocol.h"
#include "FashionStar/UServo/FashionStar_UartServo.h"

// 总线伺服舵机配置
// 设置总线伺服Servo转接板的端口号
#ifdef _WIN32
#define SERVO_PORT_NAME "COM8"          // Windows下端口号名称 COM{}
#else
#define SERVO_PORT_NAME "/dev/ttyUSB0"  // Linux下端口号名称 /dev/ttyUSB{}
#endif
#define SERVO_ID 0                      // 舵机ID号
#define DAMPING_POWER 800       // 阻尼模式的功率

using namespace std;
using namespace fsuservo;

// 创建协议对象
FSUS_Protocol protocol(SERVO_PORT_NAME, FSUS_DEFAULT_BAUDRATE);
// 创建一个舵机对象
FSUS_Servo servo0(SERVO_ID, &protocol);

// 轨迹规划参数定义
uint16_t interval;  // 运行周期 单位ms
uint16_t t_acc;     // 加速时间 单位ms
uint16_t t_dec;     // 减速时间 单位ms
float velocity;         // 目标转速 单位°/s

/* 等待并报告当前的角度*/
void waitAndReport(FSUS_Servo* servo){
    cout << "Real Angle = " << servo->curRawAngle << ", Target Angle = " << servo->targetRawAngle << endl;
    protocol.delay_ms(2000); // 暂停2s
}

int main(){
    // 打印例程信息
    cout << "Set Servo Angle" << endl;

    cout << "Set Angle = 90 deg" << endl;
    servo0.setRawAngle(90.0);  // 设置舵机的角度
    waitAndReport(&servo0);

    cout << "Set Angle = -90 deg" << endl;
    servo0.setRawAngle(-90);
    waitAndReport(&servo0);

    cout << "Set Angle = 90 deg - Set Interval = 500ms" << endl;
    interval = 500;
    t_acc = 100;
    t_dec = 100;
    servo0.setRawAngleByInterval(90, interval, t_acc, t_dec, 0);
    waitAndReport(&servo0);

    cout << "Set Angle = -90 deg - Set Velocity = 200 dps" << endl;
    velocity = 200.0;
    t_acc = 100;
    t_dec = 100;
    servo0.setRawAngleByVelocity(-90, velocity, t_acc, t_dec, 0);
    waitAndReport(&servo0);
}
9. Multi-Turn Angle Control
9.1 setRawAngleMTurn
Basic multi-turn angle control
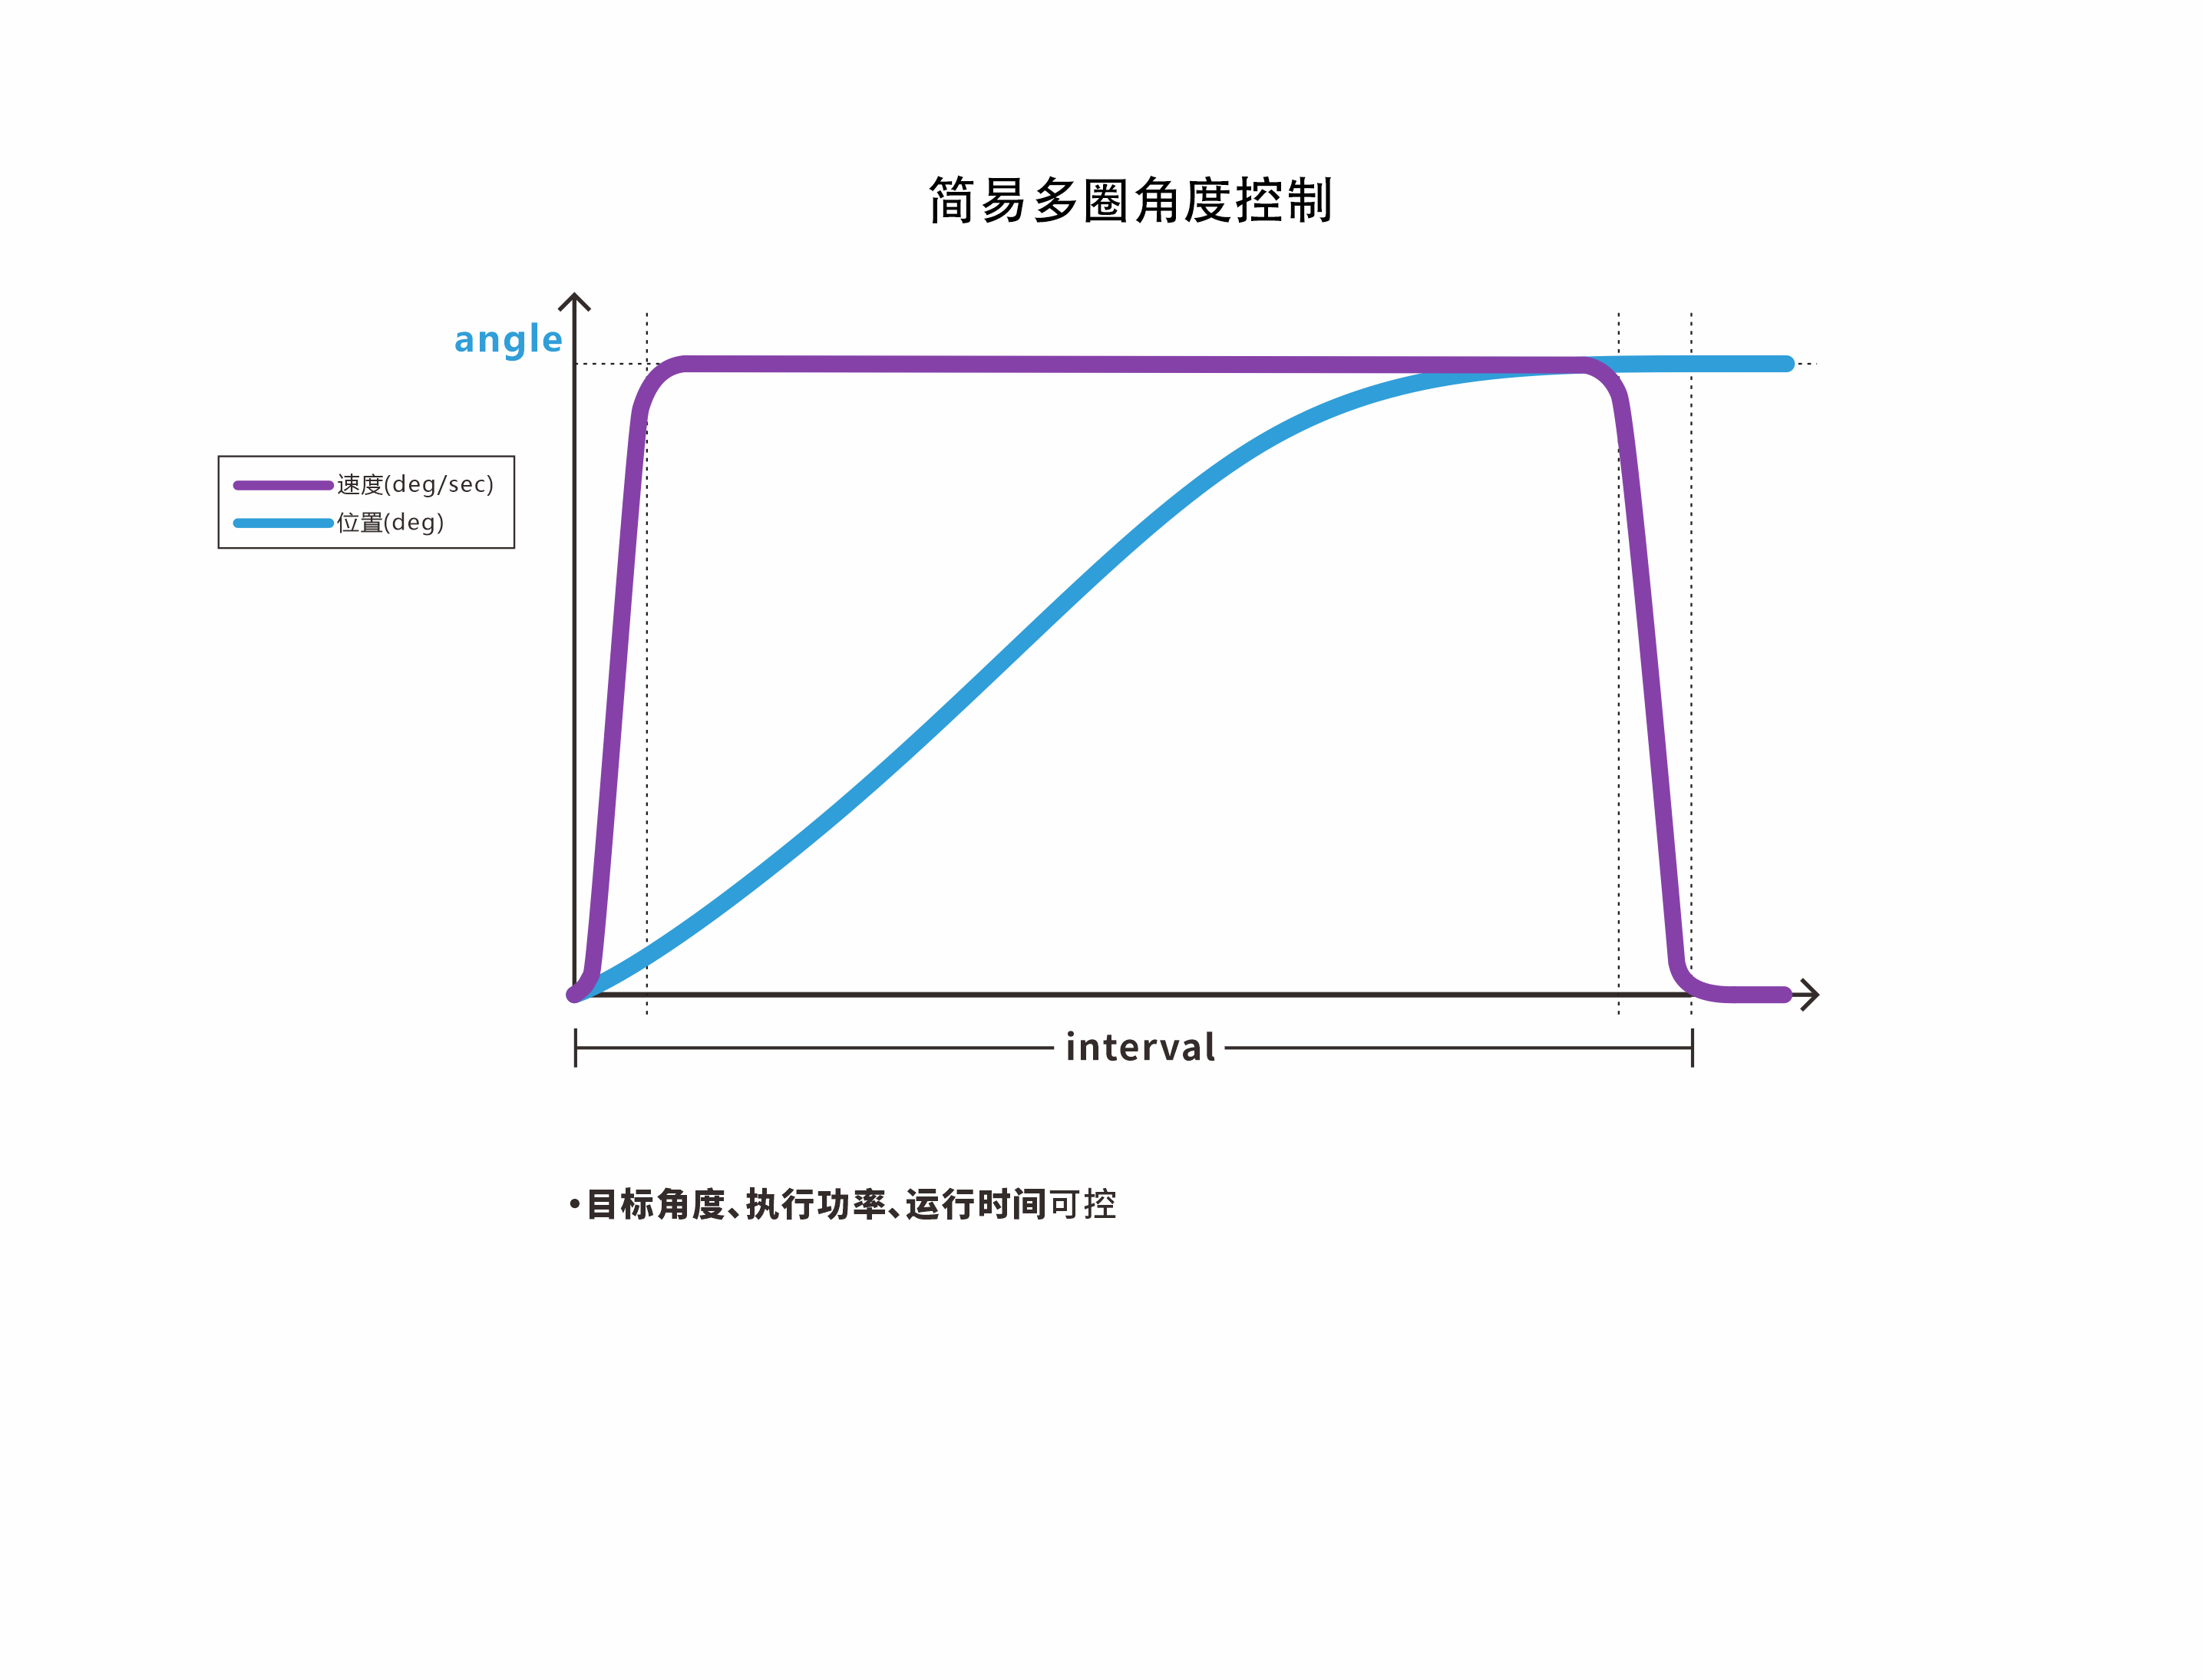
Function Prototype
// 控制舵机的角度,interval和power为设定值
void FSUS_Servo::setRawAngleMTurn(FSUS_SERVO_ANGLE_T rawAngle, FSUS_INTERVAL_T_MTURN interval, FSUS_POWER_T power)
// 控制舵机的角度,interval为设定值,power为默认值
void FSUS_Servo::setRawAngleMTurn(FSUS_SERVO_ANGLE_T rawAngle, FSUS_INTERVAL_T_MTURN interval)
// 控制舵机的角度,interval和power为默认值
void FSUS_Servo::setRawAngleMTurn(FSUS_SERVO_ANGLE_T rawAngle)
rawAngle: target angle of the Servo, in °interval: runtime of the Servo, in mspower: execution power of the Servo, in mW
Usage Example
servo0.setRawAngleMTurn(500.0,2000,0);  // 控制舵机的角度,interval和power为设定值
servo0.setRawAngleMTurn(500.0,2000);  // 控制舵机的角度,interval为设定值,power为默认值
servo0.setRawAngleMTurn(500.0);  // 控制舵机的角度,interval和power为默认值
9.2 setRawAngleMTurnByInterval
Multi-turn angle control with acceleration/deceleration (specified interval)
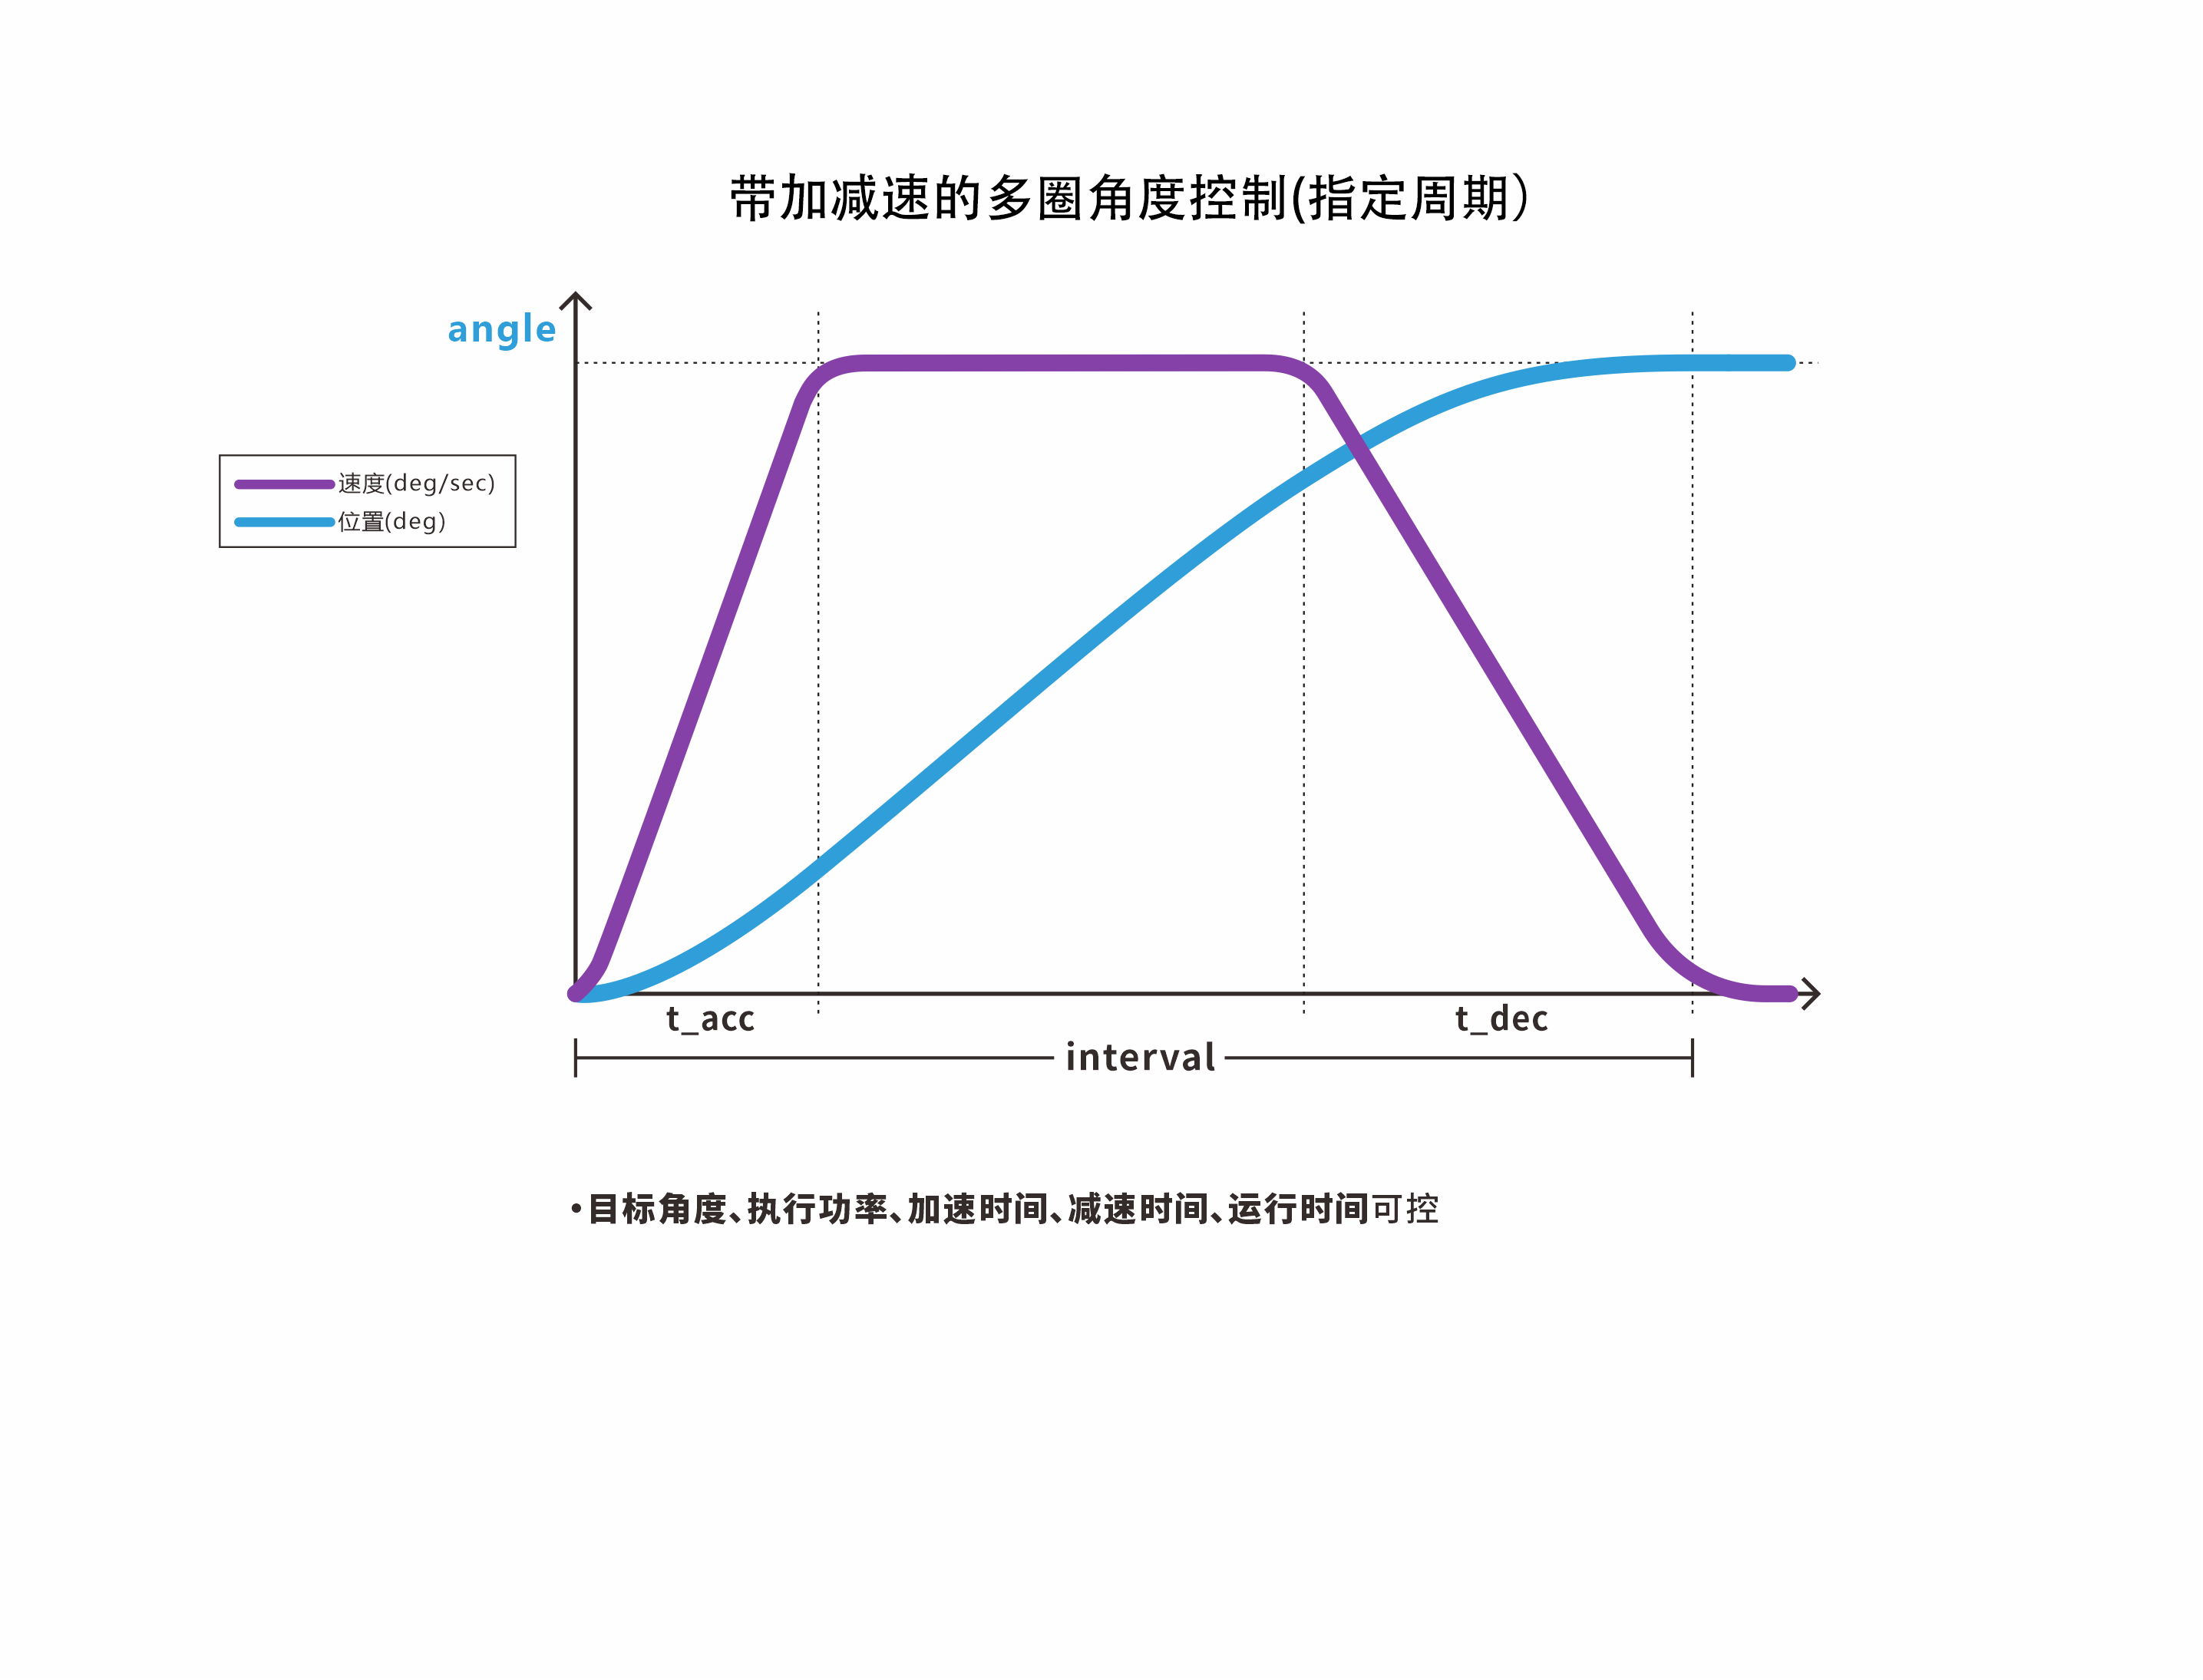
Function Prototype
// 设定舵机的原始角度(多圈+指定周期)
void FSUS_Servo::setRawAngleMTurnByInterval(FSUS_SERVO_ANGLE_T rawAngle, FSUS_INTERVAL_T_MTURN interval, FSUS_INTERVAL_T t_acc, FSUS_INTERVAL_T t_dec, FSUS_POWER_T power)
rawAngle: target angle of the Servo, in °interval: runtime of the Servo, in mst_acc: time from start to constant speed for the Servo, in ms; minimum value > 20t_dec: deceleration time when the Servo approaches the target angle, in ms; minimum value > 20power: execution power of the Servo, in mV; default is 0
Usage Example
FSUS_INTERVAL_T_MTURN interval;  // 运行周期 单位ms
FSUS_INTERVAL_T t_acc;     // 加速时间 单位ms
FSUS_INTERVAL_T t_dec;     // 减速时间 单位ms

interval = 1000;
t_acc = 100;
t_dec = 100;
servo0.setRawAngleMTurnByInterval(90, interval, t_acc, t_dec, 0);
9.3 setRawAngleMTurnByVelocity
Multi-turn angle control with acceleration/deceleration (specified speed)
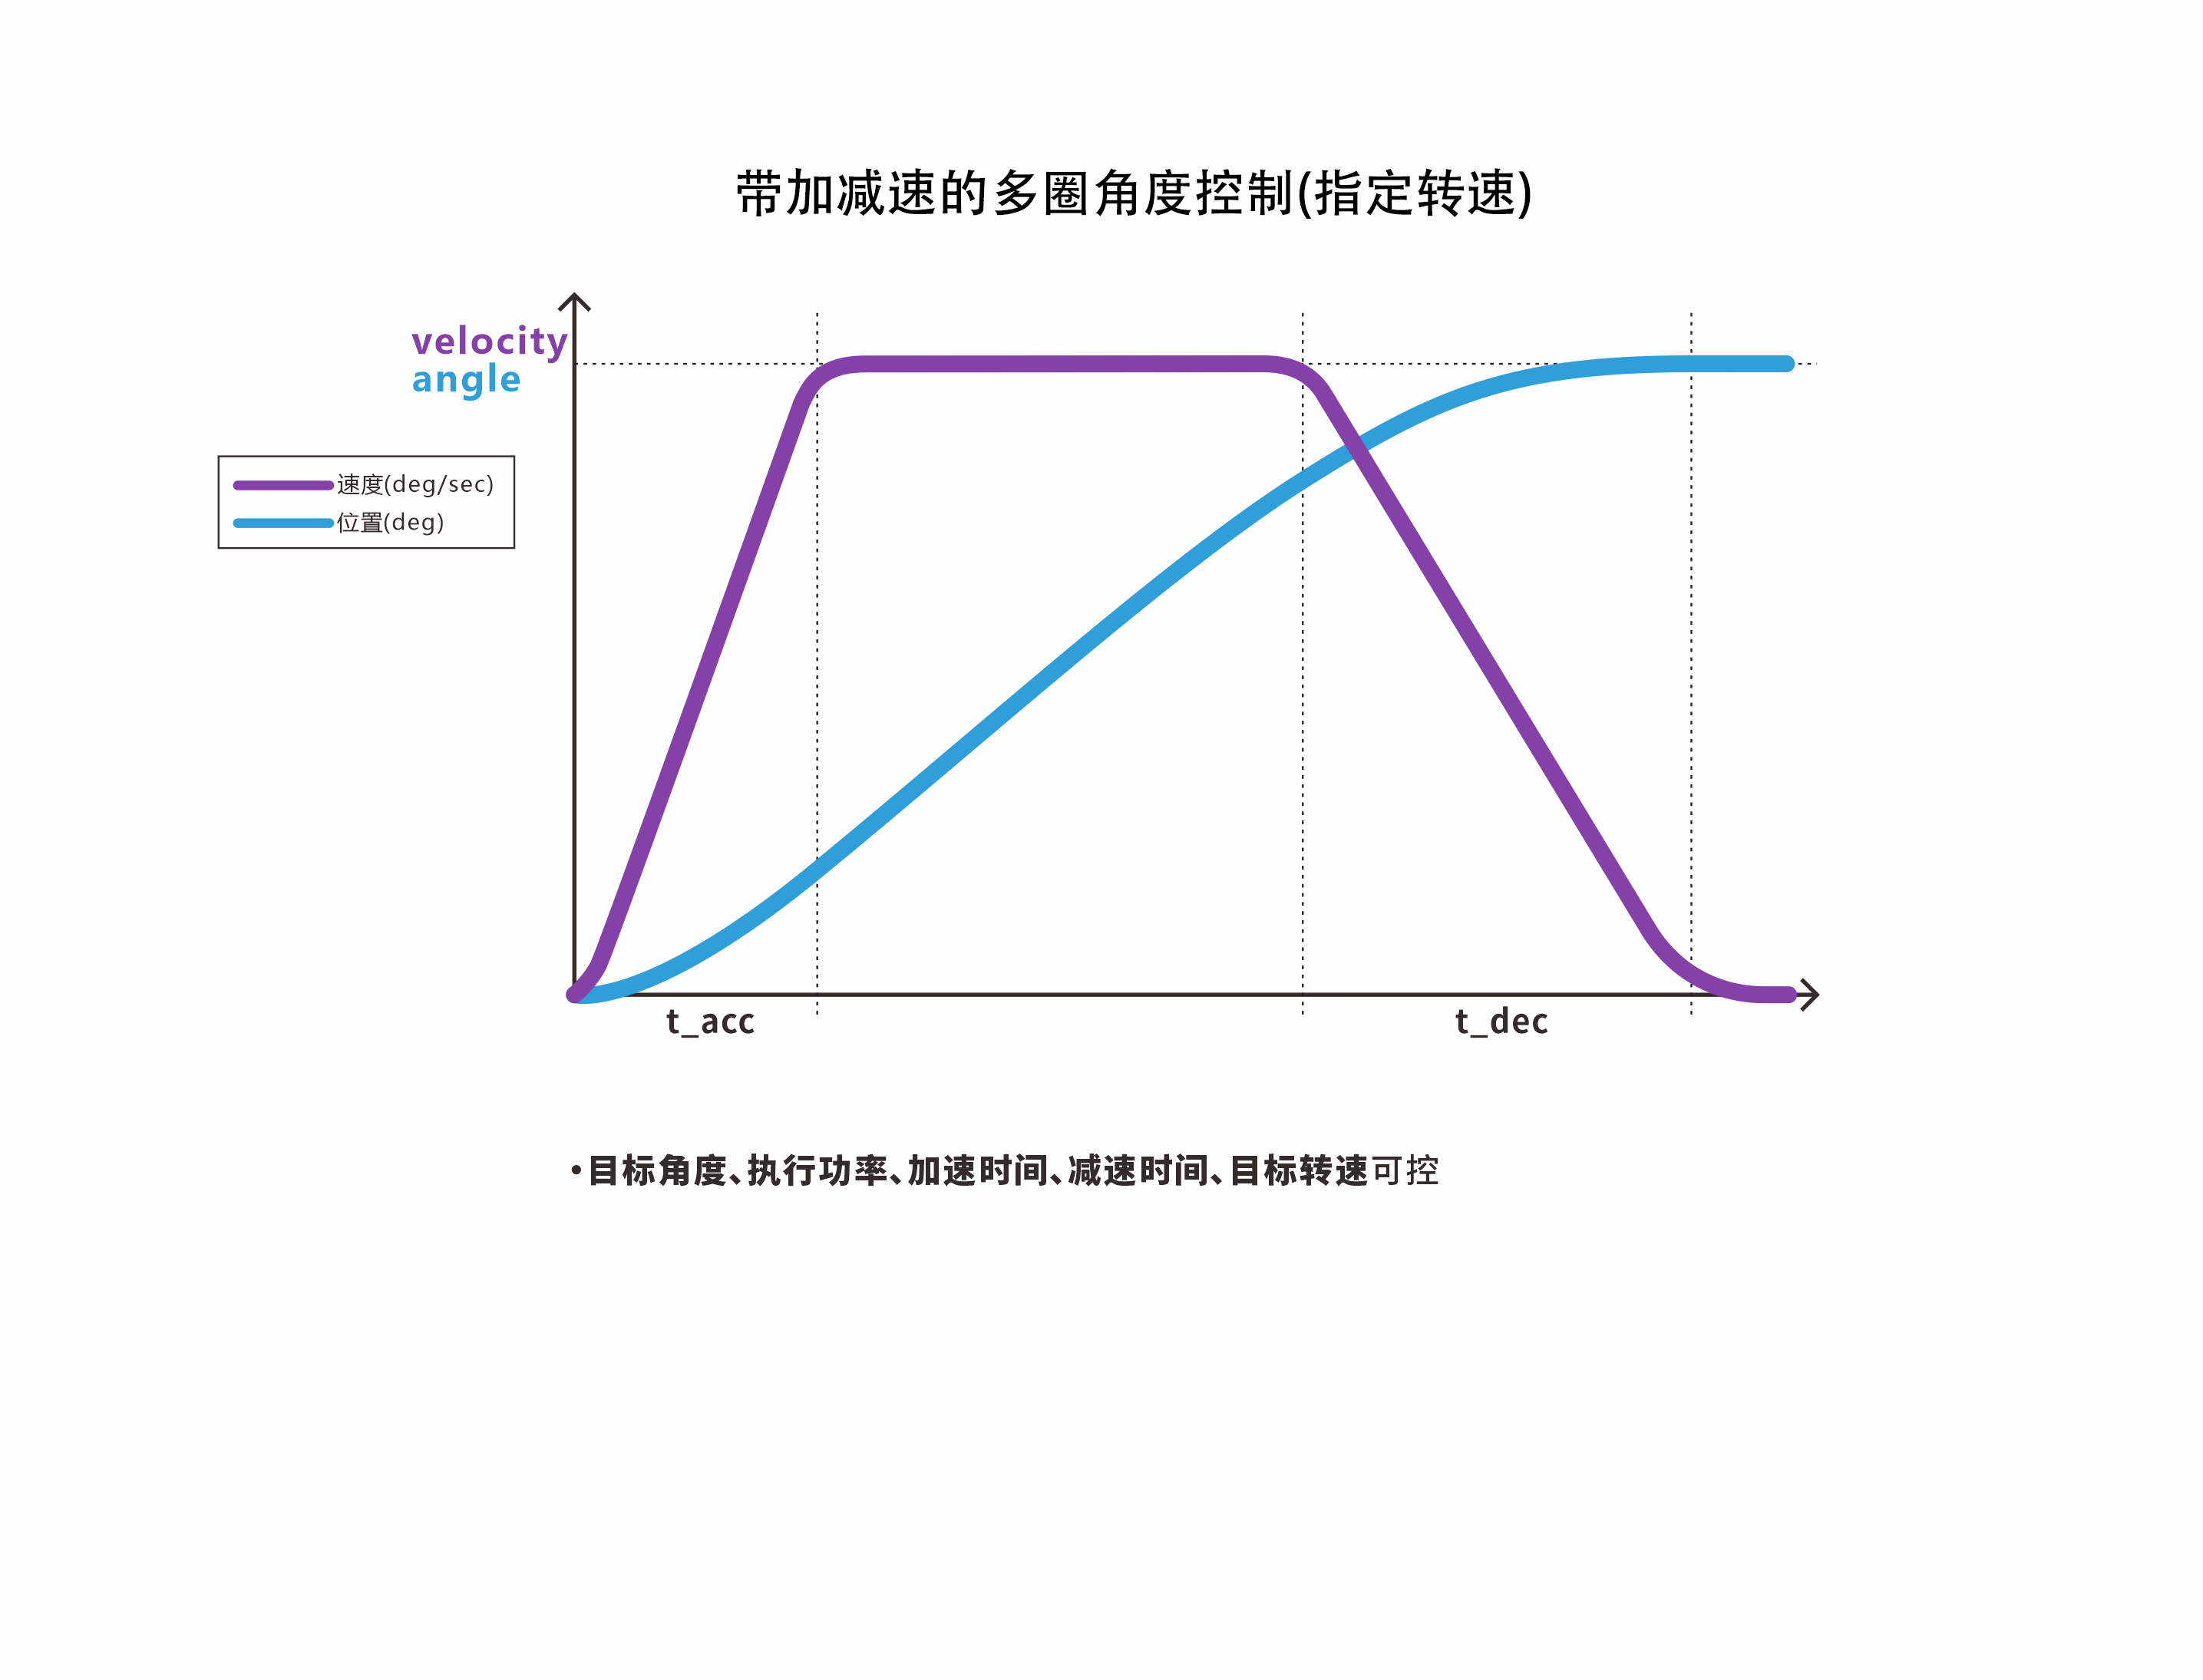
Function Prototype
// 设定舵机的原始角度(多圈+指定转速)
void FSUS_Servo::setRawAngleMTurnByVelocity(FSUS_SERVO_ANGLE_T rawAngle, FSUS_SERVO_SPEED_T velocity, FSUS_INTERVAL_T t_acc, FSUS_INTERVAL_T t_dec, FSUS_POWER_T power)
rawAngle: target angle of the Servo, in °velocity: target speed of the Servo, in °/st_acc: time from start to constant speed for the Servo, in ms; minimum value > 20t_dec: deceleration time when the Servo approaches the target angle, in ms; minimum value > 20power: execution power of the Servo, in mV; default is 0
Usage Example
FSUS_SERVO_SPEED_T velocity;// 目标转速 单位°/s
FSUS_INTERVAL_T t_acc;     // 加速时间 单位ms
FSUS_INTERVAL_T t_dec;     // 减速时间 单位ms

velocity = 200.0;
t_acc = 100;
t_dec = 100;
servo0.setRawAngleMTurnByVelocity(-90, velocity, t_acc, t_dec, 0);
9.4 queryRawAngleMTurn
Query the current multi-turn angle of the servo, send an angle query command to the servo, and assign the angle value to the curAngle property of the servo object.
Function Prototype
FSUS_SERVO_ANGLE_T FSUS_Servo::queryRawAngle()
Usage Example
- Example 1
float curAngle = uservo.queryRawAngleMTurn()
- Example 2
// 舵机角度查询 (更新角度)
uservo.queryRawAngleMTurn();
// 通过curRawAngle访问当前的真实角度
uservo.curRawAngle
9.5 Example - Servo Multi-Turn Angle Readback
Function Overview
Read the multi-turn angle of servo #0 and print it.
Example Source Code
servo_query_angle_mturn.cpp
/*
 * 舵机多圈角度回读
 * --------------------------
 * 作者: 深圳市华馨京科技有限公司
 * 网站:https://fashionstar.com.hk/
 * 更新时间: 2021/06/12
 **/
#include <iostream>

#include "CSerialPort/SerialPort.h"
#include "FashionStar/UServo/FashionStar_UartServoProtocol.h"
#include "FashionStar/UServo/FashionStar_UartServo.h"

// 总线伺服舵机配置
// 设置总线伺服Servo转接板的端口号
#ifdef _WIN32
#define SERVO_PORT_NAME "COM8"          // Windows下端口号名称 COM{}
#else
#define SERVO_PORT_NAME "/dev/ttyUSB0"  // Linux下端口号名称 /dev/ttyUSB{}
#endif
#define SERVO_ID 0                      // 舵机ID号
#define DAMPING_POWER 800       // 阻尼模式的功率

using namespace std;
using namespace fsuservo;

// 创建协议对象
FSUS_Protocol protocol(SERVO_PORT_NAME, FSUS_DEFAULT_BAUDRATE);
// 创建一个舵机对象
FSUS_Servo servo0(SERVO_ID, &protocol);

int main(){
    // 打印例程信息
    cout << "Query Servo Angle MTurn" << endl;
    // 设置舵机为阻尼模式
    // servo0.setDamping(DAMPING_POWER);

    while(true){
        // 查询(更新)舵机角度 (多圈模式)
        servo0.queryRawAngleMTurn();
        // 输出查询信息
        cout << "Servo Angle: " <<  servo0.curRawAngle << endl;
        // 延时1s
        protocol.delay_ms(1000);
    }

}
9.6 Example - Multi-Turn Angle Control Demo
Function Overview
Test control of the servo angle. This example demonstrates three APIs for controlling servo angle. After each angle control command is executed, it calls the current angle query API to obtain the real-time angle.
- Basic multi-turn angle control + current multi-turn angle query
- Multi-turn angle control with acceleration/deceleration (specified interval) + current multi-turn angle query
- Multi-turn angle control with acceleration/deceleration (specified speed) + current multi-turn angle query
Example Source Code
servo_set_angle_mturn.cpp
/*
 * 多圈角度控制功能演示
 * --------------------------
 * 作者: 深圳市华馨京科技有限公司
 * 网站:https://fashionstar.com.hk/
 * 更新时间: 2024/08/05
 */

#include <iostream>

#include "CSerialPort/SerialPort.h"
#include "FashionStar/UServo/FashionStar_UartServoProtocol.h"
#include "FashionStar/UServo/FashionStar_UartServo.h"

// 总线伺服舵机配置
// 设置总线伺服Servo转接板的端口号
#ifdef _WIN32
#define SERVO_PORT_NAME "COM8"          // Windows下端口号名称 COM{}
#else
#define SERVO_PORT_NAME "/dev/ttyUSB0"  // Linux下端口号名称 /dev/ttyUSB{}
#endif
#define SERVO_ID 0                      // 舵机ID号
#define DAMPING_POWER 800       // 阻尼模式的功率

using namespace std;
using namespace fsuservo;

// 创建协议对象
FSUS_Protocol protocol(SERVO_PORT_NAME, FSUS_DEFAULT_BAUDRATE);
// 创建一个舵机对象
FSUS_Servo servo0(SERVO_ID, &protocol);

// 轨迹规划参数定义
uint16_t interval;  // 运行周期 单位ms
uint16_t t_acc;     // 加速时间 单位ms
uint16_t t_dec;     // 减速时间 单位ms
float velocity;         // 目标转速 单位°/s

/* 等待并报告当前的角度*/
void waitAndReport(FSUS_Servo* servo){
    cout << "Real Angle = " << servo->curRawAngle << ", Target Angle = " << servo->targetRawAngle << endl;
    protocol.delay_ms(2000); // 暂停2s
}

int main(){
    // 打印例程信息
    cout << "Set Servo Angle" << endl;

    cout << "Set Angle = 900 deg" << endl;
    servo0.setRawAngleMTurn(900.0);  // 设置舵机的角度
    waitAndReport(&servo0);

    cout << "Set Angle = -900.0 deg" << endl;
    servo0.setRawAngleMTurn(-900.0);
    waitAndReport(&servo0);

    cout << "Set Angle = 900 deg - Set Interval = 10s" << endl;
    interval = 10000;
    t_acc = 100;
    t_dec = 100;
    servo0.setRawAngleMTurnByInterval(900, interval, t_acc, t_dec, 0);
    waitAndReport(&servo0);

    cout << "Set Angle = -900 deg - Set Velocity = 200 dps" << endl;
    velocity = 200.0;
    t_acc = 100;
    t_dec = 100;
    servo0.setRawAngleMTurnByVelocity(-900, velocity, t_acc, t_dec, 0);
    waitAndReport(&servo0);

}
10. Servo Damping Mode
10.1 setDamping
Set the servo to damping mode and customize the power.
Function Prototype
void FSUS_Servo::setDamping()//默认状态 功率500mW
void FSUS_Servo::setDamping(FSUS_POWER_T power)//自定义功率
power: power of the Servo, in mW. The higher the power value, the greater the damping force when rotating the Servo.
Usage Example
#define DAMPING_POWER 800 // 阻尼模式下的功率(单位mW) 500,800,1000

uservo.setDamping(DAMPING_POWER);
10.2 Example - Set Servo to Damping Mode
Function Overview
Use the setDamping function once, and the servo enters damping mode. You can modify the power in damping mode to experience different damping effects.
Example Source Code
servo_damping.cpp
/*
 * 设置舵机为阻尼模式
 * 调整参数`DAMPING_POWER`感受不同的阻尼力
 * --------------------------
 * 作者: 深圳市华馨京科技有限公司
 * 网站:https://fashionstar.com.hk/
 * 更新时间: 2024/08/05
 **/
#include <iostream>

#include "CSerialPort/SerialPort.h"
#include "FashionStar/UServo/FashionStar_UartServoProtocol.h"
#include "FashionStar/UServo/FashionStar_UartServo.h"

// 总线伺服舵机配置
// 设置总线伺服Servo转接板的端口号
#ifdef _WIN32
#define SERVO_PORT_NAME "COM8"          // Windows下端口号名称 COM{}
#else
#define SERVO_PORT_NAME "/dev/ttyUSB0"  // Linux下端口号名称 /dev/ttyUSB{}
#endif
#define SERVO_ID 0                      // 舵机ID号
#define DAMPING_POWER 800       // 阻尼模式的功率

using namespace std;
using namespace fsuservo;

// 创建协议对象
FSUS_Protocol protocol(SERVO_PORT_NAME, FSUS_DEFAULT_BAUDRATE);
// 创建一个舵机对象
FSUS_Servo servo0(SERVO_ID, &protocol);

int main(){
    // 打印例程信息
    cout << "Set Servo Mode To Damping" << endl;
    // 设置舵机为阻尼模式
    servo0.setDamping(DAMPING_POWER);
    cout << "Set Damping Power = " << DAMPING_POWER << endl;
}
11. Servo Sync Commands
11.1 setSyncRawAngle
Synchronously set single-turn angles.
Function Prototype
void FSUS_Servo::setSyncRawAngle(FSUS_SERVO_COUNT_T servo_count,FSUS_Sync_T Syncsend[])
servo_count: number of Servo controlled synchronouslySyncsend[]: control parameter structure array of the Servo
Usage Example
uint8_t set_count=1;//舵机发送数量
servo0.Syncsend[0].id=0;
servo0.Syncsend[0].angle=90;
servo0.Syncsend[0].interval_single=1000;
servo0.Syncsend[0].power=500;
servo0.setSyncRawAngle(set_count,servo0.Syncsend);//设置舵机同步的原始角度
11.2 setSyncRawAngleByInterval
Synchronously set single-turn angles (specified interval).
Function Prototype
void FSUS_Servo::setSyncRawAngleByInterval(FSUS_SERVO_COUNT_T servo_count,FSUS_Sync_T Syncsend[])
servo_count: number of Servo controlled synchronouslySyncsend[]: control parameter structure array of the Servo
Usage Example
uint8_t set_count=1;//舵机发送数量
servo0.Syncsend[0].id=0;
servo0.Syncsend[0].angle=90;
servo0.Syncsend[0].interval_single=1000;
servo0.Syncsend[0].t_acc=20;
servo0.Syncsend[0].t_dec=20;
servo0.Syncsend[0].power=500;
servo0.setSyncRawAngleByInterval(set_count,servo0.Syncsend);//设置舵机同步的原始角度(指定周期)
11.3 setSyncRawAngleByVelocity
Synchronously set single-turn angles (specified speed).
Function Prototype
void FSUS_Servo::setSyncRawAngleByVelocity(FSUS_SERVO_COUNT_T servo_count,FSUS_Sync_T Syncsend[])
servo_count: number of Servo controlled synchronouslySyncsend[]: control parameter structure array of the Servo
Usage Example
uint8_t set_count=1;//舵机发送数量
servo0.Syncsend[0].id=0;
servo0.Syncsend[0].angle=90;
servo0.Syncsend[0].velocity=100.0;
servo0.Syncsend[0].t_acc=20;
servo0.Syncsend[0].t_dec=20;
servo0.Syncsend[0].power=500;
servo0.setSyncRawAngleByVelocity(count,servo0.Syncsend);// 设定舵机同步的原始角度(指定转速)
11.4 setSyncRawAngleMTurn
Synchronously set multi-turn angles.
Function Prototype
void FSUS_Servo::setSyncRawAngleMTurn(FSUS_SERVO_COUNT_T servo_count,FSUS_Sync_T Syncsend[])
servo_count: number of Servo controlled synchronouslySyncsend[]: control parameter structure array of the Servo
Usage Example
uint8_t set_count=1;//舵机发送数量
servo0.Syncsend[0].id=0;
servo0.Syncsend[0].angle=90;
servo0.Syncsend[0].interval_multi=1000;
servo0.Syncsend[0].power=500;
servo0.setSyncRawAngleMTurn(count,servo0.Syncsend);// 设定舵机同步的原始角度(多圈)
11.5 setSyncRawAngleMTurnByInterval
Synchronously set multi-turn angles (specified interval).
Function Prototype
void FSUS_Servo::setSyncRawAngleMTurnByInterval(FSUS_SERVO_COUNT_T servo_count,FSUS_Sync_T Syncsend[])
servo_count: number of Servo controlled synchronouslySyncsend[]: control parameter structure array of the Servo
Usage Example
uint8_t set_count=1;//舵机发送数量
servo0.Syncsend[0].id=0;
servo0.Syncsend[0].angle=90;
servo0.Syncsend[0].interval_multi=1000;
servo0.Syncsend[0].t_acc=20;
servo0.Syncsend[0].t_dec=20;
servo0.Syncsend[0].power=500;
servo0.setSyncRawAngleMTurnByInterval(count,servo0.Syncsend);// 设定舵机同步的原始角度(多圈+指定周期)
11.6 setSyncRawAngleMTurnByVelocity
Synchronously set multi-turn angles (specified speed).
Function Prototype
void FSUS_Servo::setSyncRawAngleMTurnByVelocity(FSUS_SERVO_COUNT_T servo_count,FSUS_Sync_T Syncsend[])
servo_count: number of Servo controlled synchronouslySyncsend[]: control parameter structure array of the Servo
Usage Example
uint8_t set_count=1;//舵机发送数量
servo0.Syncsend[0].id=0;
servo0.Syncsend[0].angle=90;
servo0.Syncsend[0].velocity=100.0;
servo0.Syncsend[0].t_acc=20;
servo0.Syncsend[0].t_dec=20;
servo0.Syncsend[0].power=500;
servo0.setSyncRawAngleMTurnByVelocity(count,servo0.Syncsend);// 设定舵机同步的原始角度(多圈+指定周期)
11.7 Example - Sync Command Function Demo
Example Source Code
servo_synccommand_mode.cpp
/*
 * 同步指令演示
 * --------------------------
 * 作者: 深圳市华馨京科技有限公司
 * 网站:https://fashionstar.com.hk/
 * 更新时间: 2024/08/05
 */

#include <iostream>

#include "CSerialPort/SerialPort.h"
#include "FashionStar/UServo/FashionStar_UartServoProtocol.h"
#include "FashionStar/UServo/FashionStar_UartServo.h"

// 总线伺服舵机配置
// 设置总线伺服Servo转接板的端口号
#ifdef _WIN32
#define SERVO_PORT_NAME "COM8"          // Windows下端口号名称 COM{}
#else
#define SERVO_PORT_NAME "/dev/ttyUSB0"  // Linux下端口号名称 /dev/ttyUSB{}
#endif
#define SERVO_ID 0                      // 舵机ID号

using namespace std;
using namespace fsuservo;

// 创建协议对象
FSUS_Protocol protocol(SERVO_PORT_NAME, FSUS_DEFAULT_BAUDRATE);
// 创建一个舵机对象
FSUS_Servo servo0(SERVO_ID, &protocol);

uint8_t set_count=6;//舵机发送数量
uint8_t data_count=1;//舵机读取数量

int main(){
    // 打印例程信息
    cout << "SYNC SEND" << endl;

    servo0.Syncsend[0].id=0;
    servo0.Syncsend[0].angle=90;servo0.Syncsend[0].velocity=100.0;
    servo0.Syncsend[0].interval_single=1000;servo0.Syncsend[0].interval_multi=1000;
    servo0.Syncsend[0].t_acc=20;servo0.Syncsend[0].t_dec=20;servo0.Syncsend[0].power=500;
    servo0.Syncsend[1].id=1;
    servo0.Syncsend[1].angle=90;servo0.Syncsend[1].velocity=100.0;
    servo0.Syncsend[1].interval_single=1000;servo0.Syncsend[1].interval_multi=1000;
    servo0.Syncsend[1].t_acc=20;servo0.Syncsend[1].t_dec=20;servo0.Syncsend[1].power=500;
    servo0.Syncsend[2].id=2;
    servo0.Syncsend[2].angle=90;servo0.Syncsend[2].velocity=100.0;
    servo0.Syncsend[2].interval_single=1000;servo0.Syncsend[2].interval_multi=1000;
    servo0.Syncsend[2].t_acc=20;servo0.Syncsend[2].t_dec=20;servo0.Syncsend[2].power=500;
    servo0.Syncsend[3].id=3;
    servo0.Syncsend[3].angle=90;servo0.Syncsend[3].velocity=100.0;
    servo0.Syncsend[3].interval_single=1000;servo0.Syncsend[3].interval_multi=1000;
    servo0.Syncsend[3].t_acc=20;servo0.Syncsend[3].t_dec=20;servo0.Syncsend[3].power=500;
    servo0.Syncsend[4].id=4;
    servo0.Syncsend[4].angle=90;servo0.Syncsend[4].velocity=100.0;
    servo0.Syncsend[4].interval_single=1000;servo0.Syncsend[4].interval_multi=1000;
    servo0.Syncsend[4].t_acc=20;servo0.Syncsend[4].t_dec=20;servo0.Syncsend[4].power=500;

    servo0.setSyncRawAngle(set_count,servo0.Syncsend);//设置舵机同步的原始角度
    // servo0.setSyncRawAngleByInterval(count,servo0.Syncsend);//设置舵机同步的原始角度(指定周期)
    // servo0.setSyncRawAngleByVelocity(count,servo0.Syncsend);// 设定舵机同步的原始角度(指定转速)
    // servo0.setSyncRawAngleMTurn(count,servo0.Syncsend);// 设定舵机同步的原始角度(多圈)
    // servo0.setSyncRawAngleMTurnByInterval(count,servo0.Syncsend);// 设定舵机同步的原始角度(多圈+指定周期)
    // servo0.setSyncRawAngleMTurnByVelocity(count,servo0.Syncsend);// 设定舵机同步的原始角度(多圈+指定转速)
    protocol.delay_ms(2000);

    servo0.querySyncMonitor(data_count);//设定舵机同步的数据监控

    for (uint8_t i = 0; i < data_count; i++)
        {
            cout << "Test Servo ******************************************************" << endl;
            cout << "Servo ID[" << static_cast<int>(i) << "]: " << static_cast<int>(servo0.Syncmonitor[i].id) << endl;
            cout << "Voltage[" << static_cast<int>(i) << "]: " << servo0.Syncmonitor[i].voltage << " mV" << endl;
            cout << "Current[" << static_cast<int>(i) << "]: " << servo0.Syncmonitor[i].current << " mA" << endl;
            cout << "Power[" << static_cast<int>(i) << "]: " << servo0.Syncmonitor[i].power << " mW" << endl;
            cout << "Temperature[" << static_cast<int>(i) << "]: " << servo0.Syncmonitor[i].temperature << " °C" << endl;
            cout << "Status[" << static_cast<int>(i) << "]: " << static_cast<int>(servo0.Syncmonitor[i].status) << endl;
            cout << "Angle[" << static_cast<int>(i) << "]: " << servo0.Syncmonitor[i].angle << " °" << endl;
            cout << "Circle Count[" << static_cast<int>(i) << "]: " << static_cast<int>(servo0.Syncmonitor[i].circle_count) << endl;
        }


    protocol.delay_ms(2000);

}
12. Servo Status Readback
12.1 queryVoltage
Read the current voltage of the servo, in mV.
Function Prototype
uint16_t FSUS_Servo::queryVoltage()
Usage Example
uint16_t voltage = servo0.queryVoltage();
cout << "voltage: " << voltage << endl;
12.2 queryCurrent
Read the current of the servo, in mA.
Function Prototype
uint16_t FSUS_Servo::queryCurrent()
Usage Example
uint16_t current = servo0.queryCurrent();
cout << "current: " << current << endl;
12.3 queryPower
Read the current power of the servo, in mW.
Function Prototype
uint16_t FSUS_Servo::queryPower()
Usage Example
uint16_t power = servo0.queryPower();
cout << "power: " << power << endl;
12.4 queryTemperature
Read the current temperature of the servo, as an ADC value (see the appendix).
Function Prototype
uint16_t FSUS_Servo::queryTemperature()
Usage Example
uint16_t temperature = servo0.queryTemperature();
cout << "temperature: " << temperature << endl;
12.5 queryStatus
Read the current operating status of the servo. Each bit has a different meaning.
// BIT[0] - Set to 1 while executing a command, cleared after execution completes.
// BIT[1] - Set to 1 on command execution error, cleared after the next correct execution.
// BIT[2] - Set to 1 on stall error, cleared after the stall is cleared.
// BIT[3] - Set to 1 when voltage is too high, cleared after voltage returns to normal.
// BIT[4] - Set to 1 when voltage is too low, cleared after voltage returns to normal.
// BIT[5] - Set to 1 on current error, cleared after current returns to normal.
// BIT[6] - Set to 1 on power error, cleared after power returns to normal.
// BIT[7] - Set to 1 on temperature error, cleared after temperature returns to normal.
Function Prototype
uint8_t FSUS_Servo::queryStatus()
Usage Example
uint8_t status = servo0.queryStatus();
cout << "voltage high:"<<((status >> 3) & 0x01)<<endl;
12.6 Example - Read Servo Status
Function Overview
Read the current status of the servo.
- Voltage
- Current
- Power
- Temperature (ADC value)
- Operating status
Example Source Code
servo_data_read.cpp
/*
 * 读取舵机的状态
 * --------------------------
 * 作者: 深圳市华馨京科技有限公司
 * 网站:https://fashionstar.com.hk/
 * 更新时间: 2024/08/05
 **/
#include <iostream>
#include <string>

#include "CSerialPort/SerialPort.h"
#include "FashionStar/UServo/FashionStar_UartServoProtocol.h"
#include "FashionStar/UServo/FashionStar_UartServo.h"

// 总线伺服舵机配置
// 设置总线伺服Servo转接板的端口号
#ifdef _WIN32
#define SERVO_PORT_NAME "COM8"          // Windows下端口号名称 COM{}
#else
#define SERVO_PORT_NAME "/dev/ttyUSB0"  // Linux下端口号名称 /dev/ttyUSB{}
#endif
#define SERVO_ID 0                      // 舵机ID号

using namespace std;
using namespace fsuservo;

// 创建协议对象
FSUS_Protocol protocol(SERVO_PORT_NAME, FSUS_DEFAULT_BAUDRATE);
// 创建一个舵机对象
FSUS_Servo servo0(SERVO_ID, &protocol);


int main(){
    // 打印例程信息
    cout << "Servo Data Read" << endl;
    // 设置舵机角度(限制功率)
    // servo0.setAngle(0.0,  1000, 800);

    while(true){
        // 信息查询
        uint16_t voltage = servo0.queryVoltage();
        uint16_t current = servo0.queryCurrent();
        uint16_t power = servo0.queryPower();
        uint16_t temperature = servo0.queryTemperature();
        uint8_t status = servo0.queryStatus();

        // 打印状态信息
        cout << "voltage(mV): " << voltage << endl;
        cout << "current(mA): " << current << endl;
        cout << "power(mW): " << power << endl;
        cout << "temperature(ADC): " << temperature << endl;
        // 舵机工作状态标志位
        // BIT[0] - 执行指令置1,执行完成后清零。
        // BIT[1] - 执行指令错误置1,在下次正确执行后清零。
        // BIT[2] - 堵转错误置1,解除堵转后清零。
        // BIT[3] - 电压过高置1,电压恢复正常后清零。
        // BIT[4] - 电压过低置1,电压恢复正常后清零。
        // BIT[5] - 电流错误置1,电流恢复正常后清零。
        // BIT[6] - 功率错误置1,功率恢复正常后清零。
        // BIT[7] - 温度错误置1,温度恢复正常后清零。
        cout << "voltage high:"<<((status >> 3) & 0x01)<<endl;
        cout << "voltage low:"<<((status >> 4) & 0x01)<<endl;
        // 延时1s
        protocol.delay_ms(1000);
    }
}
13. Origin Setting
|
Notes:
|
13.1 SetOriginPoint
Function Prototype
void FSUS_Servo::SetOriginPoint()
Usage Example
servo0.SetOriginPoint();
13.2 Example - Servo Origin Setting
Function Overview
Query the current single-turn angle, then set the current servo position as the servo origin.
Example Source Code
servo_set_origin_point.cpp
/*
 * 舵机原点设置
 * --------------------------
 * 作者: 深圳市华馨京科技有限公司
 * 网站:https://fashionstar.com.hk/
 * 更新时间: 2024/08/05
 **/

#include <iostream>

#include "CSerialPort/SerialPort.h"
#include "FashionStar/UServo/FashionStar_UartServoProtocol.h"
#include "FashionStar/UServo/FashionStar_UartServo.h"

// 总线伺服舵机配置
// 设置总线伺服Servo转接板的端口号
#ifdef _WIN32
#define SERVO_PORT_NAME "COM8"          // Windows下端口号名称 COM{}
#else
#define SERVO_PORT_NAME "/dev/ttyUSB0"  // Linux下端口号名称 /dev/ttyUSB{}
#endif
#define SERVO_ID 0                      // 舵机ID号

using namespace std;
using namespace fsuservo;

// 创建协议对象
FSUS_Protocol protocol(SERVO_PORT_NAME, FSUS_DEFAULT_BAUDRATE);
// 创建一个舵机对象
FSUS_Servo servo0(SERVO_ID, &protocol);

int main(){
    cout << "Example Set Origin Point" << endl;
        servo0.setTorque(0);
        servo0.queryRawAngle();
        // 输出查询信息
        cout << "Before Set Origin Point: Servo Angle: " <<  servo0.curRawAngle << endl;
        servo0.SetOriginPoint();
        protocol.delay_ms(1000);
        servo0.queryRawAngle();
        cout << "After Set Origin Point: Servo Angle: " <<  servo0.curRawAngle << endl;
}
14. Async Commands
14.1 SetBeginAsync
Function Prototype
void FSUS_Servo::SetBeginAsync()
Usage Example
servo0.SetBeginAsync(); //异步写入
14.2 SetEndAsync
Function Prototype
void FSUS_Servo::SetEndAsync(uint8_t mode)
Usage Example
uint8_t endasync_mode = 0;//0执行存储指令,1取消执行存储的指令
servo0.SetEndAsync(endasync_mode);//异步执行
14.3 Example - Async Commands
Function Overview
The servo stores one command. You can choose to execute the stored command or cancel it.
Example Source Code
servo_begin_end_async.cpp
/*
 * 舵机存储一次指令异步执行的应用
 * --------------------------
 * 作者: 深圳市华馨京科技有限公司
 * 网站:https://fashionstar.com.hk/
 * 更新时间: 2025/01/05
 */

#include <iostream>

#include "CSerialPort/SerialPort.h"
#include "FashionStar/UServo/FashionStar_UartServoProtocol.h"
#include "FashionStar/UServo/FashionStar_UartServo.h"

// 总线伺服舵机配置
// 设置总线伺服Servo转接板的端口号
#ifdef _WIN32
#define SERVO_PORT_NAME "COM8"          // Windows下端口号名称 COM{}
#else
#define SERVO_PORT_NAME "/dev/ttyUSB0"  // Linux下端口号名称 /dev/ttyUSB{}
#endif
#define SERVO_ID 0                      // 舵机ID号
#define DAMPING_POWER 800       // 阻尼模式的功率

using namespace std;
using namespace fsuservo;

// 创建协议对象
FSUS_Protocol protocol(SERVO_PORT_NAME, FSUS_DEFAULT_BAUDRATE);
// 创建一个舵机对象
FSUS_Servo servo0(SERVO_ID, &protocol);

// 轨迹规划参数定义
uint16_t interval;  // 运行周期 单位ms
uint16_t t_acc;     // 加速时间 单位ms
uint16_t t_dec;     // 减速时间 单位ms
float velocity;         // 目标转速 单位°/s

uint8_t endasync_mode = 0;//0执行存储指令,1取消执行存储的指令

/* 等待并报告当前的角度*/
void waitAndReport(FSUS_Servo* servo){
    cout << "Real Angle = " << servo->curRawAngle << ", Target Angle = " << servo->targetRawAngle << endl;
    protocol.delay_ms(2000); // 暂停2s
}

int main(){
    // 打印例程信息
    cout << "Star Async" << endl;
    servo0.SetBeginAsync();

    cout << "---------First send---------" << endl;
    cout << "Set Angle = 90 deg" << endl;
    servo0.setRawAngle(90.0);  // 设置舵机的角度
    waitAndReport(&servo0);

    protocol.delay_ms(2000); // 暂停2s

    cout << "---------Second send---------" << endl;
    servo0.SetEndAsync(endasync_mode);//0执行存储指令,1取消执行存储的指令

}
15. Servo Data Monitoring
15.1 querymonitor
Function Prototype
uint16_t FSUS_Servo::querymonitor()
Usage Example
servo0.querymonitor();
15.2 Example - Read All Data of the Servo
Function Overview
Get servo data information.
Example Source Code
servo_query_monitor.cpp
/*
 * 读取舵机所有数据信息
 * --------------------------
 * 作者: 深圳市华馨京科技有限公司
 * 网站:https://fashionstar.com.hk/
 * 更新时间: 2025/01/05
 */

#include <iostream>

#include "CSerialPort/SerialPort.h"
#include "FashionStar/UServo/FashionStar_UartServoProtocol.h"
#include "FashionStar/UServo/FashionStar_UartServo.h"

// 总线伺服舵机配置
// 设置总线伺服Servo转接板的端口号
#ifdef _WIN32
#define SERVO_PORT_NAME "COM8"          // Windows下端口号名称 COM{}
#else
#define SERVO_PORT_NAME "/dev/ttyUSB0"  // Linux下端口号名称 /dev/ttyUSB{}
#endif
#define SERVO_ID 0                      // 舵机ID号

using namespace std;
using namespace fsuservo;

// 创建协议对象
FSUS_Protocol protocol(SERVO_PORT_NAME, FSUS_DEFAULT_BAUDRATE);
// 创建一个舵机对象
FSUS_Servo servo0(SERVO_ID, &protocol);


int main(){

    while (1)
    {
    servo0.querymonitor(); // 读取舵机数据
    // 打印例程信息
    cout << "*********************Test Servo monitor**************" << endl;
    cout << "Servo ID: " << static_cast<int>(servo0.servomonitor.id) << endl;
    cout << "Voltage: " << servo0.servomonitor.voltage << " mV" << endl;
    cout << "Current: " << servo0.servomonitor.current << " mA" << endl;
    cout << "Power: " << servo0.servomonitor.power << " mW" << endl;
    cout << "Temperature: " << servo0.servomonitor.temperature << " °C" << endl;
    cout << "Status: " << static_cast<int>(servo0.servomonitor.status) << endl;
    cout << "Angle: " << servo0.servomonitor.angle << " °" << endl;
    cout << "Circle Count: " << static_cast<int>(servo0.servomonitor.circle_count) << endl;

    protocol.delay_ms(2000);
    }

}
16. Control Mode Stop Command
16.1 SetStopOnControlMode
Function Prototype
void FSUS_Servo::SetStopOnControlMode(uint8_t mode, FSUS_POWER_T power)
Usage Example
uint8_t stoponcontrol_mode = 0;//控制模式停止指令的模式选择参数  0:卸力(失锁)  1:保持锁力  2:阻尼状态
servo0.SetStopOnControlMode(stoponcontrol_mode,500);
16.2 Example - Set Stop Mode
Function Overview
This command can be sent during motion to make the servo enter different states.
Example Source Code
servo_stop_oncontrolmode.cpp
/*
 * 控制模式停止指令,选择进入对应状态
 * --------------------------
 * 作者: 深圳市华馨京科技有限公司
 * 网站:https://fashionstar.com.hk/
 * 更新时间: 2025/01/05
 */

#include <iostream>

#include "CSerialPort/SerialPort.h"
#include "FashionStar/UServo/FashionStar_UartServoProtocol.h"
#include "FashionStar/UServo/FashionStar_UartServo.h"

// 总线伺服舵机配置
// 设置总线伺服Servo转接板的端口号
#ifdef _WIN32
#define SERVO_PORT_NAME "COM8"          // Windows下端口号名称 COM{}
#else
#define SERVO_PORT_NAME "/dev/ttyUSB0"  // Linux下端口号名称 /dev/ttyUSB{}
#endif
#define SERVO_ID 0                      // 舵机ID号

using namespace std;
using namespace fsuservo;

// 创建协议对象
FSUS_Protocol protocol(SERVO_PORT_NAME, FSUS_DEFAULT_BAUDRATE);
// 创建一个舵机对象
FSUS_Servo servo0(SERVO_ID, &protocol);

// 轨迹规划参数定义
uint16_t interval;  // 运行周期 单位ms
uint16_t t_acc;     // 加速时间 单位ms
uint16_t t_dec;     // 减速时间 单位ms
float velocity;         // 目标转速 单位°/s

uint8_t stoponcontrol_mode = 0;//控制模式停止指令的模式选择参数  0:卸力(失锁)  1:保持锁力  2:阻尼状态

/* 等待并报告当前的角度*/
void waitAndReport(FSUS_Servo* servo){
    cout << "Real Angle = " << servo->curRawAngle << ", Target Angle = " << servo->targetRawAngle << endl;
    protocol.delay_ms(2000); // 暂停2s
}

int main(){
    // 打印例程信息
    cout << "servo_Stop_OnControlMode 2" << endl;

    cout << "Set Angle = 90 deg" << endl;
    servo0.setRawAngle(90.0);  // 设置舵机的角度
    waitAndReport(&servo0);

    cout << "Set Angle = -90 deg" << endl;
    servo0.setRawAngle(-90);
    waitAndReport(&servo0);

    cout << "Set Angle = 90 deg - Set Interval = 500ms" << endl;
    interval = 500;
    t_acc = 100;
    t_dec = 100;
    servo0.setRawAngleByInterval(90, interval, t_acc, t_dec, 0);
    waitAndReport(&servo0);

    cout << "Set Angle = -90 deg - Set Velocity = 200 dps" << endl;
    velocity = 200.0;
    t_acc = 100;
    t_dec = 100;
    servo0.setRawAngleByVelocity(-90, velocity, t_acc, t_dec, 0);
    waitAndReport(&servo0);

    //控制模式停止指令,选择进入阻尼状态
    servo0.SetStopOnControlMode(stoponcontrol_mode,500);
}
Appendix 1 - Temperature ADC Value Conversion Table
The temperature is an ADC value and must be converted.
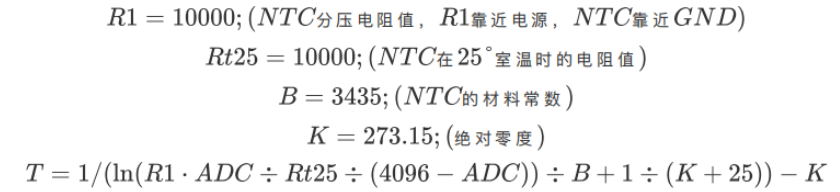
The following is the 50-79°C temperature/ADC reference table.
| Temperature (°C) | ADC | Temperature (°C) | ADC | Temperature (°C) | ADC |
|---|---|---|---|---|---|
| 50 | 1191 | 60 | 941 | 70 | 741 |
| 51 | 1164 | 61 | 918 | 71 | 723 |
| 52 | 1137 | 62 | 897 | 72 | 706 |
| 53 | 1110 | 63 | 876 | 73 | 689 |
| 54 | 1085 | 64 | 855 | 74 | 673 |
| 55 | 1059 | 65 | 835 | 75 | 657 |
| 56 | 1034 | 66 | 815 | 76 | 642 |
| 57 | 1010 | 67 | 796 | 77 | 627 |
| 58 | 986 | 68 | 777 | 78 | 612 |
| 59 | 963 | 69 | 759 | 79 | 598 |