Bus Servo SDK User Manual (STM32F407)
| 版本 | GitHub | 开发资源包 |
|---|---|---|
| v1.2026.0214 |  |
点击下载 |
1. Overview
This SDK is developed based on the UART/RS-485 Communication Protocol for Fashion Star bus servo. It provides C APIs for the STM32F407 platform and applies to the full range of servo models.
1.1 PC Configuration Software Software
The PC configuration software software can configuration bus servo and test the functions of bus servo.
-
PC configuration software software: FashionStar UART bus servo PC configuration software Software
-
Instructions: bus servo PC configuration software Software User Guide
1.2 Development Software
The USB-to-TTL serial port chip used by the bus servo adapter board is CH340. Install the driver on Windows. Verify the CH340 driver installation (Chinese).
- Keil5: Keil5 download link
- STLink driver: STLink driver download link
- Serial port assistant: Serial Port Assistant (ATK-XCOM v3.0) — Extraction code:
ktsy. - serial port configuration driver: CH340 driver download link
1.3 Legend
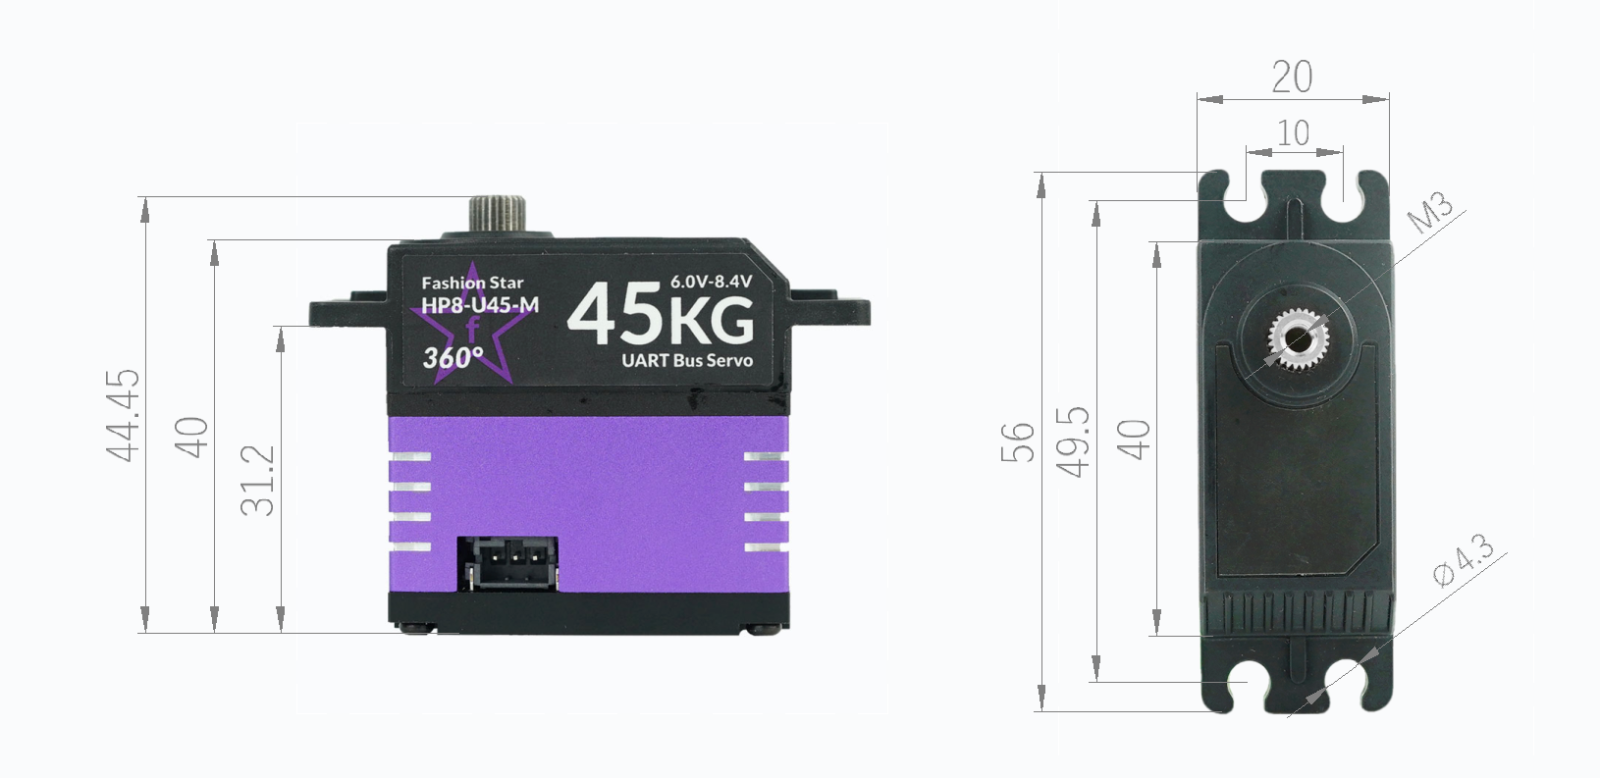
HP8-U45-M bus servo
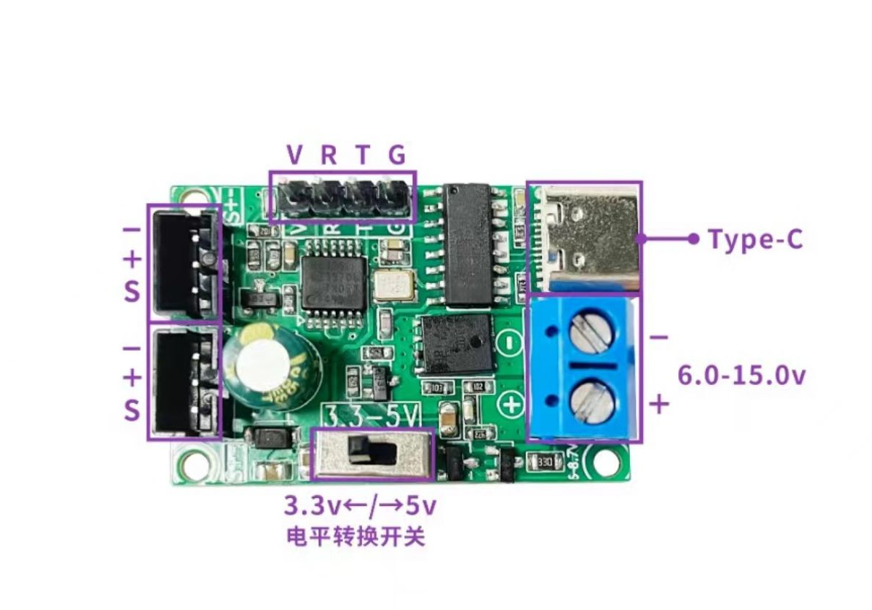
bus servo Adapter Board UC-01
2. Wiring Instructions
Development board used in this document:
- Development board model: ALIENTEK STM32F4 Explorer development board
- IC model: STM32F407ZGT6
You can also choose another STM32F4 series MCU or development board, but you need to port the project yourself.
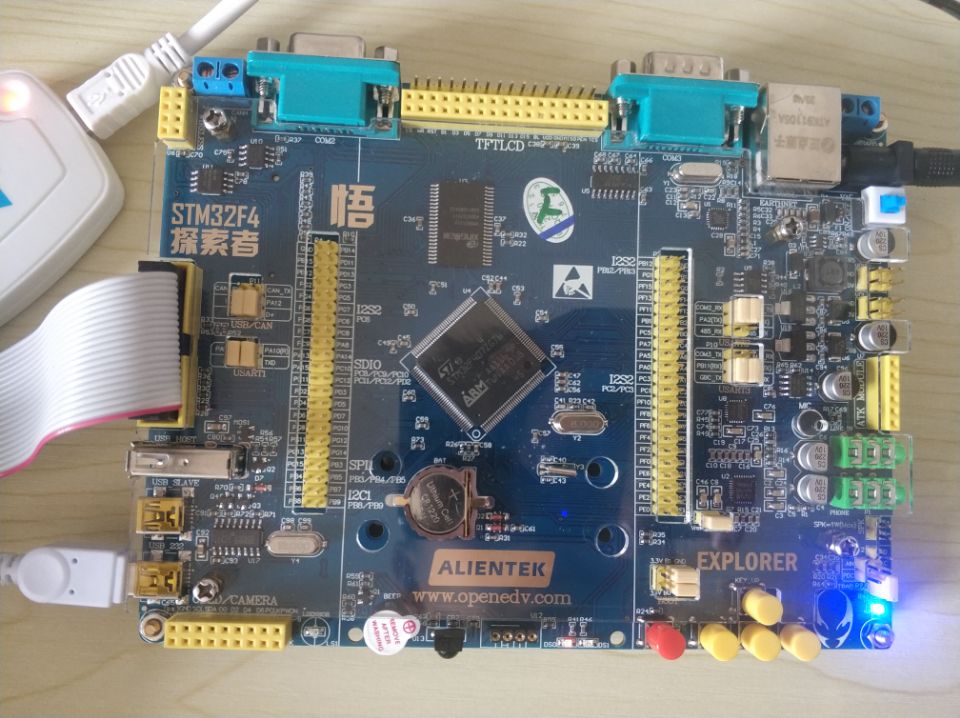
2.1 Wiring Between STM32 and STLinkV2
You can also use another downloader to connect to the development board.
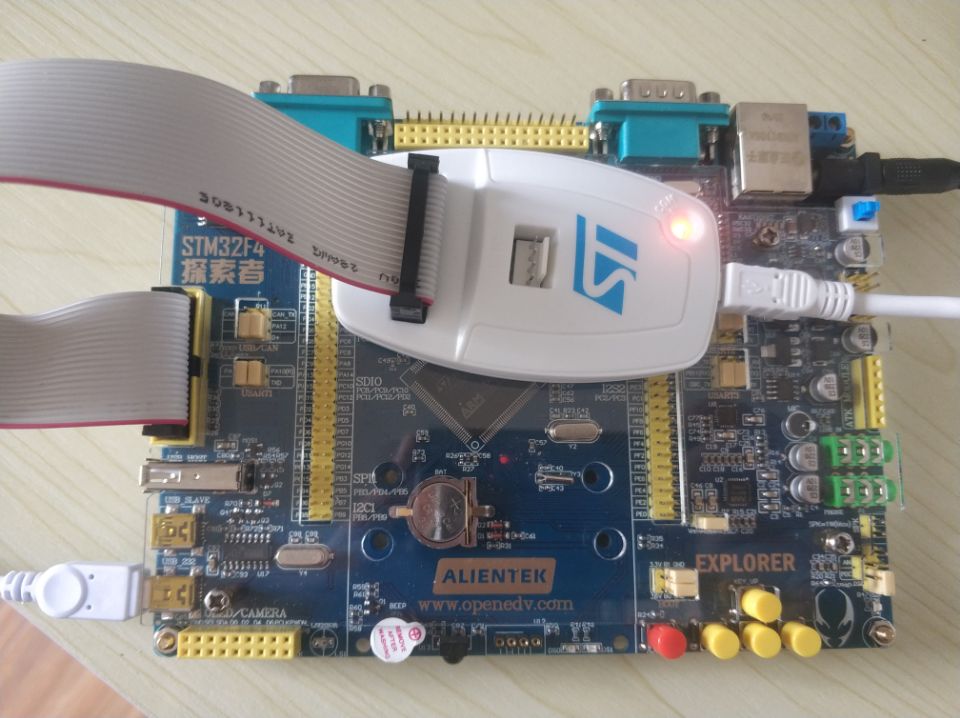
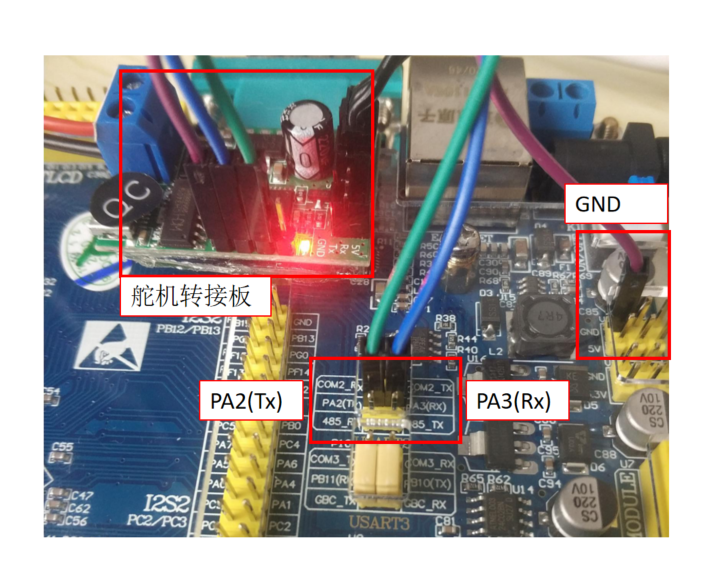
2.2 Wiring Between STM32 and Bus Servo
| STM32F4 | Servo Adapter Board | Remarks |
|---|---|---|
| PA2 (USART2 Tx) | RX | |
| PA3 (USART2 Rx) | TX | |
| GND | GND | |
| 5V | 5V | Optional, because the development board and servo adapter board are powered independently |
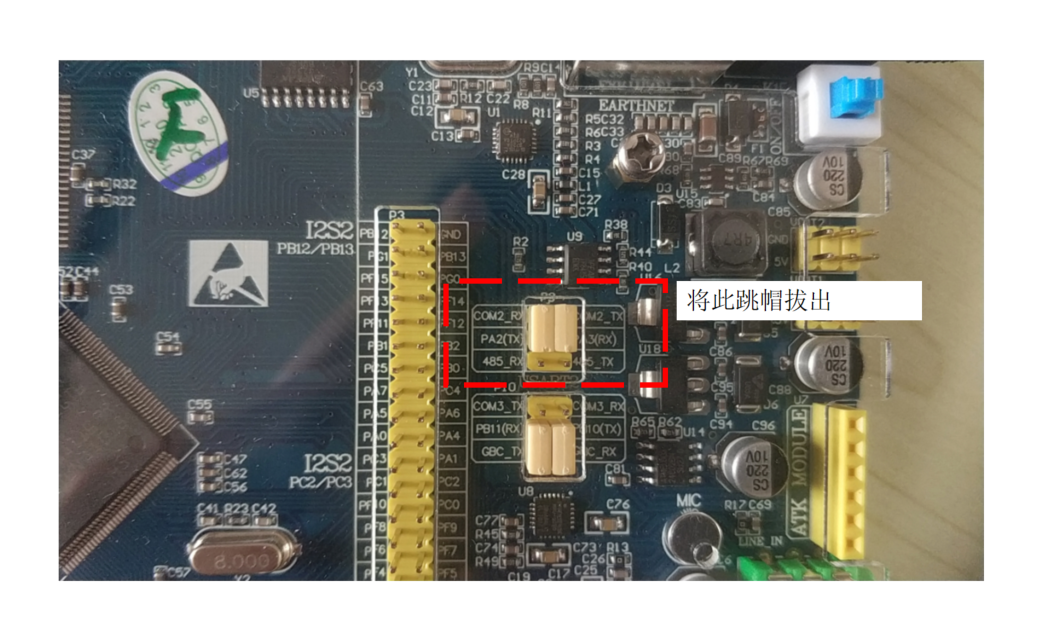
Use the jumper cap to connect COM2_RX and COM2_TX, and use it as a normal USART.
2.3 USART1 USB-to-Serial Port (Optional)
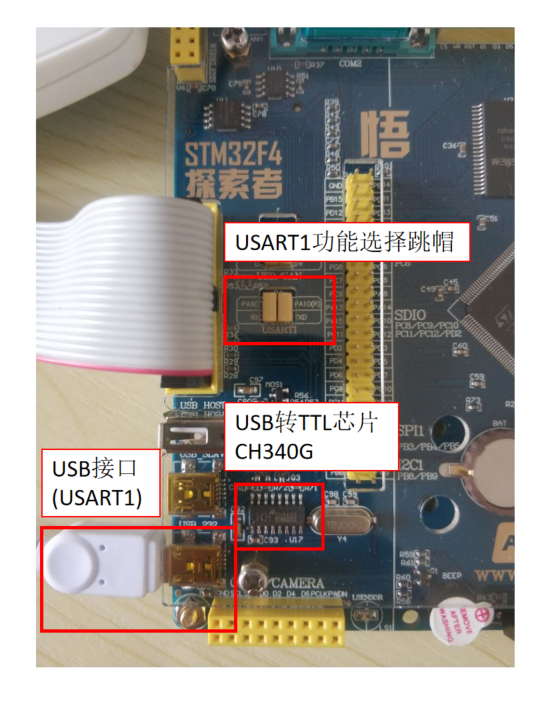
The ALIENTEK development board includes a USB-to-TTL module (CH340G), connected to USART1 of STM32F407.
It is labeled USB_232 and connects to the computer.
2.4 External Power Supply for the Development Board
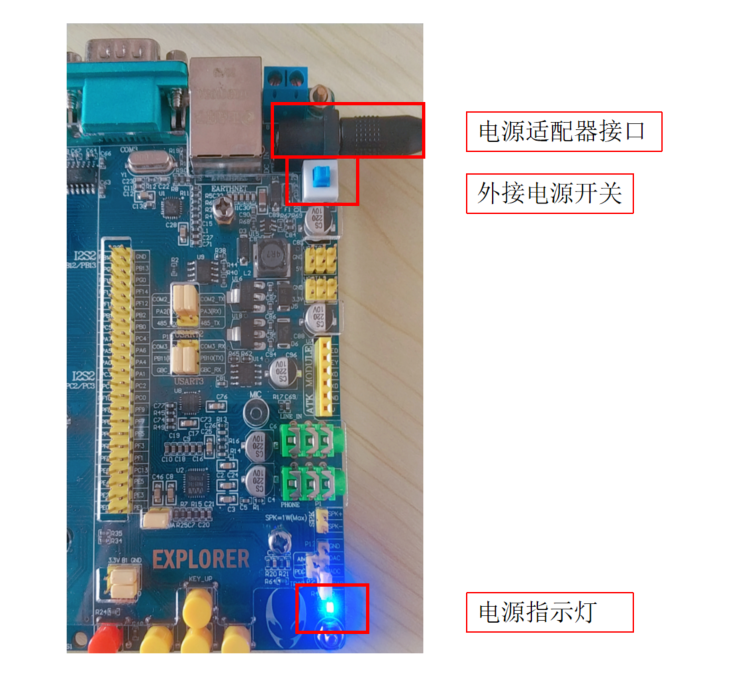
- USB power supply through the USB_232 port, or power adapter supply.
- Turn on the power switch of the development board.
3. Development Environment Configuration
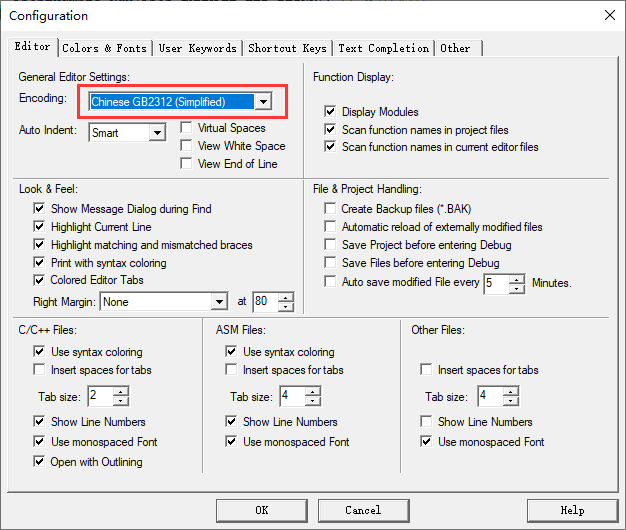
3.1 Keil - Set Encoding Format
Set the default encoding of the Keil code editor to Chinese GB2312 (Simplified).
Settings path: Eidt -> Configuration
3.2 Keil - Configuration Options
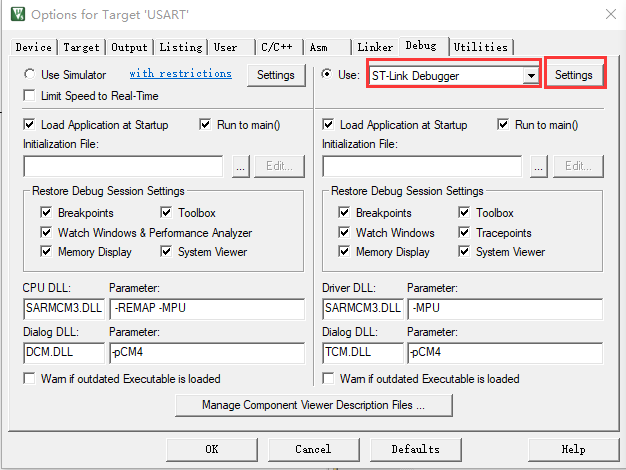
Set the configuration tool to ST-Link Debugger.
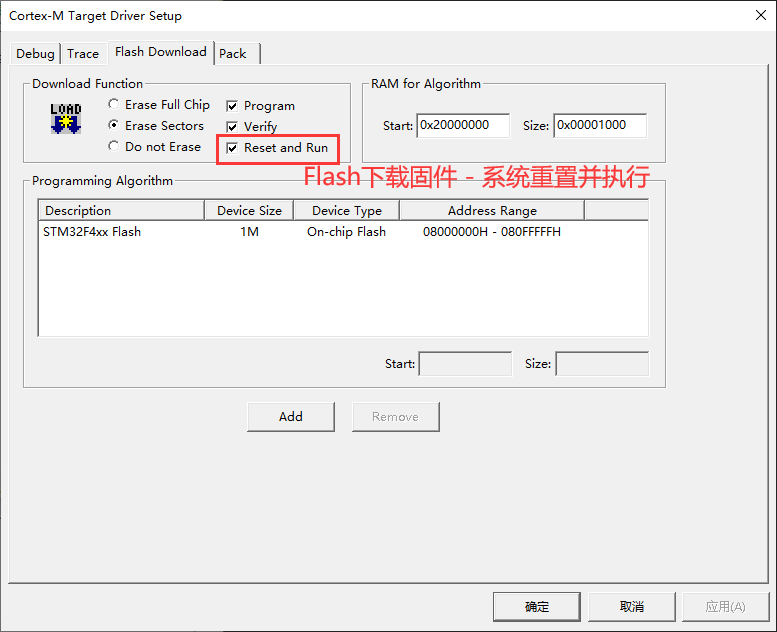
Select the Reset and Run option for easier testing.
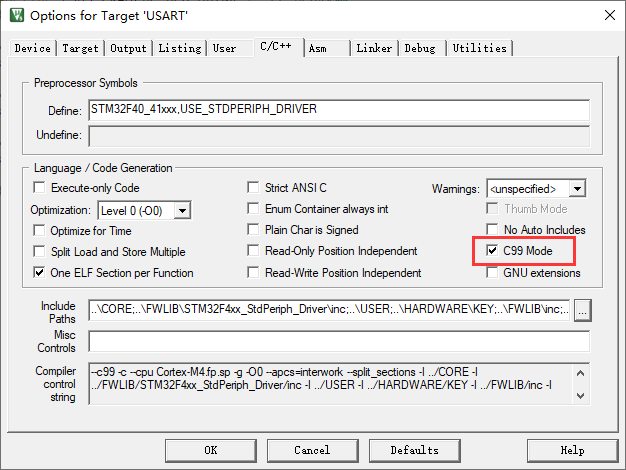
3.3 Keil - Set the Compilation Standard
In the ALIENTEK code example, the C99 option is not selected by default and must be selected manually.
4. Communication Check
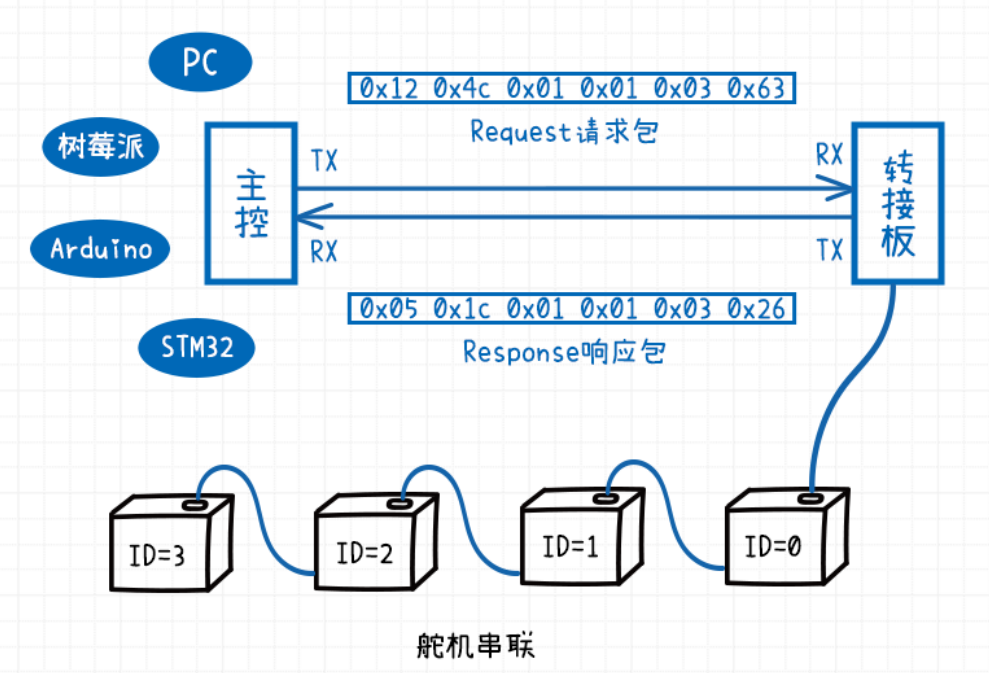
Use the communication check command to check whether the servo is online.
-
If the servo with the specified ID exists and is online, the servo sends a response packet after receiving the communication check command.
-
If the servo with the specified ID does not exist or is offline, no servo sends a response packet.
4.1 Communication Check
Function Prototype
FSUS_STATUS FSUS_Ping(Usart_DataTypeDef *usart, uint8_t servo_id);
usartSerial Port data objectUsart_DataTypeDefcorresponding to Servo controlservo_idID of the Servo
Usage Example
For the servo communication check function FSUS_Ping, pass in the serial port data structure pointer servoUsart and the ID number servoId of the servo in order.
statusCode = FSUS_Ping(servoUsart, servoId);
statusCode is the returned status code FSUS_STATUS. If the request succeeds, it returns 0. Any other value indicates that the servo communication check failed. You can look up the error corresponding to each statusCode in fashion_star_uart_servo.h.
// FSUS状态码
#define FSUS_STATUS uint8_t
#define FSUS_STATUS_SUCCESS 0 // 设置/读取成功
#define FSUS_STATUS_FAIL 1 // 设置/读取失败
#define FSUS_STATUS_TIMEOUT 2 // 等待超时
#define FSUS_STATUS_WRONG_RESPONSE_HEADER 3 // 响应头不对
#define FSUS_STATUS_UNKOWN_CMD_ID 4 // 未知的控制指令
#define FSUS_STATUS_SIZE_TOO_BIG 5 // 参数的size大于FSUS_PACK_RESPONSE_MAX_SIZE里面的限制
#define FSUS_STATUS_CHECKSUM_ERROR 6 // 校验和错误
#define FSUS_STATUS_ID_NOT_MATCH 7 // 请求的舵机ID跟反馈回来的舵机ID不匹配
#define FSUS_STATUS_ERRO 8 // 设置同步模式错误
4.2 Example - Check Whether the Servo Is Online
Function Description
Continuously sends communication check commands to servo ID 0. It lights LEDs in different colors according to the response from servo ID 0, and prints prompt information to the log output serial port.
Source Code
void FSUSExample_PingServo(void)
{

    FSUS_STATUS status_code; // 状态码
    uint8_t servo_id = 0;    // 舵机ID = 0

    printf("===Test Uart Servo Ping===r\n");
    while (1)
    {
        // 舵机通信检测
        status_code = FSUS_Ping(servo_usart, servo_id);
        if (status_code == FSUS_STATUS_SUCCESS)
        {
            // 舵机在线, LED1闪烁(绿灯)
            printf("Servo Online \r\n");
            LED0 = LED_OFF;
            LED1 = !LED1;
        }
        else
        {
            // 舵机离线, LED0闪烁(红灯)
            printf("Servo Offline,Error Code=%d \r\n", status_code);
            LED0 = !LED0;
            LED1 = LED_OFF;
        }
        // 延时等待1s
        SysTick_DelayMs(1000);
    }
}
5. Single-Turn Angle Control
|
Notes:
|
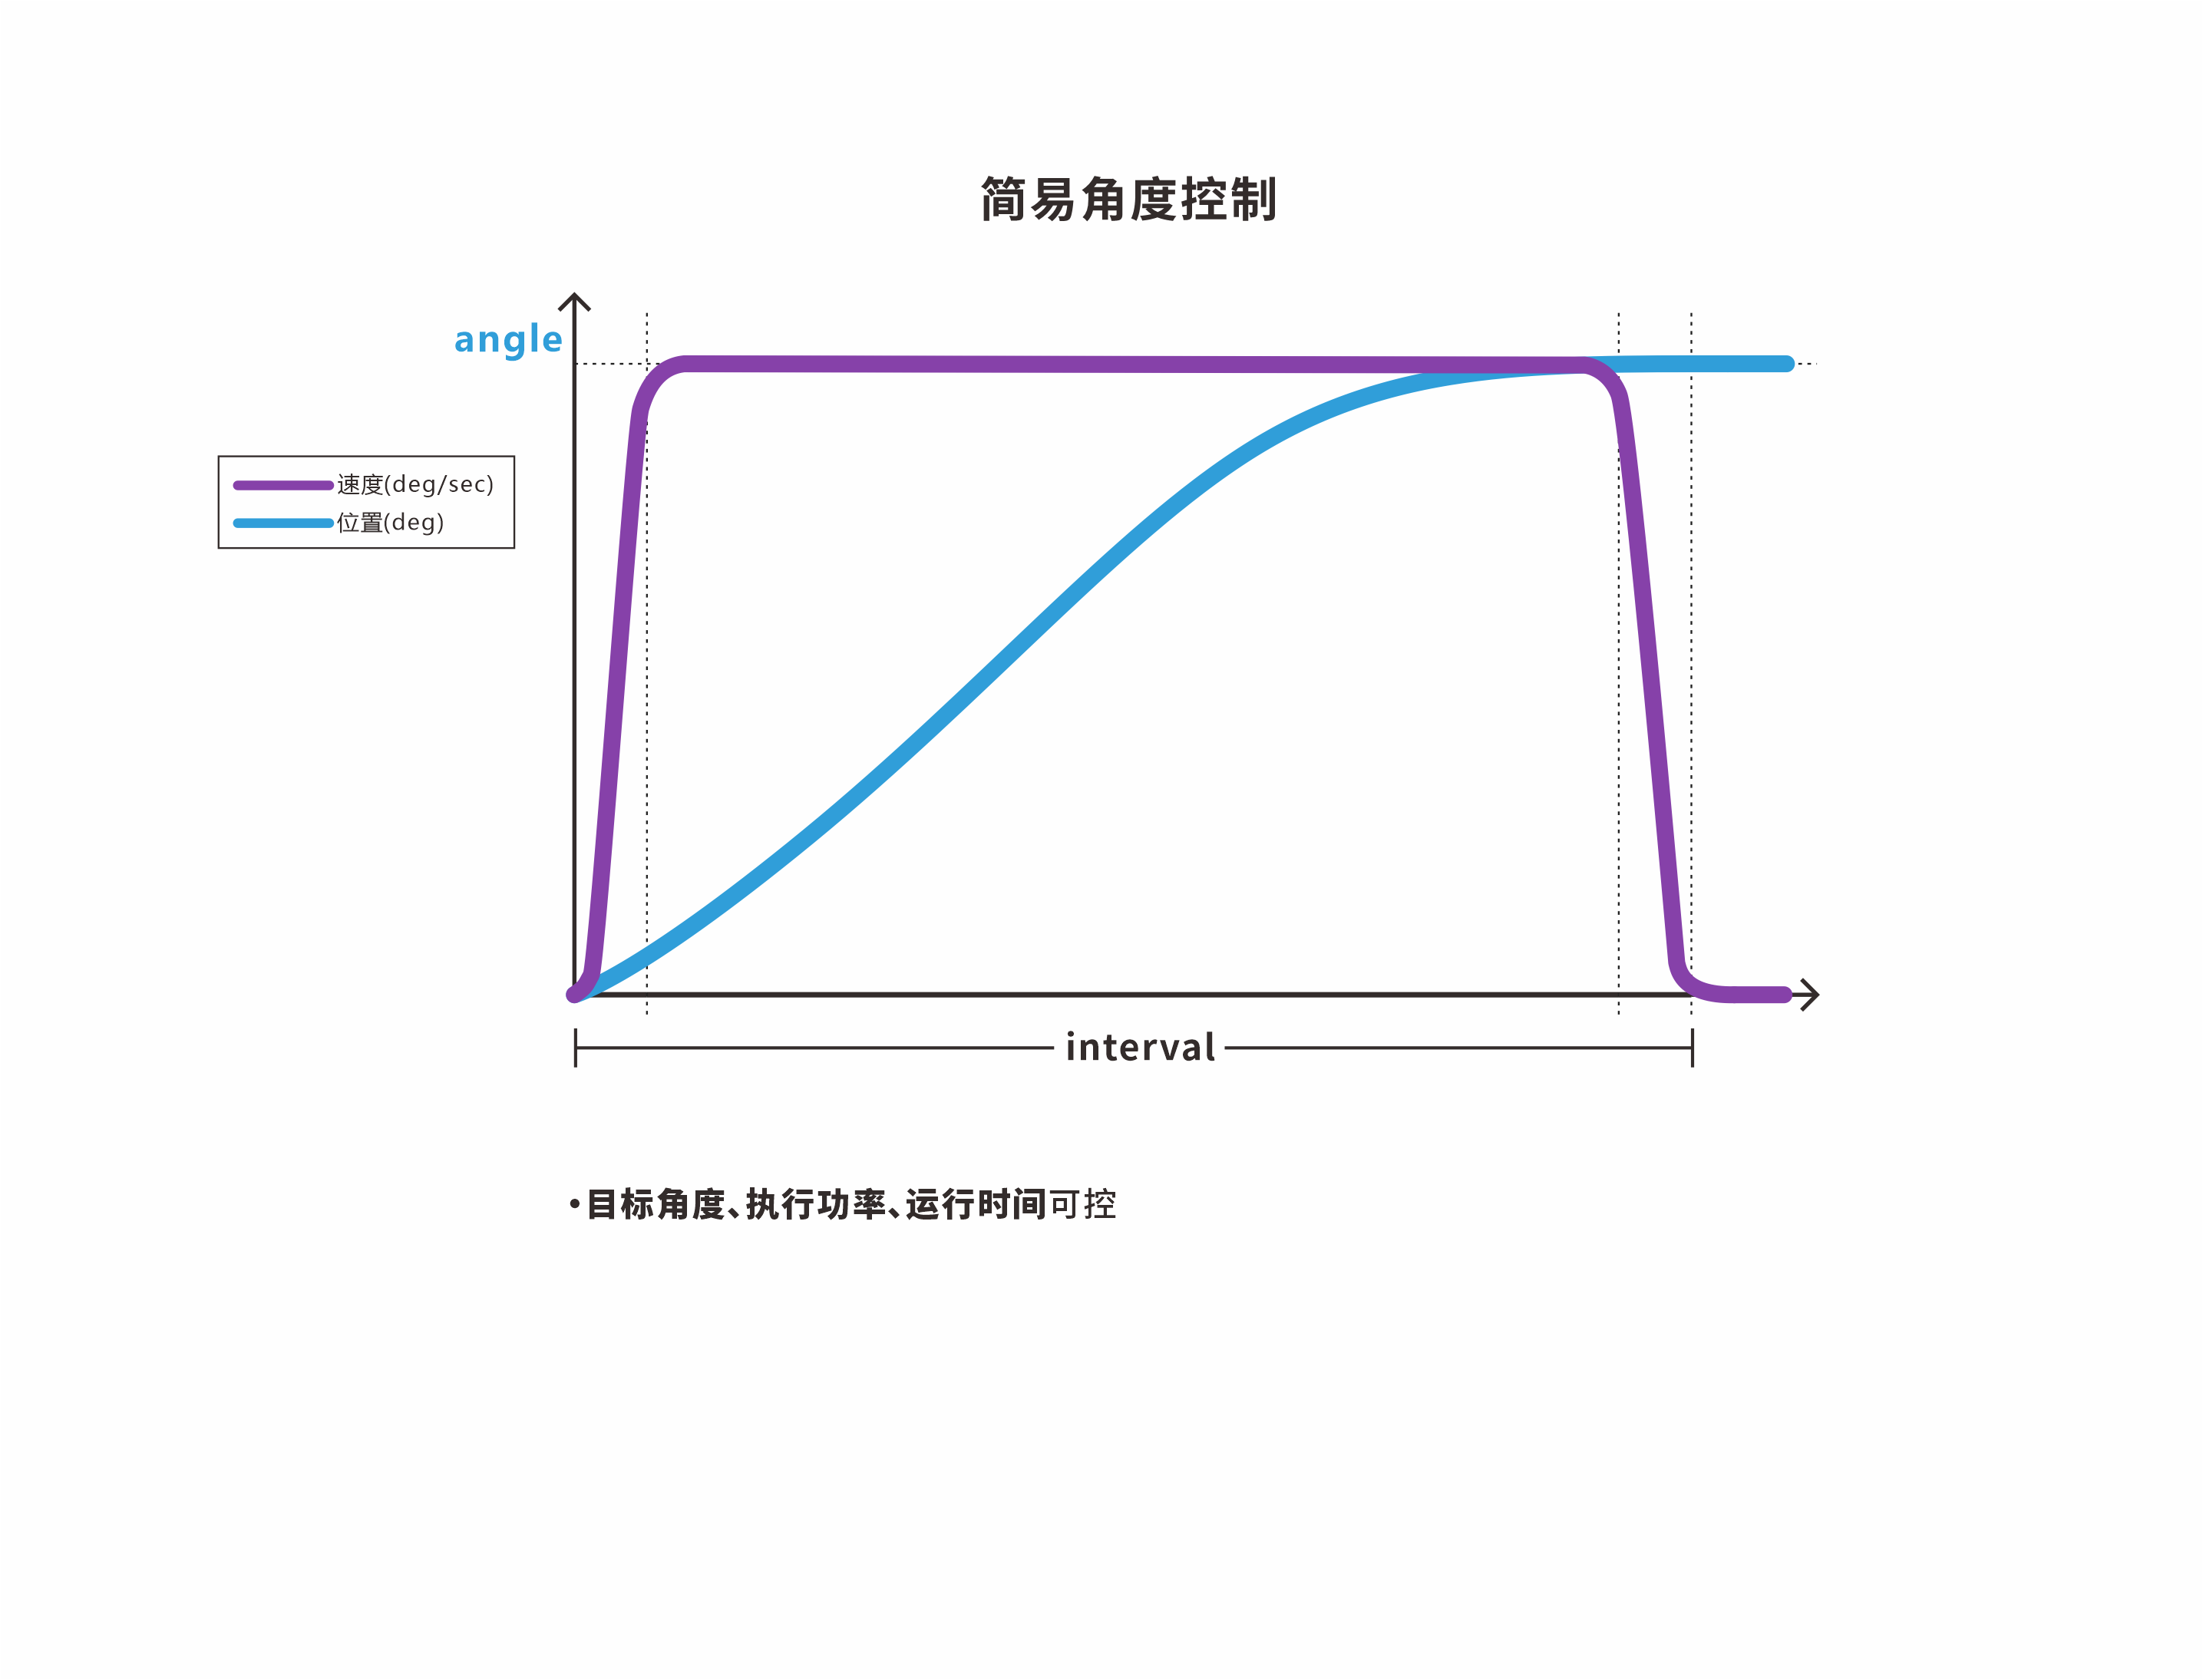
5.1 Simple Angle Control
Function Prototype
FSUS_STATUS FSUS_SetServoAngle(Usart_DataTypeDef *usart, uint8_t servo_id, float angle, uint16_t interval, uint16_t power);
usartSerial Port data objectUsart_DataTypeDefcorresponding to Servo controlservo_idID of the Servoangletarget angle of the Servo, with a minimum unit of 0.1° and a valid range of [-180.0, 180.0]intervalrun time of the Servo, in ms, with a minimum value > 100powerexecution power of the Servo, in mV, default 0
Usage Example
// 舵机控制相关的参数

uint8_t servoId = 0;  // 舵机的ID号
float angle = 0;// 舵机的目标角度  舵机角度在-180度到180度之间, 最小单位0.1°
uint16_t interval = 2000; // 运行时间ms  可以尝试修改设置更小的运行时间,例如500ms
uint16_t power = 0; // 舵机执行功率 单位mV 默认为0

FSUS_SetServoAngle(servoUsart, servoId, angle, interval, power);
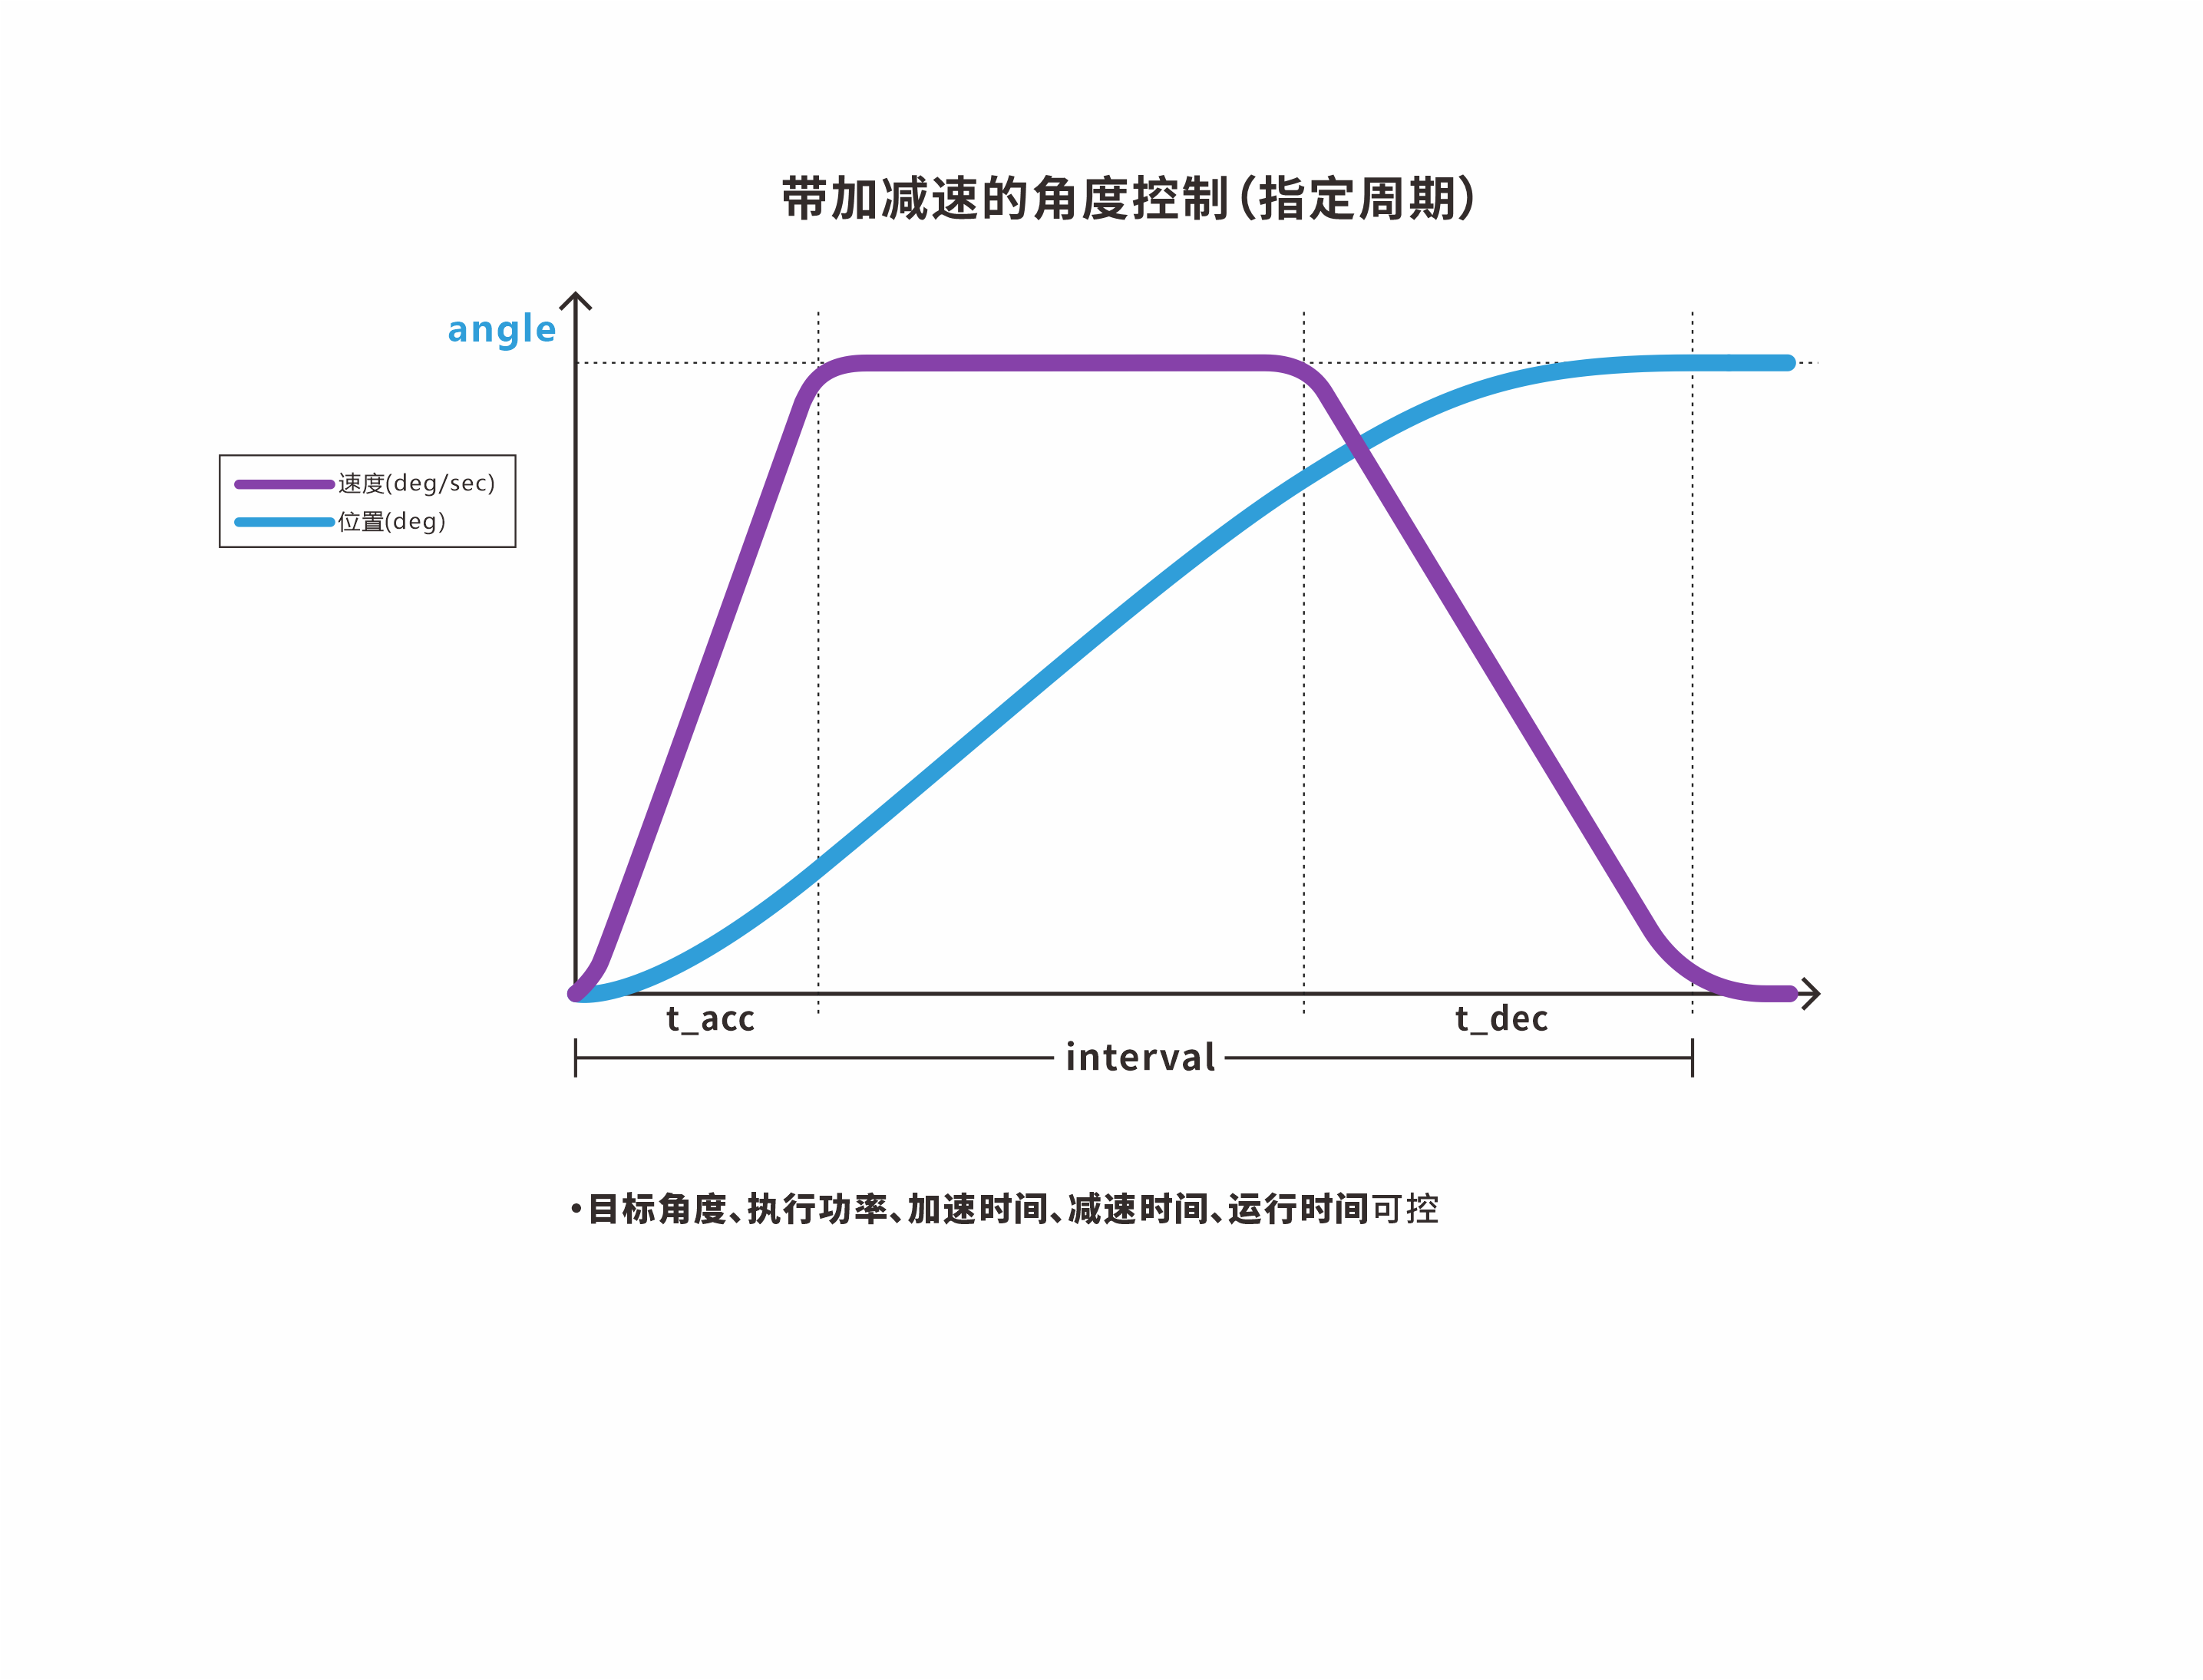
5.2 Angle Control with Acceleration and Deceleration (Specified Cycle)
Function Prototype
FSUS_STATUS FSUS_SetServoAngleByInterval(Usart_DataTypeDef *usart, uint8_t servo_id, \
                float angle, uint16_t interval, uint16_t t_acc, \
                uint16_t t_dec, uint16_t  power);
-
usartSerial Port data objectUsart_DataTypeDefcorresponding to Servo control -
servo_idID of the Servo -
angletarget angle of the Servo, with a minimum unit of 0.1° and a valid range of [-180.0, 180.0] -
intervalrun time of the Servo, in ms. The value must be >t_acc+t_dec, with a minimum value > 100 -
t_acctime for the Servo to accelerate to constant speed, in ms, with a minimum value > 20 -
t_decdeceleration time when the Servo approaches the target angle, in ms, with a minimum value > 20 -
powerexecution power of the Servo, in mV, default 0
Usage Example
//// 舵机控制相关的参数
// 舵机的ID号
uint8_t servoId = 0;
// 舵机的目标角度
// 舵机角度在-180度到180度之间, 最小单位0.1°
float angle = 0;
// 运行时间ms
// 可以尝试修改设置更小的运行时间,例如500ms
uint16_t interval = 2000;
// 加速时间
uint16_t t_acc = 100;
// 减速时间
uint16_t t_dec = 150;
// 舵机执行功率 单位mV 默认为0
uint16_t power = 0;

FSUS_SetServoAngleByInterval(servo_usart, servo_id, angle, interval, t_acc, t_dec, power);
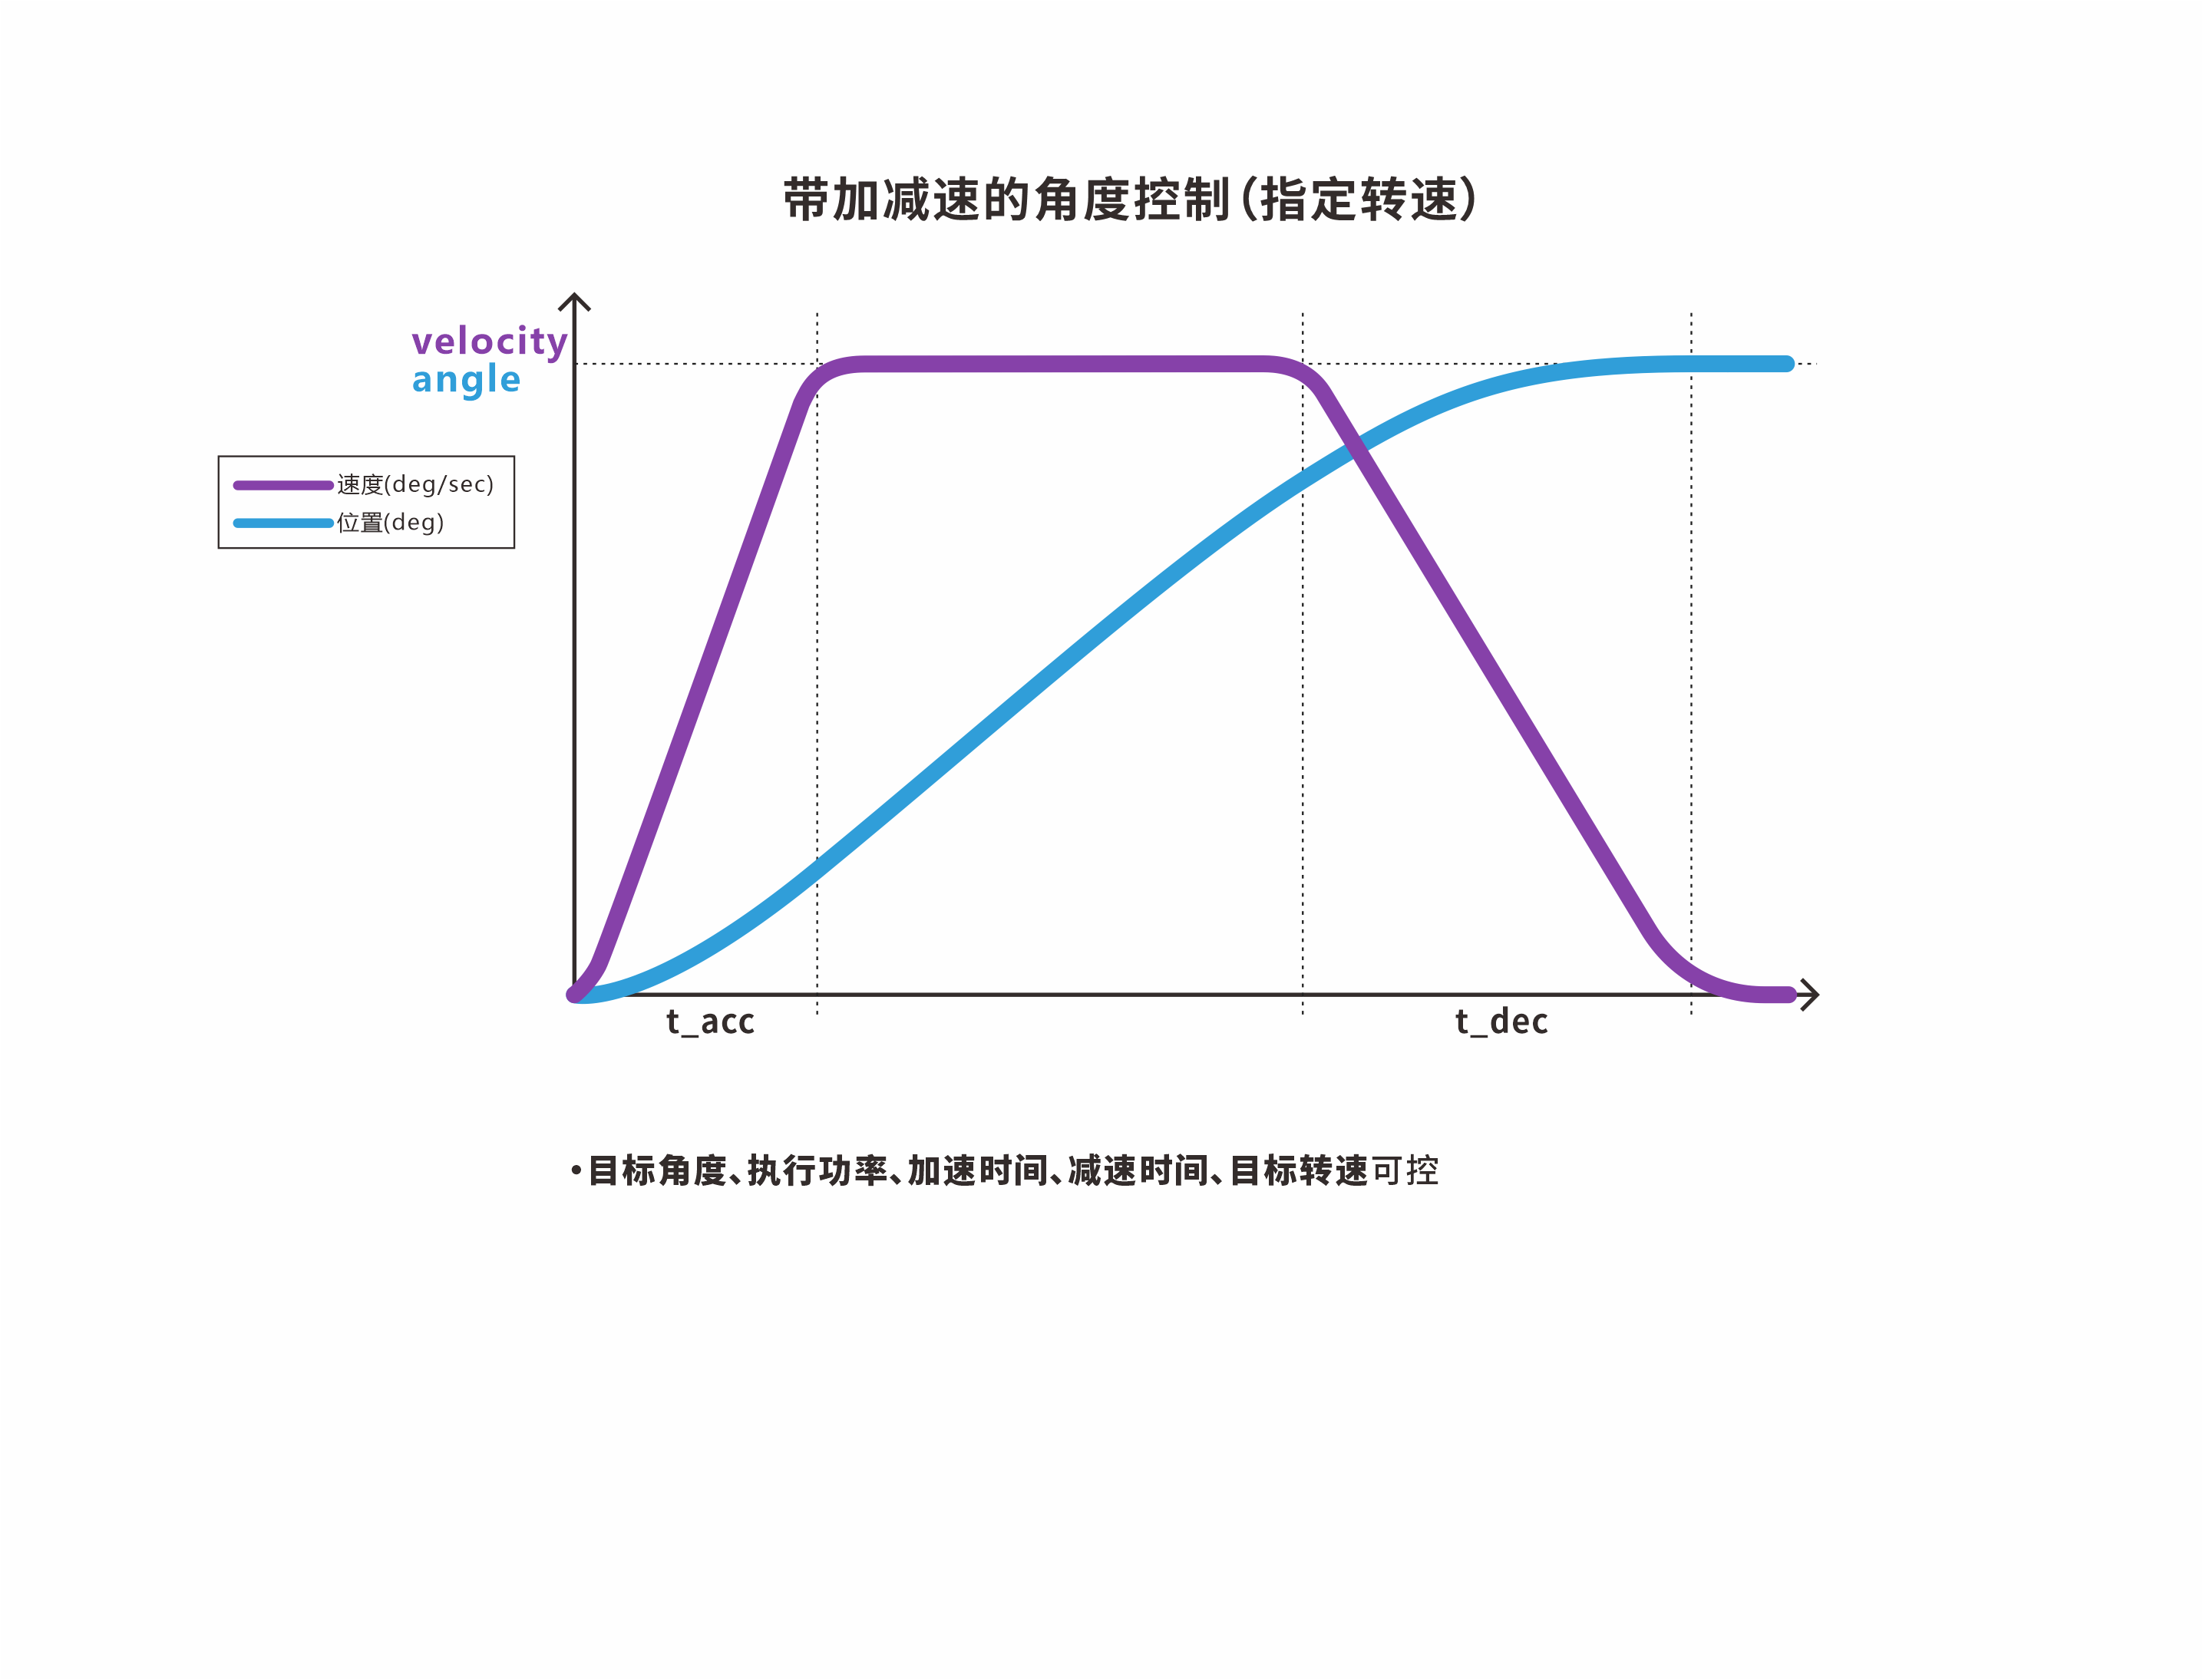
5.3 Angle Control with Acceleration and Deceleration (Specified Speed)
Function Prototype
FSUS_STATUS FSUS_SetServoAngleByVelocity(Usart_DataTypeDef *usart, uint8_t servo_id, \
                float angle, float velocity, uint16_t t_acc, \
                uint16_t t_dec, uint16_t  power);
usartSerial Port data objectUsart_DataTypeDefcorresponding to Servo controlservo_idID of the Servoangletarget angle of the Servo, with a minimum unit of 0.1° and a valid range of [-180.0, 180.0]velocitytarget speed of the Servo, in °/s, with a valid range of [1, 750]t_acctime for the Servo to accelerate to constant speed, in ms, with a minimum value > 20t_decdeceleration time when the Servo approaches the target angle, in ms, with a minimum value > 20powerexecution power of the Servo, in mV, default 0
Usage Example
//// 舵机控制相关的参数
// 舵机的ID号
uint8_t servoId = 0;
// 舵机的目标角度
// 舵机角度在-180度到180度之间, 最小单位0.1°
float angle = 0;
// 目标转速
float velocity;
// 加速时间
uint16_t t_acc = 100;
// 减速时间
uint16_t t_dec = 150;
// 舵机执行功率 单位mV 默认为0
uint16_t power = 0;

FSUS_SetServoAngleByVelocity(servo_usart, servo_id, angle, velocity, t_acc, t_dec, power);
5.4 Current Angle Query
Function Prototype
// 查询单个舵机的角度信息 angle 单位度
FSUS_STATUS FSUS_QueryServoAngle(Usart_DataTypeDef *usart, uint8_t servo_id, float *angle);
usartSerial Port data objectUsart_DataTypeDefcorresponding to Servo controlservo_idID of the Servoanglepointer used to store the current angle of the Servo
Usage Example
uint8_t servoId = 0;    // 舵机的ID号
float curAngle = 0;     // 舵机当前所在的角度
FSUS_QueryServoAngle(servoUsart, servoId, &curAngle); // 读取一下舵机的角度
//curAngle = 当前单圈角度
5.5 Example - Control a Single Servo
Function Description
Tests angle control for the servo. This example demonstrates three APIs for controlling the angle of the servo. After each angle control command is completed, it calls the current angle query API to get the real-time angle.
- Simple angle control + current angle query
- Angle control with acceleration and deceleration (specified cycle) + current angle query
- Angle control with acceleration and deceleration (specified speed) + current angle query
Source Code
/* 控制单个舵机的角度 */
void FSUSExample_SetServoAngle(void)
{
    // 舵机控制相关的参数
    // 舵机的ID号
    uint8_t servo_id = 0;
    // 舵机的目标角度
    // 舵机角度在-180度到180度之间, 最小单位0.1
    float angle = 0;
    // 时间间隔ms
    // 可以尝试修改设置更小的时间间隔,例如500ms
    uint16_t interval;
    // 目标转速
    float velocity;
    // 加速时间
    uint16_t t_acc;
    // 减速时间
    uint16_t t_dec;
    // 舵机执行功率 mV 默认为0
    uint16_t power = 0;
    // 读取的角度
    float angle_read;

    while (1)
    {
        printf("GOTO: 90.0f\r\n");
        // 控制舵机角度
        angle = 90.0;
        interval = 2000;
        FSUS_SetServoAngle(servo_usart, servo_id, angle, interval, power);
        FSUS_QueryServoAngle(servo_usart, servo_id, &angle_read);
        printf("Cur Angle: %.1f\r\n", angle_read);

        // 等待2s
        SysTick_DelayMs(2000);

        // 控制舵机角度 + 指定时间
        printf("GOTO+Interval: 0.0f\r\n");
        angle = 0.0f;
        interval = 1000;
        t_acc = 100;
        t_dec = 150;
        FSUS_SetServoAngleByInterval(servo_usart, servo_id, angle, interval, t_acc, t_dec, power);
        FSUS_QueryServoAngle(servo_usart, servo_id, &angle_read);
        printf("Cur Angle: %.1f\r\n", angle_read);

        // 等待2s
        SysTick_DelayMs(2000);

        // 控制舵机角度 + 指定转速
        printf("GOTO+Velocity: -9.0f\r\n");
        angle = -90.0f;
        velocity = 200.0f;
        t_acc = 100;
        t_dec = 150;
        FSUS_SetServoAngleByVelocity(servo_usart, servo_id, angle, velocity, t_acc, t_dec, power);
        FSUS_QueryServoAngle(servo_usart, servo_id, &angle_read);
        printf("Cur Angle: %.1f\r\n", angle_read);
    }
}
Output Log
GOTO: 90.0f
Cur Angle: 89.7
GOTO+Interval: 0.0f
Cur Angle: 0.4
GOTO+Velocity: -9.0f
Cur Angle: -89.5
5.6 Example - Check Whether Servo Is Online and Control Multiple Servo
Function Description
Demonstrates how to use the simple angle control command to control multiple servo.
Source Code
void FSUSExample_SetNServoAngle(void)
{
    //// 舵机控制相关的参数
    // 时间间隔ms
    // 可以尝试修改设置更小的时间间隔,例如500ms
    uint16_t interval = 2000;
    // 舵机执行功率 mV 默认为0
    uint16_t power = 0;
    // 是否为多圈模式
    // 0: 单圈模式; 1: 多圈模式;
    uint8_t is_mturn = 0;
    while (1)
    {
        // Control the servo Pan-Tilt angle
        FSUS_SetServoAngle(servo_usart, 0, 90.0, interval, power);
        FSUS_SetServoAngle(servo_usart, 1, 45.0, interval, power);
        // 阻塞式等待, 等待旋转到目标角度
        // 注意要跟设定值相同
        FSUS_Wait(servo_usart, 0, 90.0, is_mturn);
        FSUS_Wait(servo_usart, 1, 45.0, is_mturn);

        // 等待2s
        SysTick_DelayMs(2000);

        // 控制舵机旋转到另外一个角度
        FSUS_SetServoAngle(servo_usart, 0, -90.0, interval, power);
        FSUS_SetServoAngle(servo_usart, 1, -45.0, interval, power);
        // 阻塞式等待, 等待旋转到目标角度
        // 注意要跟设定值相同
        FSUS_Wait(servo_usart, 0, -90.0, is_mturn);
        FSUS_Wait(servo_usart, 1, -45.0, is_mturn);

        // 等待2s
        SysTick_DelayMs(2000);
    }
}
6. Multi-Turn Angle Control
|
Notes:
|
6.1 Simple Multi-Turn Angle Control
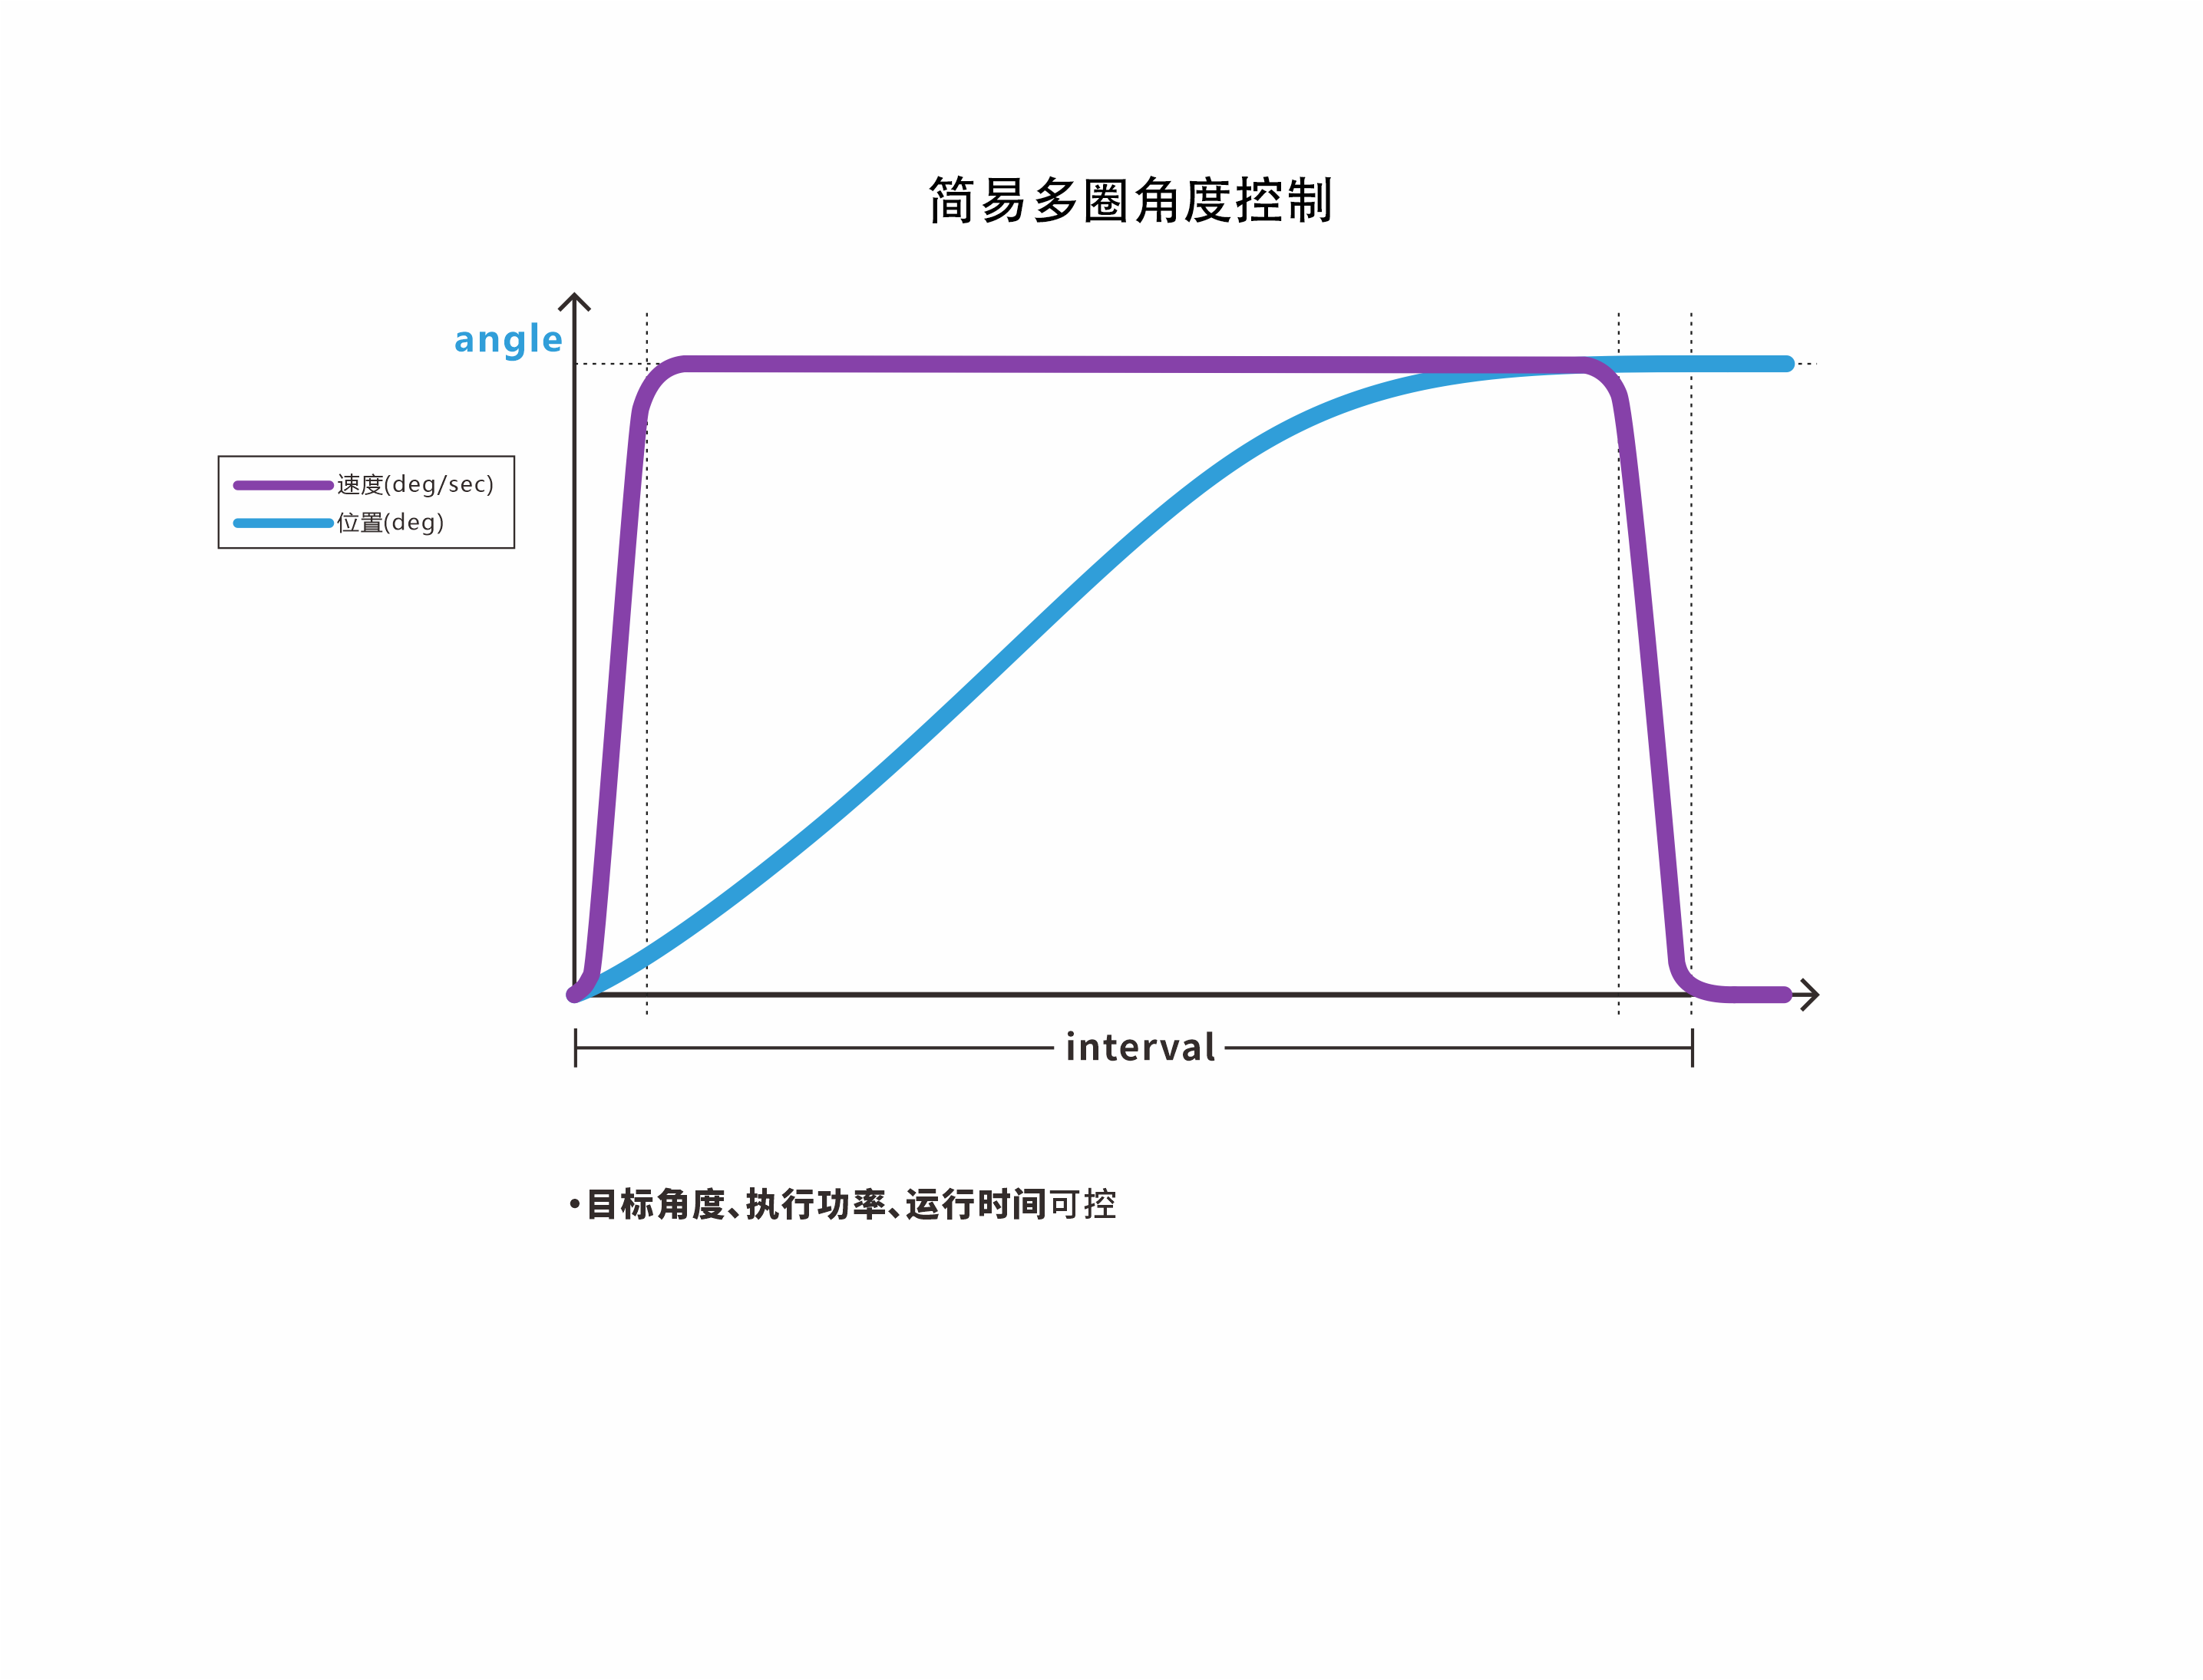
Function Prototype
FSUS_STATUS FSUS_SetServoAngleMTurn(Usart_DataTypeDef *usart, uint8_t servo_id, float angle, uint32_t interval, uint16_t power);
usartSerial Port data objectUsart_DataTypeDefcorresponding to Servo controlservo_idID of the Servoangletarget angle of the Servo, with a minimum unit of 0.1° and a valid range of [-368,640.0°, 368,640.0°]intervalrun time of the Servo, in ms, with a minimum value > 100powerexecution power of the Servo, in mV, default 0
Usage Example
//// 舵机控制相关的参数
// 舵机的ID号
uint8_t servo_id = 0;
// 舵机的目标角度
float angle= 720.0f;
uint32_t interval = 2000;   // 运行时间ms
// 舵机执行功率,单位mV,默认为0
uint16_t power = 0;

FSUS_SetServoAngleMTurn(servo_usart, servo_id, angle, interval, power);
6.2 Multi-Turn Angle Control with Acceleration and Deceleration (Specified Cycle)
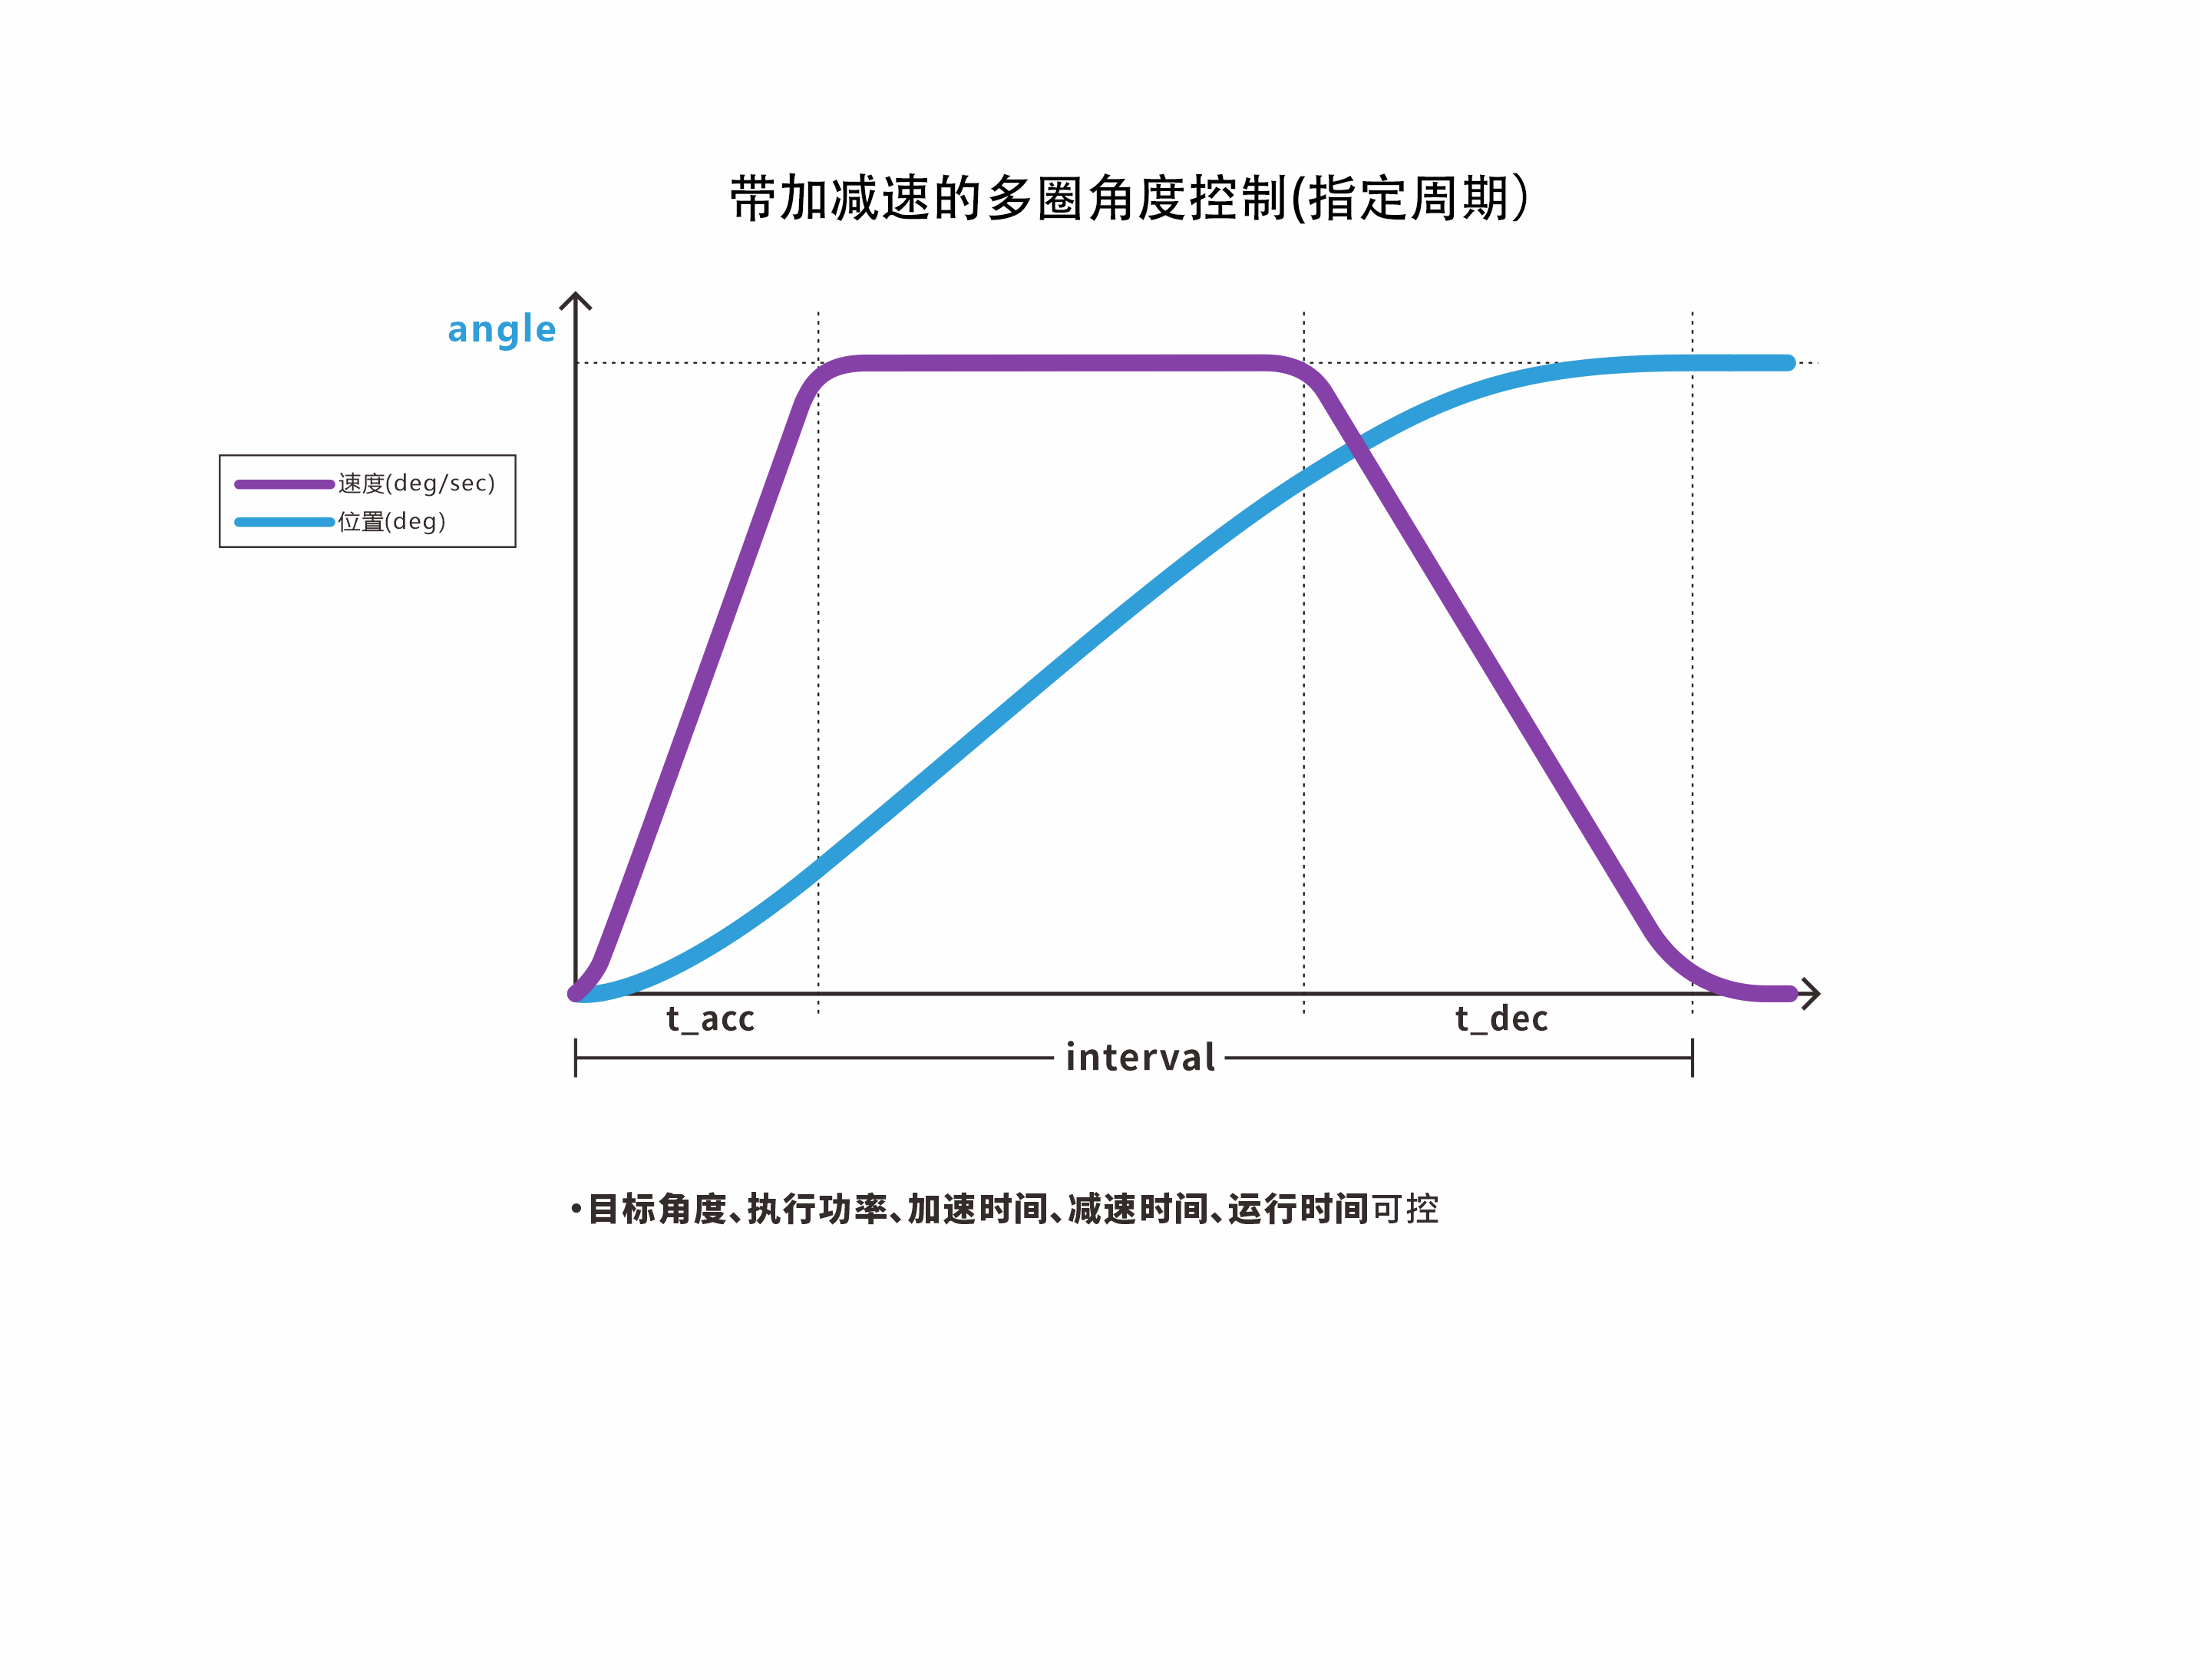
Function Prototype
FSUS_STATUS FSUS_SetServoAngleMTurnByInterval(Usart_DataTypeDef *usart, uint8_t servo_id, float angle, \
            uint32_t interval,  uint16_t t_acc,  uint16_t t_dec, uint16_t power);
usartSerial Port data objectUsart_DataTypeDefcorresponding to Servo controlservo_idID of the Servoangletarget angle of the Servo, with a minimum unit of 0.1° and a valid range of [-368,640.0°, 368,640.0°]intervalrun time of the Servo, in ms. The value must be >t_acc+t_dec, with a minimum value > 100t_acctime for the Servo to accelerate to constant speed, in ms, with a minimum value > 20t_decdeceleration time when the Servo approaches the target angle, in ms, with a minimum value > 20powerexecution power of the Servo, in mV, default 0
Usage Example
//// 舵机控制相关的参数
// 舵机的ID号
uint8_t servo_id = 0;
// 舵机的目标角度
float angle= 720.0f;
uint32_t interval = 2000;   // 运行时间ms
// 舵机执行功率,单位mV,默认为0
uint16_t power = 0;
// 加速时间(单位ms)
uint16_t t_acc = 100;
// 减速时间
uint16_t t_dec = 200;

FSUS_SetServoAngleMTurnByInterval(servo_usart, servo_id, angle, interval, t_acc, t_dec, power);
6.3 Multi-Turn Angle Control with Acceleration and Deceleration (Specified Speed)
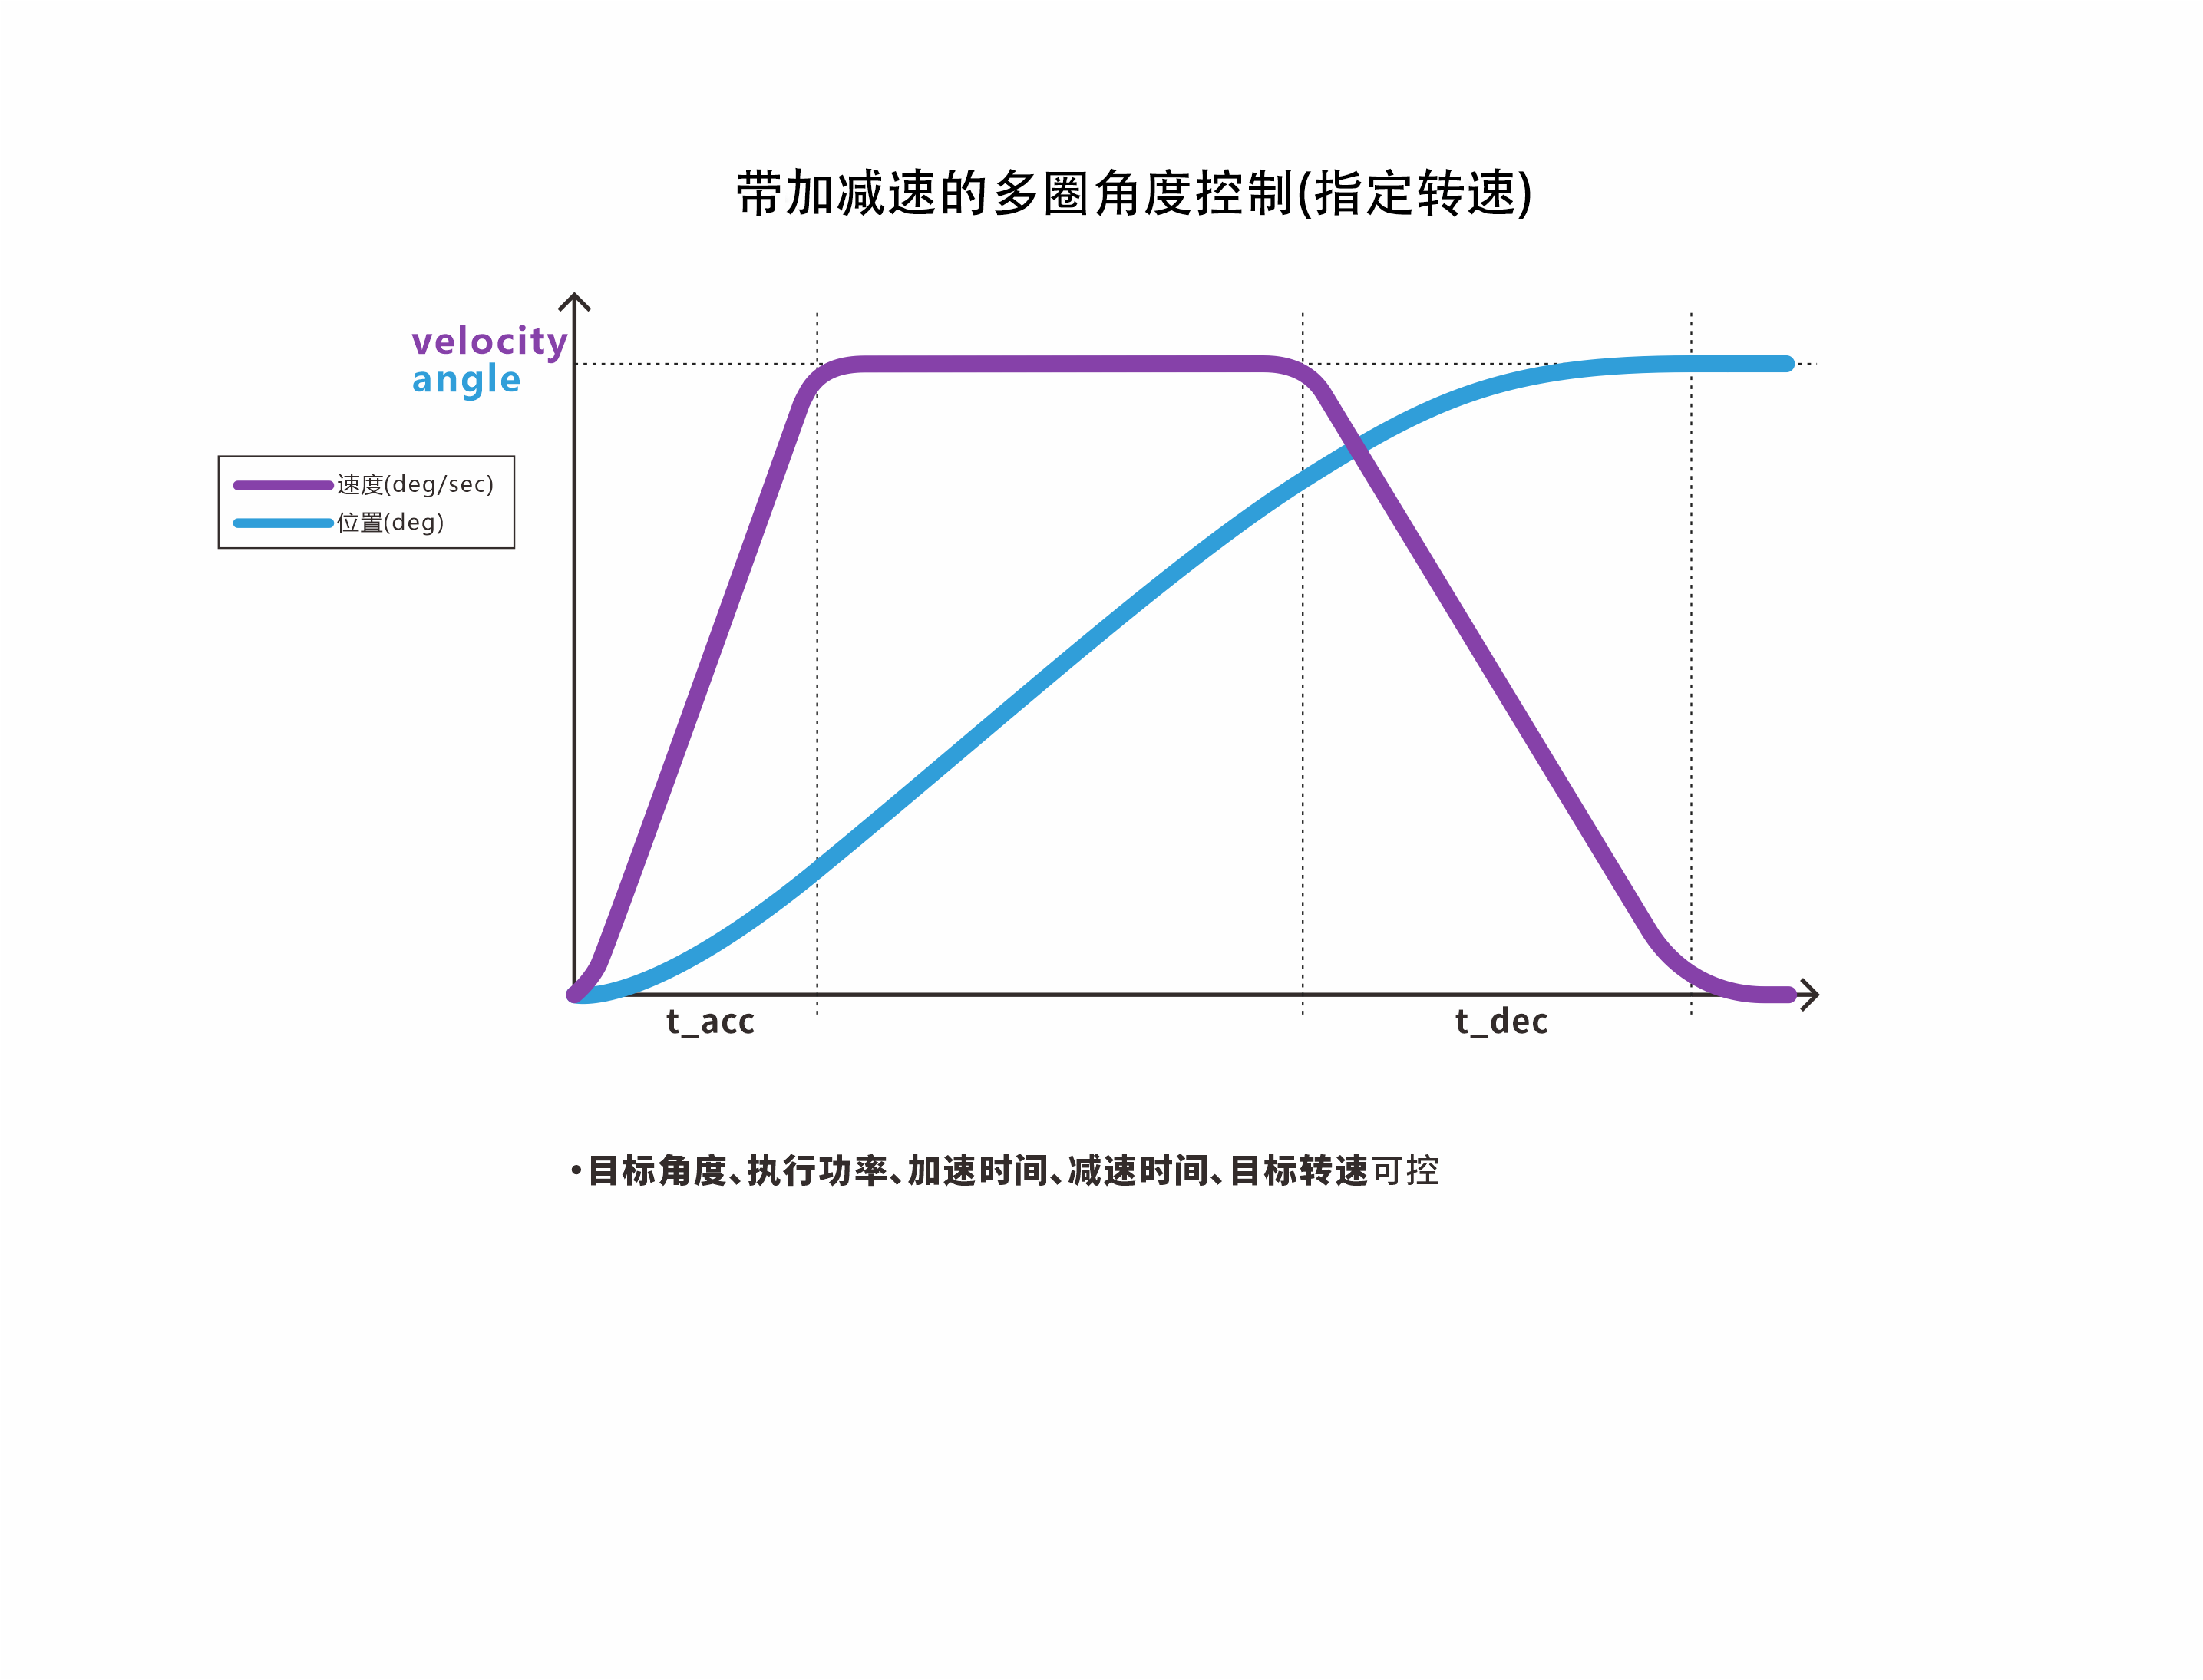
Function Prototype
FSUS_STATUS FSUS_SetServoAngleMTurnByVelocity(Usart_DataTypeDef *usart, uint8_t servo_id, float angle, \
            float velocity, uint16_t t_acc,  uint16_t t_dec, uint16_t power);
usartSerial Port data objectUsart_DataTypeDefcorresponding to Servo controlservo_idID of the Servoangletarget angle of the Servo, with a minimum unit of 0.1° and a valid range of [-368,640.0°, 368,640.0°]velocitytarget speed of the Servo, in °/s, with a valid range of [1, 750]t_acctime for the Servo to accelerate to constant speed, in ms, with a minimum value > 20t_decdeceleration time when the Servo approaches the target angle, in ms, with a minimum value > 20powerexecution power of the Servo, in mV, default 0
Usage Example
//// 舵机控制相关的参数
// 舵机的ID号
uint8_t servo_id = 0;
// 舵机的目标角度
float angle= 720.0f;
float velocity = 100.0f;    // 电机转速, 单位dps,°/s
// 舵机执行功率,单位mV,默认为0
uint16_t power = 0;
// 加速时间(单位ms)
uint16_t t_acc = 100;
// 减速时间
uint16_t t_dec = 200;

FSUS_SetServoAngleMTurnByVelocity(servo_usart, servo_id, angle, velocity, t_acc, t_dec, power);
6.4 Current Multi-Turn Angle Query
Function Prototype
FSUS_STATUS FSUS_QueryServoAngleMTurn(Usart_DataTypeDef *usart, uint8_t servo_id, float *angle);
-
usartSerial Port data objectUsart_DataTypeDefcorresponding to Servo control -
servo_idID of the Servo -
anglepointer used to store the current multi-turn angle of the Servo
Usage Example
uint8_t servoId = 0;    // 舵机的ID号
float curAngle = 0;     // 舵机当前所在的角度
FSUS_QueryServoAngleMTurn(servoUsart, servoId, &curAngle); // 读取一下舵机的角度
//curAngle = 当前单圈角度
6.5 Clear Current Turn Count
Function Prototype
FSUS_STATUS FSUS_ServoAngleReset(Usart_DataTypeDef *usart, uint8_t servo_id);
-
usartSerial Port data objectUsart_DataTypeDefcorresponding to Servo control -
servo_idID of the Servo
Usage Example
uint8_t servoId = 0;    // 舵机的ID号
FSUS_ServoAngleReset(servoUsart, servoId); // 清除当前圈数
6.6 Example - Multi-Turn Angle Control
Function Description
This example demonstrates multi-turn angle control and the API usage for querying the real-time multi-turn angle.
- Simple multi-turn angle control + current multi-turn angle query
- Multi-turn angle control with acceleration and deceleration (specified cycle) + current multi-turn angle query
- Multi-turn angle control with acceleration and deceleration (specified speed) + current multi-turn angle query
Source Code
/* 多圈角度控制 */
void FSUSExample_SetServoAngleMTurn(void)
{
    //// 舵机控制相关的参数
    // 舵机的ID号
    uint8_t servo_id = 0;
    // 舵机的目标角度
    // 舵机角度在-180度到180度之间, 最小单位0.1
    float angle;
    uint32_t interval; // 时间间隔ms
    float velocity;    // 电机转速, 单位dps,°/s
    // 舵机执行功率 mV 默认为0
    uint16_t power = 0;
    // 加速时间(单位ms)
    uint16_t t_acc;
    // 减速时间
    uint16_t t_dec;
    // 读取的角度
    float angle_read;

    while (1)
    {
        printf("MTurn GOTO: 720.0f\r\n");
        // 控制舵机角度(多圈)
        angle = 720.0f;
        interval = 2000;
        FSUS_SetServoAngleMTurn(servo_usart, servo_id, angle, interval, power);
        FSUS_QueryServoAngleMTurn(servo_usart, servo_id, &angle_read);
        printf("Cur Angle: %.1f\r\n", angle_read);

        // 等待2s
        SysTick_DelayMs(2000);

        // 控制舵机旋转到另外一个角度(多圈)
        printf("MTurn GOTO: 0.0f\r\n");
        angle = 0.0;
        FSUS_SetServoAngleMTurn(servo_usart, servo_id, angle, interval, power);
        FSUS_QueryServoAngleMTurn(servo_usart, servo_id, &angle_read);
        printf("Cur Angle: %.1f\r\n", angle_read);

        // 等待2s
        SysTick_DelayMs(2000);

        // 控制舵机角度(多圈+指定周期)
        printf("MTurn+Interval GOTO: -180.0f\r\n");
        angle = 180.0f;
        interval = 1000;
        t_acc = 100;
        t_dec = 200;
        FSUS_SetServoAngleMTurnByInterval(servo_usart, servo_id, angle, interval, t_acc, t_dec, power);
        FSUS_QueryServoAngleMTurn(servo_usart, servo_id, &angle_read);
        printf("Cur Angle: %.1f\r\n", angle_read);

        // 等待2s
        SysTick_DelayMs(2000);

        // 控制舵机角度(多圈+指定转速)
        printf("MTurn+Velocity GOTO: -180.0f\r\n");
        angle = -180.0f;
        velocity = 100.0f;
        t_acc = 100;
        t_dec = 200;
        FSUS_SetServoAngleMTurnByVelocity(servo_usart, servo_id, angle, velocity, t_acc, t_dec, power);
        FSUS_QueryServoAngleMTurn(servo_usart, servo_id, &angle_read);
        printf("Cur Angle: %.1f\r\n", angle_read);

        // 等待2s
        SysTick_DelayMs(2000);
    }
}
Output Log
MTurn GOTO: 720.0f
Cur Angle: 719.7
MTurn GOTO: 0.0f
Cur Angle: 0.4
MTurn+Interval GOTO: -180.0f
Cur Angle: 179.7
MTurn+Velocity GOTO: -180.0f
Cur Angle: -179.5
MTurn GOTO: 720.0f
Cur Angle: 719.5
MTurn GOTO: 0.0f
Cur Angle: 0.4
MTurn+Interval GOTO: -180.0f
Cur Angle: 179.7
MTurn+Velocity GOTO: -180.0f
Cur Angle: -179.5
7. Servo Damping Mode
7.1 Set Damping Mode and Power
Function Prototype
// 舵机阻尼模式
FSUS_STATUS FSUS_DampingMode(Usart_DataTypeDef *usart, uint8_t servoId, uint16_t power);
usartSerial Port data objectUsart_DataTypeDefcorresponding to Servo controlservoIdID of the Servopowerpower of the Servo, in mW
Usage Example
// 连接在转接板上的总线伺服舵机ID号
uint8_t servoId = 0;
// 阻尼模式下的功率,功率越大阻力越大
uint16_t power = 500;
// 设置舵机为阻尼模式
FSUS_DampingMode(servoUsart, servoId, power);
7.2 Example - Damping Mode and Angle Feedback
Function Description
Sets the servo to damping mode and requests the angle of the servo. When the servo is rotated, the angle of the servo is updated at intervals, and the serial port prints servo angle information at intervals.
Source Code
/* 舵机阻尼模式与角度回传 */
void FSUSExample_SetServoDamping(void)
{
    FSUS_STATUS status_code; // 请求包的状态码
    uint8_t servo_id = 0;    // 连接在转接板上的总线伺服舵机ID号
    uint16_t power = 500;    // 阻尼模式下的功率,功率越大阻力越大
    float angle = 0;         // 舵机的角度

    // 设置舵机为阻尼模式
    FSUS_DampingMode(servo_usart, servo_id, power);
    while (1)
    {
        // 读取一下舵机的角度
        status_code = FSUS_QueryServoAngle(servo_usart, servo_id, &angle);

        if (status_code == FSUS_STATUS_SUCCESS)
        {
            // 成功的读取到了舵机的角度
            printf("[INFO] servo id= %d ; angle = %f\r\n", servo_id, angle);
        }
        else
        {
            // 没有正确的读取到舵机的角度
            printf("\r\n[INFO] read servo %d angle, status code: %d \r\n", servo_id, status_code);
            printf("[ERROR]failed to read servo angle\r\n");
        }
        // 等待500ms
        SysTick_DelayMs(500);
    }
}
Log Output
[INFO] servo id= 0 ; angle = 0.000000
[INFO] servo id= 0 ; angle = 0.100000
[INFO] servo id= 0 ; angle = 0.100000
[INFO] servo id= 0 ; angle = 12.000000
[INFO] servo id= 0 ; angle = 42.799999
[INFO] servo id= 0 ; angle = 51.700001
[INFO] servo id= 0 ; angle = 76.099998
[INFO] servo id= 0 ; angle = 107.099998
[INFO] servo id= 0 ; angle = 133.300003
[INFO] servo id= 0 ; angle = 163.100006
8. Servo Synchronous Commands
8.1 Control Servo with Synchronous Commands
Function Prototype
FSUS_STATUS FSUS_SyncCommand(Usart_DataTypeDef *usart, uint8_t servo_count, uint8_t ServoMode, FSUS_sync_servo servoSync[]);
usartSerial Port data objectUsart_DataTypeDefcorresponding to Servo controlservo_countnumber of Servo to synchronize-
servomodesynchronous command mode selection -
servoSync[]Servo control parameter structure
Usage Example
/*同步指令模式选择
* 1:设置舵机的角度
* 2:设置舵机的角度(指定周期)
* 3:设置舵机的角度(指定转速)
* 4:设置舵机的角度(多圈模式)
* 5:设置舵机的角度(多圈模式, 指定周期)
* 6:设置舵机的角度(多圈模式, 指定转速)
* 7:读取舵机的数据*/
uint8_t sync_mode=1;//同步指令模式

uint8_t sync_count=5;//舵机数量

//结构体数组定义在#include "fashion_star_uart_servo.c"
FSUS_sync_servo SyncArray[20]; // 假设您要控制20个伺服同步
ServoData servodata[20];//假设您要读取20个伺服舵机的数据

//如需更改舵机数量在#include "fashion_star_uart_servo.h"对应修改extern
extern FSUS_sync_servo SyncArray[20]; // 假设您要控制20个伺服同步
extern ServoData servodata[20];//假设您要读取20个伺服舵机的数据

servoSyncArray[0].angle=90;/*角度*/
servoSyncArray[0].id=0;/*舵机ID号*/
servoSyncArray[0].velocity=100;/*速度*/                servoSyncArray[0].interval_single=1000;/*单圈时间*/    servoSyncArray[0].interval_multi=1000; /*多圈时间*/     servoSyncArray[0].t_acc=100;/*加速时间*/
servoSyncArray[0].t_dec=100;/*减速时间*/                servoSyncArray[0].power=100;/*功率*/
/*********************************以此类推赋值剩下舵机参数 灵活性高**************************************/

FSUS_SyncCommand(servo_usart, servo_count, servomode, servoSyncArray);
8.2 Example - Synchronous Commands
Function Description
Controls all servo at the same time with high real-time performance.
Source Code
void FSUSExample_SYNC(void)
{
    /*同步指令模式选择
* 1:设置舵机的角度
* 2:设置舵机的角度(指定周期)
* 3:设置舵机的角度(指定转速)
* 4:设置舵机的角度(多圈模式)
* 5:设置舵机的角度(多圈模式, 指定周期)
* 6:设置舵机的角度(多圈模式, 指定转速)
* 7:读取舵机的数据*/
uint8_t sync_mode=1;//同步指令模式

uint8_t sync_count=5;//舵机数量


        SyncArray[0].angle=90;
        SyncArray[0].id=0;SyncArray[0].interval_single=0;SyncArray[0].interval_multi=1000;SyncArray[0].velocity=100;SyncArray[0].t_acc=100;SyncArray[0].t_dec=100;
        SyncArray[1].angle=-90;
        SyncArray[1].id=1;SyncArray[1].interval_single=0;SyncArray[1].interval_multi=1000;SyncArray[1].velocity=100;SyncArray[1].t_acc=100;SyncArray[1].t_dec=100;
        SyncArray[2].angle=90;
        SyncArray[2].id=2;SyncArray[2].interval_single=0;SyncArray[2].interval_multi=1000;SyncArray[2].velocity=100;SyncArray[2].t_acc=100;SyncArray[2].t_dec=100;
        SyncArray[3].angle=-90;
        SyncArray[3].id=3;SyncArray[3].interval_single=0;SyncArray[3].interval_multi=1000;SyncArray[3].velocity=100;SyncArray[3].t_acc=100;SyncArray[3].t_dec=100;
        SyncArray[4].angle=-90;
        SyncArray[4].id=4;SyncArray[4].interval_single=0;SyncArray[4].interval_multi=1000;SyncArray[4].velocity=100;SyncArray[4].t_acc=100;SyncArray[4].t_dec=100;
        //发送同步指令控制
        FSUS_SyncCommand(servo_usart,sync_count,sync_mode,SyncArray);
        SysTick_DelayMs(1000);
        //发送同步指令读取
        FSUS_SyncCommand(servo_usart,sync_count,7,SyncArray);
        SysTick_DelayMs(200);

        SyncArray[0].angle=45;SyncArray[0].interval_single=0;SyncArray[0].velocity=20;
        SyncArray[1].angle=-45;SyncArray[1].interval_single=0;SyncArray[1].velocity=20;
        SyncArray[2].angle=45;SyncArray[2].interval_single=0;SyncArray[2].velocity=20;
        SyncArray[3].angle=-45;SyncArray[3].interval_single=0;SyncArray[3].velocity=20;
        SyncArray[4].angle=-45;SyncArray[4].interval_single=0;SyncArray[4].velocity=20;
        //发送同步指令控制
        FSUS_SyncCommand(servo_usart,sync_count,sync_mode,SyncArray);
        SysTick_DelayMs(1000);
        //发送同步指令读取
        FSUS_SyncCommand(servo_usart,sync_count,7,SyncArray);
        SysTick_DelayMs(200);
}
9. Servo Data Monitoring
9.1 Read Servo Data
Function Prototype
FSUS_STATUS FSUS_ServoMonitor(Usart_DataTypeDef *usart, uint8_t servo_id, ServoData servodata[]);
usartSerial Port data objectUsart_DataTypeDefcorresponding to Servo controlservo_idID of the Servoservodata[]data storage structure for the Servo
Usage Example
//要读取的舵机id号
uint8_t servoId = 0;
//舵机的存储数据结构体
ServoData servodata_single[1];
// 读取舵机数据函数
FSUS_ServoMonitor(servo_usart,servo_id,servodata_single);
9.2 Example - Servo Data Monitoring
Function Description
Reads all parameters of the servo.
Source Code
void FSUSExample_MONTIOR(void)
{
    /*数据监控的数据
* id:舵机的id号
* voltage:舵机的电压
* current:舵机的电流
* power:舵机的执行功率
* temperature:舵机的温度
* status:舵机的状态
* angle:舵机的角度
* circle_count:舵机的转动圈数*/
ServoData servodata_single[1];//读取一个舵机的数据

//要读取的舵机id号
uint8_t servo_id=0;

            FSUS_DampingMode(servo_usart,servo_id,500);
            FSUS_ServoMonitor(servo_usart,servo_id,servodata_single);
            printf("read ID: %d\r\n", servodata_single[0].id);
            printf("read sucess, voltage: %d mV\r\n", servodata_single[0].voltage);
            printf("read sucess, current: %d mA\r\n", servodata_single[0].current);
            printf("read sucess, power: %d mW\r\n", servodata_single[0].power);
            printf("read sucess, temperature: %d \r\n", servodata_single[0].temperature);
            if ((servodata_single[0].status >> 3) & 0x01)
            printf("read sucess, voltage too high\r\n");
            if ((servodata_single[0].status >> 4) & 0x01)
            printf("read sucess, voltage too low\r\n");
            printf("read sucess, angle: %f\r\n", servodata_single[0].angle);
            printf("read sucess, circle_count: %d\r\n", servodata_single[0].circle_count);
            SysTick_DelayMs(1000);

}
10. Servo Status Reading
10.1 Read Parameters
Function Prototype
// 读取数据
FSUS_STATUS FSUS_ReadData(Usart_DataTypeDef *usart, uint8_t servoId,  uint8_t address, uint8_t *value, uint8_t *size);
usartSerial Port data objectUsart_DataTypeDefcorresponding to Servo controlservoIdID of the Servoaddressread-only parameter or custom parameter addressvaluepointer used to store the read datasizepointer used to store the length of the read data
Usage Example
uint8_t servoId = 0;        // 连接在转接板上的总线伺服舵机ID号
uint8_t value;
uint8_t dataSize;

statusCode = FSUS_ReadData(servoUsart, servoId, FSUS_PARAM_SERVO_STATUS, (uint8_t *)&value, &dataSize);

if (statusCode == FSUS_STATUS_SUCCESS)
{
    // 舵机工作状态标志位
    // BIT[0] - 执行指令置1,执行完成后清零。
    // BIT[1] - 执行指令错误置1,在下次正确执行后清零。
    // BIT[2] - 堵转错误置1,解除堵转后清零。
    // BIT[3] - 电压过高置1,电压恢复正常后清零。
    // BIT[4] - 电压过低置1,电压恢复正常后清零。
    // BIT[5] - 电流错误置1,电流恢复正常后清零。
    // BIT[6] - 功率错误置1,功率恢复正常后清零。
    // BIT[7] - 温度错误置1,温度恢复正常后清零。

    if ((value >> 3) & 0x01)
        printf("read sucess, voltage too high\r\n");
    if ((value >> 4) & 0x01)
        printf("read sucess, voltage too low\r\n");
}
10.2 Write Custom Parameters
|
We recommend using PC configuration software to write custom parameters. |
Function Prototype
// 写入数据
FSUS_STATUS FSUS_WriteData(Usart_DataTypeDef *usart, uint8_t servoId, uint8_t address, uint8_t *value, uint8_t size);
usartSerial Port data objectUsart_DataTypeDefcorresponding to Servo controlservoIdID of the Servoaddresscustom parameter addressvaluepointer to the data to writesizelength of the data to write
Usage Example
uint8_t servoId = 0;        // 连接在转接板上的总线伺服舵机ID号
float angleLimitLow = -90.0;    // 舵机角度下限设定值
value = (int16_t)(angleLimitLow*10); // 舵机角度下限 转换单位为0.1度
statusCode = FSUS_WriteData(servoUsart, servoId, FSUS_PARAM_ANGLE_LIMIT_LOW, (uint8_t *)&value, 2);
10.3 Reset Servo Custom Parameters
Function Prototype
FSUS_STATUS FSUS_ResetUserData(Usart_DataTypeDef *usart, uint8_t servoId);
usartSerial Port data objectUsart_DataTypeDefcorresponding to Servo controlservoIdID of the Servo
Usage Example
uint8_t servoId = 0;        // 连接在转接板上的总线伺服舵机ID号
FSUS_ResetUserData(servoUsart, servoId);
10.4 Example - Read Servo Parameters (Temperature, Power, Operating Status)
Function Description
Reads the real-time status of the servo and provides an example for detecting abnormal operating status.
- Voltage
- Current
- Power
- Temperature
- Operating status flag bits
    // 舵机工作状态标志位
    // BIT[0] - 执行指令置1,执行完成后清零。
    // BIT[1] - 执行指令错误置1,在下次正确执行后清零。
    // BIT[2] - 堵转保护置1,解除堵转后清零。
    // BIT[3] - 电压过高置1,电压恢复正常后清零。
    // BIT[4] - 电压过低置1,电压恢复正常后清零。
    // BIT[5] - 电流保护置1,电流恢复正常后清零。
    // BIT[6] - 功率保护置1,功率恢复正常后清零。
    // BIT[7] - 温度保护置1,温度恢复正常后清零。
Source Code
/*读取舵机状态*/
void FSUSExample_ReadData(void)
{
    uint8_t servo_id = 0;   // 连接在转接板上的总线伺服舵机ID号
    FSUS_STATUS statusCode; // 状态码

    // 数据表里面的数据字节长度一般为1个字节/2个字节/4个字节
    // 查阅通信协议可知,舵机角度上限的数据类型是有符号短整型(UShort, 对应STM32里面的int16_t),长度为2个字节
    // 所以这里设置value的数据类型为int16_t
    int16_t value;
    uint8_t dataSize;
    // 传参数的时候, 要将value的指针强行转换为uint8_t

    // 读取电压
    statusCode = FSUS_ReadData(servo_usart, servo_id, FSUS_PARAM_VOLTAGE, (uint8_t *)&value, &dataSize);

    printf("read ID: %d\r\n", servo_id);

    if (statusCode == FSUS_STATUS_SUCCESS)
    {
        printf("read sucess, voltage: %d mV\r\n", value);
    }
    else
    {
        printf("fail\r\n");
    }

    // 读取电流
    statusCode = FSUS_ReadData(servo_usart, servo_id, FSUS_PARAM_CURRENT, (uint8_t *)&value, &dataSize);
    if (statusCode == FSUS_STATUS_SUCCESS)
    {
        printf("read sucess, current: %d mA\r\n", value);
    }
    else
    {
        printf("fail\r\n");
    }

    // 读取功率
    statusCode = FSUS_ReadData(servo_usart, servo_id, FSUS_PARAM_POWER, (uint8_t *)&value, &dataSize);
    if (statusCode == FSUS_STATUS_SUCCESS)
    {
        printf("read sucess, power: %d mW\r\n", value);
    }
    else
    {
        printf("fail\r\n");
    }
    // 读取温度
    statusCode = FSUS_ReadData(servo_usart, servo_id, FSUS_PARAM_TEMPRATURE, (uint8_t *)&value, &dataSize);
    if (statusCode == FSUS_STATUS_SUCCESS)
    {
        double temperature, temp;
        temp = (double)value;
        temperature = 1 / (log(temp / (4096.0f - temp)) / 3435.0f + 1 / (273.15 + 25)) - 273.15;
        printf("read sucess, temperature: %f\r\n", temperature);
    }
    else
    {
        printf("fail\r\n");
    }
    // 读取工作状态
    statusCode = FSUS_ReadData(servo_usart, servo_id, FSUS_PARAM_SERVO_STATUS, (uint8_t *)&value, &dataSize);
    if (statusCode == FSUS_STATUS_SUCCESS)
    {
        // 舵机工作状态标志位
        // BIT[0] - 执行指令置1,执行完成后清零。
        // BIT[1] - 执行指令错误置1,在下次正确执行后清零。
        // BIT[2] - 堵转保护置1,解除堵转后清零。
        // BIT[3] - 电压过高置1,电压恢复正常后清零。
        // BIT[4] - 电压过低置1,电压恢复正常后清零。
        // BIT[5] - 电流保护置1,电流恢复正常后清零。
        // BIT[6] - 功率保护置1,功率恢复正常后清零。
        // BIT[7] - 温度保护置1,温度恢复正常后清零。

        if ((value >> 3) & 0x01)
            printf("read sucess, voltage too high\r\n");
        if ((value >> 4) & 0x01)
            printf("read sucess, voltage too low\r\n");
    }
    else
    {
        printf("fail\r\n");
    }
    printf("================================= \r\n");

    // 死循环
    while (1)
    {
    }
}
Output Log
read ID: 0                                      //舵机id
read success, voltage: 8905 mv                 //当前电压
read success, current: 0 ma                    //当前电流
read success, power: 0 mw                      //当前功率
read success, temperature: 32.240993           //当前温度
read success, voltage too high                 //如果当前电压超过舵机参数设置的舵机高压保护值,可以读到标志位
=================================
11. Stop Command
|
Notes:
|
Function Prototype
FSUS_STATUS FSUS_StopOnControlMode(Usart_DataTypeDef *usart, uint8_t servo_id, uint8_t mode, uint16_t power);
usartSerial Port data objectUsart_DataTypeDefcorresponding to Servo controlservo_idID of the Servomodestop command number for the Servopowerpower of the Servo, in mW
Usage Example
/* 停止指令*/
//mode 指令停止形式
//0-停止后卸力(失锁)
//1-停止后保持锁力
//2-停止后进入阻尼状态
uint8_t stopcolmode=0;
uint8_t servo_id = 0;   // 连接在转接板上的总线伺服舵机ID号
uint16_t power = 500;  //功率
FSUS_StopOnControlMode(servoUsart, servo_id, stopcolmode, power);
11.1 Example - Stop Command
Function Description
Enters damping state after the command is executed.
Source Code
/* 控制模式停止状态 */
void FSUSExample_StopOnControlMode(void)
{
//0-停止后卸力(失锁)
//1-停止后保持锁力
//2-停止后进入阻尼状态
uint8_t stopcolmode=2;

float   angle = 135.0;// 舵机的目标角度
uint16_t interval = 1000;// 时间间隔ms
uint16_t    power = 500;// 舵机执行功率
uint8_t servo_id=0;// 舵机的ID号

  FSUS_SetServoAngle(servo_usart, servo_id, angle, interval, power);
    SysTick_DelayMs(1000);

    //停止后进入对应状态
    FSUS_StopOnControlMode(servo_usart, servo_id, stopcolmode, power);
    SysTick_DelayMs(1000);
}
12. Origin Setting
|
Notes:
|
Function Prototype
FSUS_STATUS FSUS_SetOriginPoint(Usart_DataTypeDef *usart, uint8_t servo_id);
-
usartSerial Port data objectUsart_DataTypeDefcorresponding to Servo control -
servo_idID of the Servo
Usage Example
uint8_t servoId = 0;    // 舵机的ID号
FSUS_SetOriginPoint(servoUsart, servoId); // 设置当前舵机角度为原点
13. Asynchronous Commands
13.1 Asynchronous Write Command
Function Prototype
FSUS_STATUS FSUS_BeginAsync(Usart_DataTypeDef *usart);
usartSerial Port data objectUsart_DataTypeDefcorresponding to Servo control
Usage Example
FSUS_BeginAsync(servo_usart);
13.2 Asynchronous Execute Command
Function Prototype
FSUS_STATUS FSUS_EndAsync(Usart_DataTypeDef *usart,uint8_t mode);
usartSerial Port data objectUsart_DataTypeDefcorresponding to Servo controlmodeasynchronous execution mode of the Servo
Usage Example
uint8_t async_mode=0; //0:执行存储的命令  1:取消存储的命令
FSUS_EndAsync(servo_usart,async_mode);
13.3 Example - Asynchronous Commands
Function Description
Stores one command.
Source Code
void FSUSExample_BEGIN_ENDASYNC(void)
{
    // 舵机的ID号
    uint8_t servo_id = 0;
    // 舵机的目标角度
    // 舵机角度在-180度到180度之间, 最小单位0.1
    float angle;
    uint32_t interval; // 时间间隔ms
    uint16_t power = 0;// 舵机执行功率 mV 默认为0
    float angle_read;// 读取的角度
    uint8_t async_mode=0; //0:执行存储的命令  1:取消存储的命令


        //异步写入
        FSUS_BeginAsync(servo_usart);

        printf("GOTO: 135.0f\r\n");
    // 简易角度控制 + 当前角度查询
    angle = 0.0;
    interval = 2000;
    FSUS_SetServoAngle(servo_usart, servo_id, angle, interval, power);
    FSUS_QueryServoAngle(servo_usart, servo_id, &angle_read);
    printf("Cur Angle: %.1f\r\n", angle_read);

        printf("*******************\n");

    //发送上面的命令是不会动的,只是存储了命令
    //等待5秒
        SysTick_DelayMs(5000);

        //异步执行
        FSUS_EndAsync(servo_usart,async_mode);
}
Appendix Table 1 - Read-Only Parameter Table
| address | Parameter Name (en) |
Parameter Name (cn) |
Byte Type |
Byte Length |
Description | Unit |
|---|---|---|---|---|---|---|
| 1 | voltage | servo Voltage | uint16_t | 2 | mV | |
| 2 | current | servo Current | uint16_t | 2 | mA | |
| 3 | power | servo Power | uint16_t | 2 | mW | |
| 4 | temprature | servo Temperature | uint16_t | 2 | ADC | |
| 5 | servo_status | servo Operating Status | uint8_t | 1 | BIT[0] - set to 1 while a command is executing, cleared after execution is complete. BIT[1] - set to 1 when command execution fails, cleared after the next correct execution. BIT[2] - set to 1 for stall protection, cleared after the stall is resolved. BIT[3] - set to 1 for overvoltage, cleared after voltage returns to normal. BIT[4] - set to 1 for undervoltage, cleared after voltage returns to normal. BIT[5] - set to 1 for current protection, cleared after current returns to normal. BIT[6] - set to 1 for power protection, cleared after power returns to normal. BIT[7] - set to 1 for temperature protection, cleared after temperature returns to normal. |
|
| 6 | servo_type | servo Model | uint16_t | 2 | ||
| 7 | firmware_version | servo Firmware Version | uint16_t | 2 | ||
| 8 | serial_number | servo Serial Number | uint32_t | 4 | The servo serial number (serial_number) is not the servo ID. It is the unique identifier of the servo. |
Appendix Table 2 - Custom Parameter Table
| address | Parameter Name (en) |
Parameter Name (cn) |
Byte Type |
Byte Length |
Description | Unit |
|---|---|---|---|---|---|---|
| 33 | response_switch | Response Switch | uint8_t | 1 | 0 - servo control command execution can be interrupted; new commands overwrite old commands, with no feedback data 1 - servo control command execution cannot be interrupted; feedback data is sent after command execution completes |
|
| 34 | servo_id | servo ID | uint8_t | 1 | The initial default ID of the servo is 0. Modify this value to change the ID of the servo | |
| 36 | baudrate | Baud Rate Option | uint8_t | 1 | 1 - 9600 2 - 19200 3 - 38400 4 - 57600 5 - 115200 6 - 250000 7 - 500000 8 - 1000000 |
|
| 37 | stall_protect_mode | servo Stall Protection Mode | uint8_t | 1 | 0 - reduce servo power to the power limit 1 - release servo torque (servo torque release) |
|
| 38 | stall_power_limit | servo Stall Power Limit | uint16_t | 2 | mW | |
| 39 | over_volt_low | servo Voltage Lower Limit | uint16_t | 2 | mV | |
| 40 | over_volt_high | servo Voltage Upper Limit | uint16_t | 2 | mV | |
| 41 | over_temprature | Temperature Upper Limit | uint16_t | 2 | See Appendix Table 3 | ADC |
| 42 | over_power | Power Upper Limit | uint16_t | 2 | mW | |
| 43 | over_current | Current Upper Limit | uint16_t | 2 | mA | |
| 44 | accel_switch | Acceleration | uint8_t | 1 | servo currently must enable acceleration processing, so only the 0x01 option can be set. | |
| 46 | po_lock_switch | servo Power-On Torque Switch | uint8_t | 1 | 0 - servo releases torque after power-on 1 - servo holds torque after power-on |
|
| 47 | wb_lock_switch | Wheel-Mode Brake Torque Switch | uint8_t | 1 | 0 - release servo torque when stopped 1 - hold servo torque when stopped |
|
| 48 | angle_limit_switch | Angle Limit Switch | uint8_t | 1 | 0 - disable angle limit 1 - enable angle limit |
|
| 49 | soft_start_switch | First Slow Execution After Power-On | uint8_t | 1 | 0 - disable first slow execution after power-on 1 - enable first slow execution after power-on |
|
| 50 | soft_start_time | First Execution Time After Power-On | uint16_t | 2 | ms | |
| 51 | angle_limit_high | servo Angle Upper Limit | int16_t | 2 | 0.1° | |
| 52 | angle_limit_low | servo Angle Lower Limit | int16_t | 2 | 0.1° | |
| 53 | angle_mid_offset | servo Midpoint Angle Offset | int16_t | 2 | 0.1° |
Appendix Table 3 - Temperature ADC Value Conversion Table
Temperature is returned as an ADC value and must be converted.
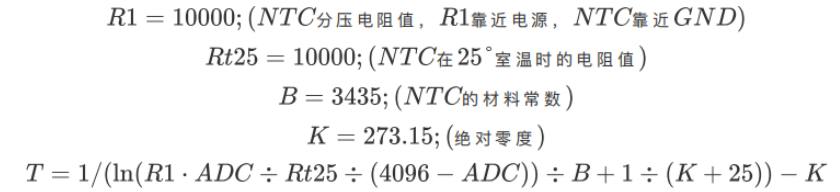
The following is the temperature/ADC reference table for 50-79°C.
| Temperature (°C) | ADC | Temperature (°C) | ADC | Temperature (°C) | ADC |
|---|---|---|---|---|---|
| 50 | 1191 | 60 | 941 | 70 | 741 |
| 51 | 1164 | 61 | 918 | 71 | 723 |
| 52 | 1137 | 62 | 897 | 72 | 706 |
| 53 | 1110 | 63 | 876 | 73 | 689 |
| 54 | 1085 | 64 | 855 | 74 | 673 |
| 55 | 1059 | 65 | 835 | 75 | 657 |
| 56 | 1034 | 66 | 815 | 76 | 642 |
| 57 | 1010 | 67 | 796 | 77 | 627 |
| 58 | 986 | 68 | 777 | 78 | 612 |
| 59 | 963 | 69 | 759 | 79 | 598 |