Bus Servo SDK User Manual (MicroPython / ESP32)
| 版本 | GitHub | 开发资源包 |
|---|---|---|
| v1.2026.0214 |  |
点击下载 |
1. Hardware Preparation
1.1 ESP32 Serial Port Resources
ESP32 has three sets of UART resources:
| Function | GPIO |
|---|---|
| UART0 Tx | GPIO 1 |
| UART0 Rx | GPIO 3 |
| UART1 Tx | GPIO 10 |
| UART1 Rx | GPIO 9 |
| UART2 Tx | GPIO 17 |
| UART2 Rx | GPIO 16 |
We use UART2 on the ESP32 as the control serial port for the servo.
1.2 Wiring Between ESP32 and the Servo Adapter Board
| ESP32 | Servo Adapter Board (UC01/UC02) | Notes |
|---|---|---|
| GPIO 16 (UART2 Rx) | Tx | |
| GPIO 17 (UART2 Tx) | Rx | |
| VIN / 5V | 5V | Optional |
| GND | GND |
Adapter board references: https://item.taobao.com/item.htm?spm=a230r.1.14.30.426d3a099evcwf&id=608949258481&ns=1&abbucket=6#detail, https://item.taobao.com/item.htm?spm=a230r.1.14.36.426d3a099evcwf&id=647103774901&ns=1&abbucket=6#detail
Notes
- The servo adapter board requires an external power supply during use.
- During development, if the ESP32 is connected to the computer, the 5V wire can be left disconnected.
1.3 NodeMCU32s
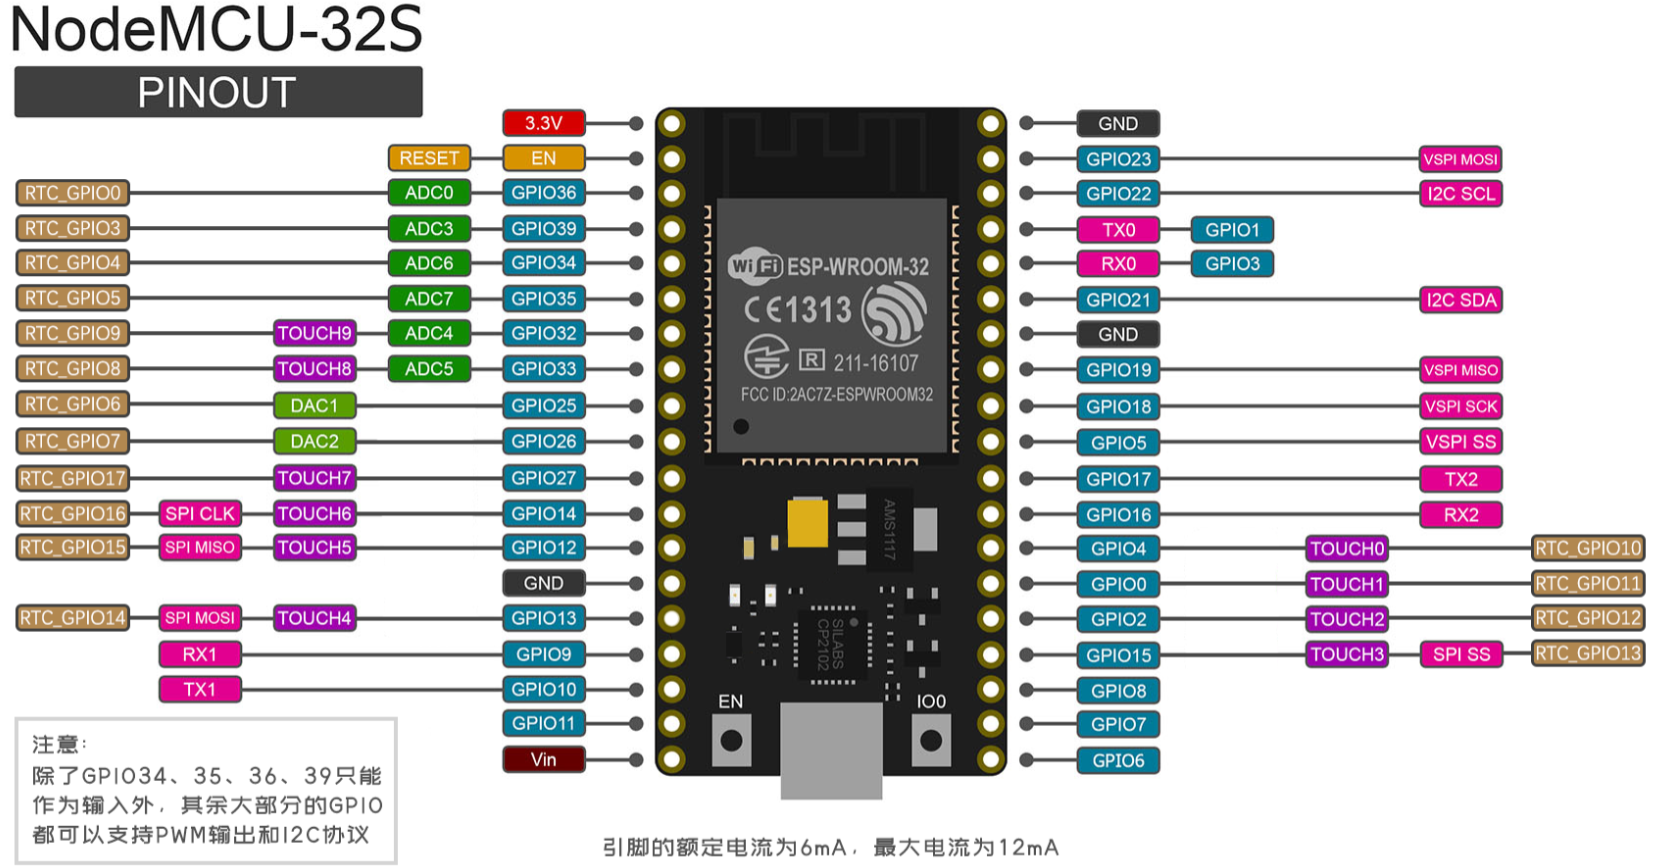
| Function | GPIO | Board Label |
|---|---|---|
| UART0 Tx | GPIO 1 | TX |
| UART0 Rx | GPIO 3 | RX |
| UART1 Tx | GPIO 10 | D3 |
| UART1 Rx | GPIO 9 | D2 |
| UART2 Tx | GPIO 17 | 17 |
| UART2 Rx | GPIO 16 | 16 |
Detailed NodeMCU32s hardware resource introduction: NodeMCU-32S Pinout Manual
2. Development Environment Configuration
For the process of flashing MicroPython firmware to ESP32 on Windows 10 and developing MicroPython with Thonny IDE, refer to the following article:
MicroPython ESP32 Development Environment Configuration (Win10 + Thonny IDE) (https://blog.csdn.net/Little_Carter/article/details/128597071)
Download and flash the following firmware version:
- v1.27.0 (2025-12-09) .bin (https://micropython.org/resources/firmware/ESP32_GENERIC-20251209-v1.27.0.bin)
- For the older version consistent with the original version of this document: v1.16 (2021-06-23) .bin (https://micropython.org/resources/firmware/ESP32_GENERIC-20210623-v1.16.bin)
- Firmware download page: MicroPython ESP32_GENERIC Download Page (https://micropython.org/download/ESP32_GENERIC/)
Note: Thonny IDE is not required. You can use another IDE for development and script file upload.
3. Install the Bus Servo Library
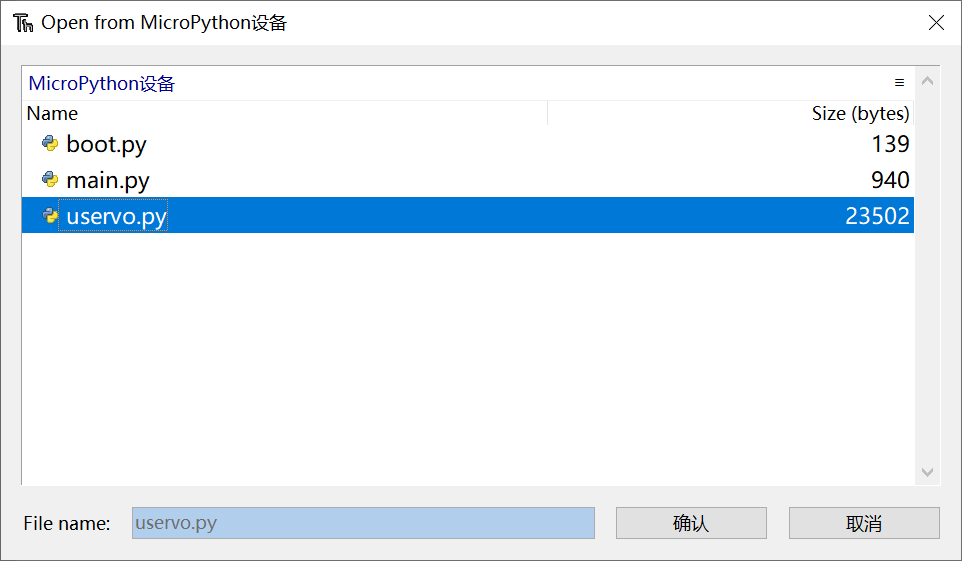
There is a uservo.py in the src/ folder. Upload it to the root directory of the ESP32 MicroPython file system.
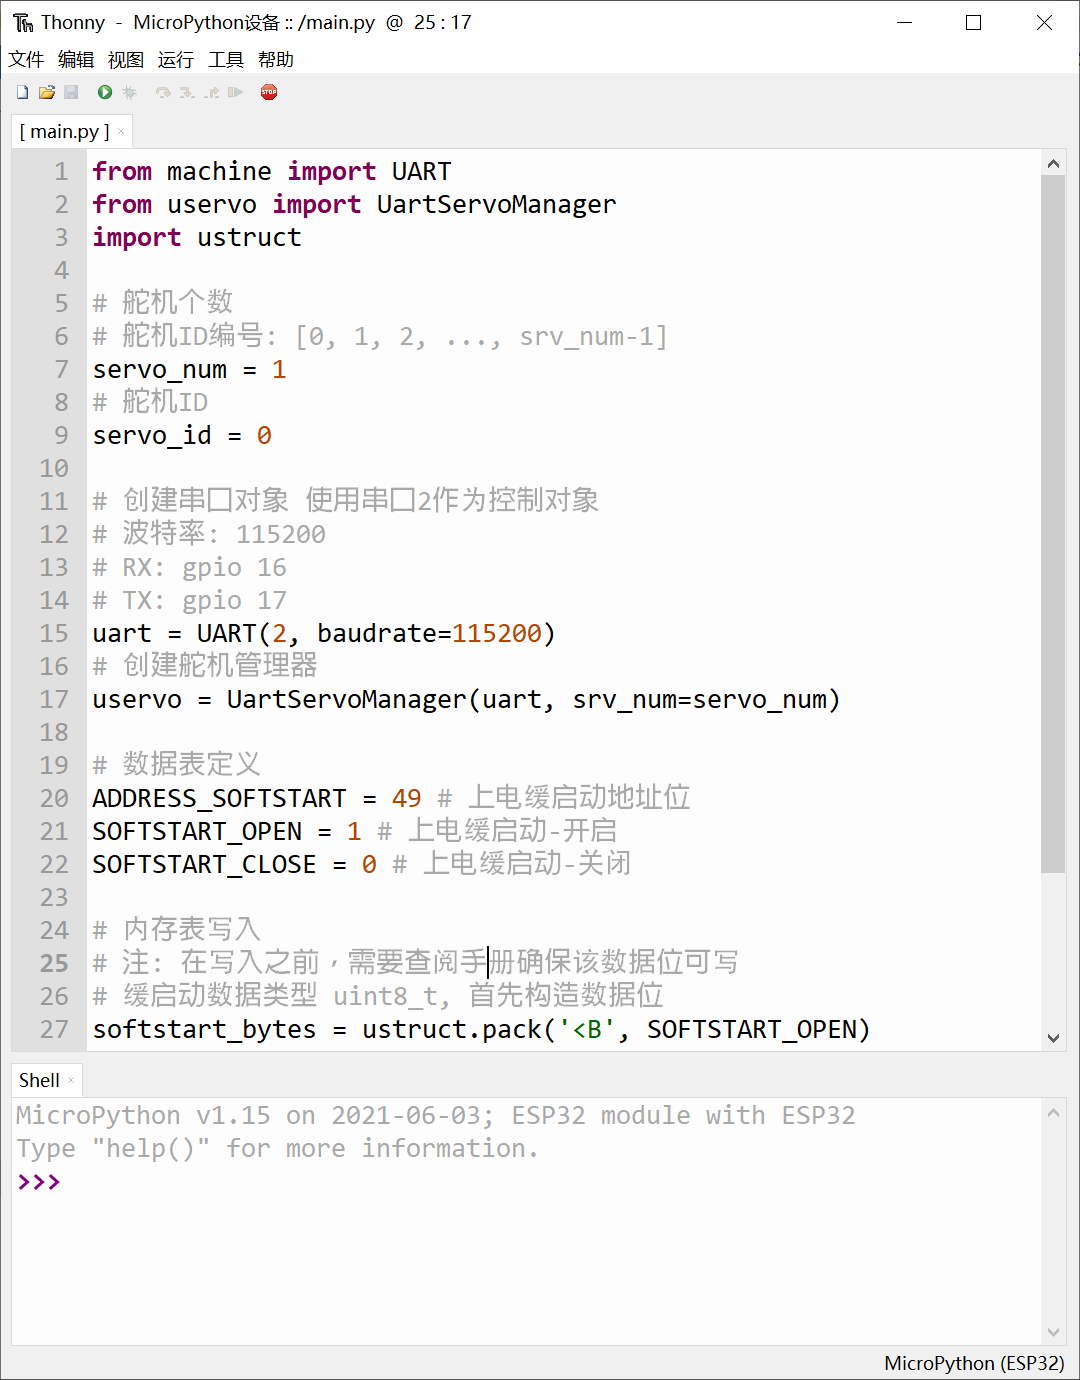
Running example code is also simple. Copy the .py file in the example/ folder into the Thonny IDE code editor, then save it as main.py in the ESP32 file system.
4. Create a Bus Servo Manager
In normal use, import the following two dependencies:
# 串口总线通信
from machine import UART
# UartServoManager 是总线伺服舵机管理器
from uservo import UartServoManager
Configure parameters:
# 舵机个数
# 注:舵机ID编号 假定是依次递增的
# 例: [0, 1, 2, ..., srv_num-1]
servo_num = 1
# 要测试的舵机ID
servo_id = 0
Then create a serial port object and specify the related parameters:
# 创建串口对象 使用串口2作为控制对象
# 波特率: 115200
# RX: gpio 16
# TX: gpio 17
uart = UART(2, baudrate=115200)
Create a servo manager and pass the serial port object into the constructor UartServoManager:
# 创建舵机管理器
uservo = UartServoManager(uart, srv_num=servo_num)
5. Servo Communication Check
5.1 API - ping
Call the ping() function of servo to perform servo communication detection and determine whether the servo is online.
Function Prototype
def ping(self, servo_id:int):
Input Parameters
servo_id: Servo ID
Output Parameters
is_online: whether the Servo is online
5.2 Example Source Code
example/ping.py
'''
FashionStar Uart舵机
> MicroPython SDK舵机通讯检测 Example <
--------------------------------------------------
 * 作者: 深圳市华馨京科技有限公司
 * 网站:https://fashionstar.com.hk/
 * 更新时间: 2023/03/13
--------------------------------------------------
'''
from machine import UART
from uservo import UartServoManager

# 舵机个数
# 注:舵机ID编号 假定是依次递增的
# 例: [0, 1, 2, ..., srv_num-1]
servo_num = 1
# 要测试的舵机ID
servo_id = 0

# 创建串口对象 使用串口2作为控制对象
# 波特率: 115200
# RX: gpio 16
# TX: gpio 17
uart = UART(2, baudrate=115200)
# 创建舵机管理器
uservo = UartServoManager(uart, srv_num=servo_num)

# 舵机通讯检测
is_online = uservo.ping(servo_id)
print("舵机ID={} 是否在线: {}".format(servo_id, is_online))
6. Servo Damping Mode
6.1 API - set_damping
Set the servo to damping mode.
Function Prototype
def set_damping(self, servo_id, power=0):
Input Parameters
servo_id: Servo IDpower: Servo power, in mW
Output Parameters
- None
6.2 Example Source Code
'''
FashionStar Uart舵机
> MicroPython SDK 舵机阻尼模式 <
--------------------------------------------------
 * 作者: 深圳市华馨京科技有限公司
 * 网站:https://fashionstar.com.hk/
 * 更新时间: 2023/03/13
--------------------------------------------------
'''
from machine import UART
from uservo import UartServoManager

# 舵机个数
# 注:舵机ID编号 假定是依次递增的
# 例: [0, 1, 2, ..., srv_num-1]
servo_num = 1
# 要测试的舵机ID
servo_id = 0

# 创建串口对象 使用串口2作为控制对象
# 波特率: 115200
# RX: gpio 16
# TX: gpio 17
uart = UART(2, baudrate=115200)
# 创建舵机管理器
uservo = UartServoManager(uart, srv_num=servo_num)

# 测试舵机为阻尼模式
power = 1000 # 阻尼模式下的功率, 单位mW
uservo.set_damping(servo_id, power)
7. Servo Angle Readback
7.1 API - query_servo_angle
Function Prototype
def query_servo_angle(self, servo_id):
Input Parameters
servo_id: Servo ID
Output Parameters
angle: Servo angle (single-turn / multi-turn)
Notes
Whether the returned angle is in multi-turn mode or single-turn mode depends on whether the last angle command used to control the servo was single-turn or multi-turn. The default is single-turn.
To manually specify multi-turn or single-turn query, set the boolean value uservo.servos[servo_id].is_mturn before querying.
is_mturn=True: return the multi-turn angleis_mturn=False: return the single-turn angle
7.2 Example Source Code
Set the servo to damping mode. Rotate the servo and print the current angle every 1s.
example/query_servo_angle.py
'''
FashionStar Uart舵机
> MicroPython SDK舵机角度查询 Example <
--------------------------------------------------
 * 作者: 深圳市华馨京科技有限公司
 * 网站:https://fashionstar.com.hk/
 * 更新时间: 2023/03/13
--------------------------------------------------
'''
from machine import UART
from uservo import UartServoManager
import time

# 舵机个数
# 注:舵机ID编号 假定是依次递增的
# 例: [0, 1, 2, ..., srv_num-1]
servo_num = 1
# 要测试的舵机ID
servo_id = 0

# 创建串口对象 使用串口2作为控制对象
# 波特率: 115200
# RX: gpio 16
# TX: gpio 17
uart = UART(2, baudrate=115200)
# 创建舵机管理器
uservo = UartServoManager(uart, srv_num=servo_num)

# 设置舵机为阻尼模式
uservo.set_damping(servo_id, 500)

# 舵机角度查询
while True:
    angle = uservo.query_servo_angle(servo_id)
    print("当前舵机角度: {:4.1f} °".format(angle), end='\r')
    time.sleep(1)
8. Servo Angle Control
8.1 API - set_servo_angle
Set the servo angle. This API includes six servo angle control modes and calls different commands through different parameters. For the specific usage, refer to Example Source Code.
Function Prototype
def set_servo_angle(self, servo_id:int, angle:float, is_mturn:bool=False, interval:float=None, velocity:float=None, t_acc:int=20, t_dec:int=20, power:int=0, mean_dps:float=100.0):
Input Parameters
servo_id: ID of the Servoangle: target angleis_mturn: whether multi-turn mode is usedinterval: interval, in msvelocity: target speed of the Servo, in dpst_acc: acceleration time, valid when specifying the target speed, in mst_dec: deceleration time, valid when specifying the deceleration time, in mspower: power limit, in mWmean_dps: average speed, in dps, used to estimate interval
Output Parameters
- None
8.2 API - wait
Wait for all servo to reach the target angle.
Function Prototype
def wait(self, timeout=None):
Input Parameters
timeout: blocking wait timeout threshold, in ms
Output Parameters
- None
8.3 Example Source Code
example/set_servo_angle.py
'''
FashionStar Uart舵机
> 舵机角度控制 <
--------------------------------------------------
 * 作者: 深圳市华馨京科技有限公司
 * 网站:https://fashionstar.com.hk/
 * 更新时间: 2023/03/13
--------------------------------------------------
'''
from machine import UART
from uservo import UartServoManager
import time

# 舵机个数
# 舵机ID编号: [0, 1, 2, ..., srv_num-1]
servo_num = 1
# 舵机ID
servo_id = 0
# 舵机是否有多圈模式的功能
servo_has_mturn_func = False

# 创建串口对象 使用串口2作为控制对象
# 波特率: 115200
# RX: gpio 16
# TX: gpio 17
uart = UART(2, baudrate=115200)
# 创建舵机管理器
uservo = UartServoManager(uart, srv_num=servo_num)


print("[单圈模式]设置舵机角度为90.0°")
uservo.set_servo_angle(servo_id, 90.0, interval=0) # 设置舵机角度 极速模式
uservo.wait() # 等待舵机静止
print("-> {}".format(uservo.query_servo_angle(servo_id)))

print("[单圈模式]设置舵机角度为-80.0°, 周期1000ms")
uservo.set_servo_angle(servo_id, -80.0, interval=1000) # 设置舵机角度(指定周期 单位ms)
uservo.wait() # 等待舵机静止
print("-> {}".format(uservo.query_servo_angle(servo_id)))

print("[单圈模式]设置舵机角度为70.0°, 设置转速为200 °/s, 加速时间100ms, 减速时间100ms")
uservo.set_servo_angle(servo_id, 70.0, velocity=200.0, t_acc=100, t_dec=100) # 设置舵机角度(指定转速 单位°/s)
uservo.wait() # 等待舵机静止
print("-> {}".format(uservo.query_servo_angle(servo_id)))


print("[单圈模式]设置舵机角度为-90.0°, 添加功率限制")
uservo.set_servo_angle(servo_id, -90.0, power=400) # 设置舵机角度(指定功率 单位mW)
uservo.wait() # 等待舵机静止

#########################################################################################
if servo_has_mturn_func:
    print("[多圈模式]设置舵机角度为900.0°, 周期1000ms")
    uservo.set_servo_angle(servo_id, 900.0, interval=1000, is_mturn=True) # 设置舵机角度(指定周期 单位ms)
    uservo.wait() # 等待舵机静止
    print("-> {}".format(uservo.query_servo_angle(servo_id)))

    print("[多圈模式]设置舵机角度为-900.0°, 设置转速为200 °/s")
    uservo.set_servo_angle(servo_id, -900.0, velocity=200.0, t_acc=100, t_dec=100, is_mturn=True) # 设置舵机角度(指定转速 单位°/s) dps: degree per second
    uservo.wait() # 等待舵机静止
    print("-> {}".format(uservo.query_servo_angle(servo_id)))

    print("[多圈模式]设置舵机角度为-850.0°, 添加功率限制")
    uservo.set_servo_angle(servo_id, -850.0, power=400, is_mturn=True) # 设置舵机角度(指定功率 单位mW)
    uservo.wait() # 等待舵机静止
    print("-> {}".format(uservo.query_servo_angle(servo_id)))
9. Wheel Mode (Deprecated in Version 316 and Later)
9.1 API - wheel_stop
Stop rotation in wheel mode.
Function Prototype
def wheel_stop(self, servo_id):
Input Parameters
servo_id: Servo ID
Output Parameters
- None
9.2 API - set_wheel_norm
Set the wheel to normal mode. The speed unit is °/s.
Function Prototype
def set_wheel_norm(self, servo_id, is_cw=True, mean_dps=None)
Input Parameters
servo_id: Servo IDis_cw: whether clockwiseTrue: clockwiseFalse: counterclockwisemean_dps: average speed
Output Parameters
- None
9.3 API - set_wheel_turn
Wheel mode: rotate the servo for a specified number of turns.
Function Prototype
def set_wheel_turn(self, servo_id, turn=1, is_cw=True, mean_dps=None, is_wait=True):
Input Parameters
servo_id: Servo IDturn: target number of turnsis_cw: rotation direction, whether clockwiseTrue: clockwiseFalse: counterclockwisemean_dps: average speedis_wait: whether to wait in blocking mode
Output Parameters
- None
9.4 API - set_wheel_time
Wheel mode: rotate for a specified time.
Function Prototype
def set_wheel_time(self, servo_id, interval=1000, is_cw=True, mean_dps=None, is_wait=True):
Input Parameters
servo_id: Servo IDinterval: target rotation time, in msis_cw: rotation direction, whether clockwiseTrue: clockwiseFalse: counterclockwisemean_dps: average speed, in dpsis_wait: whether to wait in blocking mode
Output Parameters
- None
9.5 Example Source Code
example/wheel.py
'''
FashionStar Uart舵机
> MicroPython SDK 舵机轮式模式测试 <
--------------------------------------------------
 * 作者: 深圳市华馨京科技有限公司
 * 网站:https://fashionstar.com.hk/
 * 更新时间: 2023/03/13
--------------------------------------------------
'''
from machine import UART
from uservo import UartServoManager
import time

# 舵机个数
# 舵机ID编号: [0, 1, 2, ..., srv_num-1]
servo_num = 1
# 舵机ID
servo_id = 0

# 创建串口对象 使用串口2作为控制对象
# 波特率: 115200
# RX: gpio 16
# TX: gpio 17
uart = UART(2, baudrate=115200)
# 创建舵机管理器
uservo = UartServoManager(uart, srv_num=servo_num)

print("测试常规模式")

# 设置舵机为轮式普通模式
# 旋转方向(is_cw) : 顺时针
# 角速度(mean_dps) : 单位°/s
uservo.set_wheel_norm(servo_id, is_cw=True, mean_dps=200.0)
# 延时5s然后关闭
time.sleep(5.0)

# 轮子停止
uservo.wheel_stop(servo_id)
time.sleep(1)

# 定圈模式
print("测试定圈模式")
uservo.set_wheel_turn(servo_id, turn=5, is_cw=False, mean_dps=200.0)

# 轮子定时模式
print("测试定时模式")
uservo.set_wheel_time(servo_id, interval=5000, is_cw=True, mean_dps=200.0)
10. User-Defined Parameter Settings
10.1 API - reset_user_data
Reset custom parameters and restore default values.
Function Prototype
def reset_user_data(self, servo_id):
Input Parameters
servo_id: Servo ID
Output Parameters
- None
10.2 API - read_data
Read parameters.
Function Prototype
def read_data(self, servo_id, address):
Input Parameters
servo_id: Servo IDaddress: memory table
Output Parameters
content: binary data stream of the value
10.3 API - write_data
Write custom parameters.
Function Prototype
def write_data(self, servo_id, address, content):
Input Parameters
servo_id: Servo IDaddress: memory tablecontent: binary data stream of the value
Output Parameters
- None
10.4 Example Source Code - Reset User Parameters
example/reset_user_data.py
'''
FashionStar Uart舵机
> 自定义参数重置 <

注意事项: 重置内存表这个指令比较特殊, 舵机ID也会被重置为0
因此测试该指令的时候, 最好只接一颗舵机。
--------------------------------------------------
 * 作者: 深圳市华馨京科技有限公司
 * 网站:https://fashionstar.com.hk/
 * 更新时间: 2023/03/13
--------------------------------------------------
'''
from machine import UART
from uservo import UartServoManager
import ustruct

# 舵机个数
# 注:舵机ID编号 假定是依次递增的
# 例: [0, 1, 2, ..., srv_num-1]
servo_num = 1
# 要测试的舵机ID
servo_id = 0

# 创建串口对象 使用串口2作为控制对象
# 波特率: 115200
# RX: gpio 16
# TX: gpio 17
uart = UART(2, baudrate=115200)
# 创建舵机管理器
uservo = UartServoManager(uart, srv_num=servo_num)

# 重置用户数据
uservo.reset_user_data(servo_id)
10.5 Example Source Code - Read Parameters
example/read_data.py
'''
FashionStar Uart舵机
> 参数读取 <
--------------------------------------------------
 * 作者: 深圳市华馨京科技有限公司
 * 网站:https://fashionstar.com.hk/
 * 更新时间: 2023/03/13
--------------------------------------------------
'''
from machine import UART
from uservo import UartServoManager
import ustruct

# 舵机个数
# 注:舵机ID编号 假定是依次递增的
# 例: [0, 1, 2, ..., srv_num-1]
servo_num = 1
# 要测试的舵机ID
servo_id = 0

# 创建串口对象 使用串口2作为控制对象
# 波特率: 115200
# RX: gpio 16
# TX: gpio 17
uart = UART(2, baudrate=115200)
# 创建舵机管理器
uservo = UartServoManager(uart, srv_num=servo_num)


# 数据表定义
ADDRESS_VOLTAGE = 1 # 总线电压值的地址

# 内存表读取
# 注: 因为每个数据位数据格式各不相同
# 因此读取得到的是字节流
voltage_bytes = uservo.read_data(servo_id, ADDRESS_VOLTAGE)

# 数据解析
# 电压的数据格式为uint16_t,单位: mV
# 关于struct的用法,请参阅官方手册: https://docs.python.org/3/library/struct.html
voltage = ustruct.unpack('<H', voltage_bytes)
print("总线电压 {} mV".format(voltage))
10.6 Example Source Code - Write Parameters
example/write_data.py
'''
FashionStar Uart舵机
> 自定义参数写入 <
--------------------------------------------------
 * 作者: 深圳市华馨京科技有限公司
 * 网站:https://fashionstar.com.hk/
 * 更新时间: 2023/03/13
--------------------------------------------------
'''
from machine import UART
from uservo import UartServoManager
import ustruct

# 舵机个数
# 舵机ID编号: [0, 1, 2, ..., srv_num-1]
servo_num = 1
# 舵机ID
servo_id = 0

# 创建串口对象 使用串口2作为控制对象
# 波特率: 115200
# RX: gpio 16
# TX: gpio 17
uart = UART(2, baudrate=115200)
# 创建舵机管理器
uservo = UartServoManager(uart, srv_num=servo_num)

# 数据表定义
ADDRESS_SOFTSTART = 49 # 上电缓启动地址位
SOFTSTART_OPEN = 1 # 上电缓启动-开启
SOFTSTART_CLOSE = 0 # 上电缓启动-关闭

# 内存表写入
# 注: 在写入之前,需要查阅手册确保该数据位可写
# 缓启动数据类型 uint8_t, 首先构造数据位
softstart_bytes = ustruct.pack('<B', SOFTSTART_OPEN)
# 将数据写入内存表
ret = uservo.write_data(servo_id, ADDRESS_SOFTSTART, softstart_bytes)
# 打印日志
print("缓启动数据写入是否成功: {}".format(ret))
11. Status Data Readback
11.1 API - query_voltage
Query the current voltage.
Function Prototype
def query_voltage(self, servo_id)
Input Parameters
servo_id: Servo ID
Output Parameters
voltage: voltage, in V
11.2 API - query_current
Query the current.
Function Prototype
def query_current(self, servo_id):
Input Parameters
servo_id: Servo ID
Output Parameters
power: Servo current, in A
11.3 API - query_power
Query the current power.
Function Prototype
def query_power(self, servo_id)
Input Parameters
servo_id: Servo ID
Output Parameters
power: Servo power, in W
11.4 API - query_temperature
Query the current temperature of the servo.
Function Prototype
def query_temperature(self, servo_id)
Input Parameters
servo_id: Servo ID
Output Parameters
temperature: temperature, ADC value
11.5 Example Source Code
example/servo_status.py
'''
FashionStar Uart舵机
> 读取舵机的状态信息 <
--------------------------------------------------
 * 作者: 深圳市华馨京科技有限公司
 * 网站:https://fashionstar.com.hk/
 * 更新时间: 2023/03/13
--------------------------------------------------
'''
from machine import UART
from uservo import UartServoManager
import time

# 舵机个数
# 舵机ID编号: [0, 1, 2, ..., srv_num-1]
servo_num = 1
# 舵机ID
servo_id = 0

# 创建串口对象 使用串口2作为控制对象
# 波特率: 115200
# RX: gpio 16
# TX: gpio 17
uart = UART(2, baudrate=115200)
# 创建舵机管理器
uservo = UartServoManager(uart, srv_num=servo_num)

def log_servo_status():
    '''打印舵机状态'''
    # 读取温度
    voltage = uservo.query_voltage(servo_id)
    # 读取电流
    current = uservo.query_current(servo_id)
    # 读取功率
    power = uservo.query_power(servo_id)
    # 读取温度
    temp = uservo.query_temperature(servo_id)

    print("Voltage: {:4.1f}V; Current: {:4.1f}A; Power: {:4.1f}W; T: {:2.1f}".format(\
        voltage, current, power, temp), end='\r')

while True:
    uservo.set_servo_angle(servo_id, 90)
    while not uservo.is_stop():
        log_servo_status()
        time.sleep(0.1)

    time.sleep(1)

    uservo.set_servo_angle(servo_id, -90)
    while not uservo.is_stop():
        log_servo_status()
        time.sleep(0.1)

    time.sleep(1)
12. Data Monitoring
12.1 API - query_servo_monitor
Batch read operating status data.
Function Prototype
def query_servo_monitor(self,servo_id=0):
Input Parameters
servo_id: Servo ID
Output Parameters
voltage: Servo voltagecurrent: Servo currentvoltage: Servo powertemp: Servo temperaturestatus: Servo statusangle: Servo angle (single-turn / multi-turn)turn: turns
12.2 Example Source Code
'''
总线伺服舵机
> MicroPythonPython SDK监控指令 Example <
--------------------------------------------------
 * 作者: 深圳市华馨京科技有限公司
 * 网站:https://fashionstar.com.hk/
 * 更新时间: 2024/12/23
--------------------------------------------------
'''

import ustruct
from machine import UART
from uservo import UartServoManager
import time

# 舵机ID编号: [0, 1, 2, ..., srv_num-1]
# 扫描舵机个数
servo_num = 4
# 舵机ID
servo_id = 0
# 舵机是否有多圈模式的功能
#servo_has_mturn_func = False

# 创建串口对象 使用串口2作为控制对象
# 波特率: 115200
# RX: gpio 16
# TX: gpio 17
uart = UART(2, baudrate=115200)
# 创建舵机管理器
uservo = UartServoManager(uart, srv_num=servo_num)
servo_info = uservo.query_servo_monitor(servo_id=0)
print("舵机 电压: {:.2f} V".format( servo_info["voltage"]/1000))
print("舵机 角度: {:.2f} °".format( servo_info["angle"] ))
print("舵机电压: {:.2f}V, 电流: {:.2f}A, 功率: {:.2f}W, 温度: {:.2f}°C, 状态: {}, 角度: {:.2f}°, 圈数: {:.0f}"
          .format( servo_info["voltage"] / 1000, servo_info["current"] / 1000, servo_info["power"] / 1000, servo_info["temp"], servo_info["status"], servo_info["angle"], servo_info["turn"]))
13. Async Commands
13.1 API - begin_async
Async write command. The next received command is cached. Only angle commands are supported.
Function Prototype
def begin_async(self):
Input Parameters
- None
Output Parameters
- None
13.2 API - end_async
Async execute command. Execute the cached command immediately. If the cancel parameter is 1, the cache is cleared.
Function Prototype
def end_async(self,cancel=0):
Input Parameters
cancel: whether to cancel
Output Parameters
- None
13.3 Example Source Code
'''
总线伺服舵机
> MicroPython SDK异步指令 Example <
--------------------------------------------------
 * 作者: 深圳市华馨京科技有限公司
 * 网站:https://fashionstar.com.hk/
 * 更新时间: 2024/12/23
--------------------------------------------------
'''

import ustruct
from machine import UART
from uservo import UartServoManager
import time


# 舵机个数
# 舵机ID编号: [0, 1, 2, ..., srv_num-1]
servo_num = 4
# 舵机ID
servo_id = 0
# 舵机是否有多圈模式的功能
servo_has_mturn_func = False

# 创建串口对象 使用串口2作为控制对象
# 波特率: 115200
# RX: gpio 16
# TX: gpio 17
uart = UART(2, baudrate=115200)
# 创建舵机管理器
uservo = UartServoManager(uart, srv_num=servo_num)

uservo.begin_async()   #  异步写入命令
time.sleep(0.02)
SERVO_ID  = 0
uservo.set_servo_angle( 0, angle = 20.0, interval=0, power=10000)
time.sleep(2.02)
uservo.end_async(0)    #  是否取消异步执行命令    0:执行; 1:取消
14. Origin Setting
14.1 API - set_origin_point
Set the current position as the origin.
Function Prototype
def set_origin_point(self,servo_id=0):
Input Parameters
servo_id: Servo ID
Output Parameters
- None
14.2 Example Source Code
'''
总线伺服舵机
> MicroPython SDK设置舵机原点指令 Example <
--------------------------------------------------
 * 作者: 深圳市华馨京科技有限公司
 * 网站:https://fashionstar.com.hk/
 * 更新时间: 2024/08/20
--------------------------------------------------
'''

import ustruct
from machine import UART
from uservo import UartServoManager
import time


# 舵机ID编号: [0, 1, 2, ..., srv_num-1]
# 扫描舵机个数
servo_num = 4
# 舵机ID
servo_id = 0
# 舵机是否有多圈模式的功能
#servo_has_mturn_func = False

# 创建串口对象 使用串口2作为控制对象
# 波特率: 115200
# RX: gpio 16
# TX: gpio 17
uart = UART(2, baudrate=115200)
# 创建舵机管理器
uservo = UartServoManager(uart, srv_num=servo_num)

angle = uservo.query_servo_angle(servo_id)

print("当前舵机角度: {:4.1f} °".format(angle), end='\n')

uservo.disable_torque(servo_id)

uservo.set_origin_point(servo_id)

time.sleep(1)

angle = uservo.query_servo_angle(servo_id)

print("设置新的原点后舵机角度: {:4.1f}°".format(angle), end='\n')
15. Stop Command
15.1 API - stop_on_control_mode
Make the servo keep a different state mode after stopping.
Function Prototype
def stop_on_control_mode(self,servo_id, method, power):
Input Parameters
servo_id: Servo IDmethod: mode after stopping: 0x10 release torque; 0x11 hold torque; 0x12 enter damping statepower: holding power
Output Parameters
- None
15.2 Example Source Code
'''
总线伺服舵机
> MicroPython SDK停止指令 Example <
--------------------------------------------------
 * 作者: 深圳市华馨京科技有限公司
 * 网站:https://fashionstar.com.hk/
 * 更新时间: 2024/12/23
--------------------------------------------------
'''
import ustruct
from machine import UART
from uservo import UartServoManager
import time


# 舵机ID编号: [0, 1, 2, ..., srv_num-1]
# 扫描舵机个数
servo_num = 4
# 舵机ID
servo_id = 0
# 舵机是否有多圈模式的功能
#servo_has_mturn_func = False
# 创建串口对象 使用串口2作为控制对象
# 波特率: 115200
# RX: gpio 16
# TX: gpio 17
uart = UART(2, baudrate=115200)
# 创建舵机管理器
uservo = UartServoManager(uart, srv_num=servo_num)
uservo.stop_on_control_mode(servo_id, method=0x10, power=500)
uservo.stop_on_control_mode(servo_id, method=0x11, power=500)
uservo.stop_on_control_mode(servo_id, method=0x12, power=500)
16. Sync Commands
16.1 API - send_sync_angle
Sync command - angle control.
Function Prototype
def send_sync_angle(self,8, servo_num=2, command_data_list):
Input Parameters
- Command packet ID
servo_num: number of synchronized Servocommand_data_list: command content
Output Parameters
- None
16.2 API - send_sync_anglebyinterval
Sync command - angle control based on acceleration/deceleration time.
Function Prototype
def send_sync_anglebyinterval(self,11,servo_num=2, command_data_list):
Input Parameters
- Command packet ID supported by the sync command
servo_num: number of synchronized Servocommand_data_list: command content
Output Parameters
- None
16.3 API - send_sync_anglebyvelocity
Sync command - angle control based on target speed.
Function Prototype
def send_sync_anglebyvelocity(self,12, servo_num=2, command_data_list):
Input Parameters
- Command packet ID supported by the sync command
servo_num: number of synchronized Servocommand_data_list: command content
Output Parameters
- None
16.4 API - send_sync_multiturnangle
Sync command - multi-turn angle control.
Function Prototype
def send_sync_multiturnangle(self,13,servo_num=2 , command_data_list):
Input Parameters
- Command packet ID supported by the sync command
servo_num: number of synchronized Servocommand_data_list: command content
Output Parameters
- None
16.5 API - send_sync_multiturnanglebyinterval
Sync command - multi-turn angle control based on acceleration/deceleration time.
Function Prototype
def send_sync_angle(self,8,servo_num=2 , command_data_list):
Input Parameters
- Command packet ID supported by the sync command
servo_num: number of synchronized Servocommand_data_list: command content
Output Parameters
- None
16.6 API - send_sync_multiturnanglebyvelocity
Sync command - multi-turn angle control based on target speed.
Function Prototype
def send_sync_multiturnanglebyvelocity(self,15, servo_num=2, command_data_list):
Input Parameters
- Command packet ID supported by the sync command
servo_num: number of synchronized Servocommand_data_list: command content
Output Parameters
- None
16.7 Example Source Code
'''
总线伺服舵机
> MicroPython SDK同步命令 Example <
--------------------------------------------------
 * 作者: 深圳市华馨京科技有限公司
 * 网站:https://fashionstar.com.hk/
 * 更新时间: 2024/12/23
--------------------------------------------------
'''
import ustruct
from machine import UART
from uservo import UartServoManager
import time


# 舵机ID编号: [0, 1, 2, ..., srv_num-1]
# 扫描舵机个数
servo_num = 4
# 舵机ID
#servo_id = 0
# 舵机是否有多圈模式的功能
#servo_has_mturn_func = False

# 创建串口对象 使用串口2作为控制对象
# 波特率: 115200
# RX: gpio 16
# TX: gpio 17
uart = UART(2, baudrate=115200)
# 创建舵机管理器
uservo = UartServoManager(uart, srv_num=servo_num)

command_data_list1 = [
    ustruct.pack('<BhHH', 1, -400, 800, 10000),  # 同步命令角度模式控制
    ustruct.pack('<BhHH', 0, -400, 800, 10000),  #id0+度数-40 +时间 +功率
]
uservo.send_sync_angle(8, 2, command_data_list1)
time.sleep(2.02)


command_data_list2 = [
    ustruct.pack('<BhHHHH', 1, 0, 500, 100, 100, 10000), # 同步命令角度模式控制(基於加减速時間)
    ustruct.pack('<BhHHHH', 0, 0, 500, 100, 100, 10000), #id0+度数0+总时间+启动加速时间+运动减速时间+功率
]
uservo.send_sync_anglebyinterval(11, 2, command_data_list2)
time.sleep(2.02)


command_data_list4 = [
    ustruct.pack('<BhHHHH', 1, 400, 500, 100, 100, 10000),# 同步命令角度模式控制 (基於速率的運動控制 )
    ustruct.pack('<BhHHHH', 0, 400, 500, 100, 100, 10000),# id0+度数40+时间+功率
]
uservo.send_sync_anglebyvelocity(12, 2, command_data_list4)
time.sleep(2.02)


command_data_list3 = [
    ustruct.pack('<BlLH', 1, 800, 1000, 10000),# 同步命令多圈角度模式控制
    ustruct.pack('<BlLH', 0, 800, 1000, 10000),# id0+度数80 +时间 +功率
]
uservo.send_sync_multiturnangle(13, 2, command_data_list3)
time.sleep(2.02)

command_data_list5 = [
    ustruct.pack('<BlLHHH', 1, 1200, 500, 100, 100, 10000),# 同步命令多圈角度模式控制 (基於加減速時段的運動控制 )
    ustruct.pack('<BlLHHH', 0, 1200, 500, 100, 100, 10000),# id0+度数120+时间+启动加速时间+运动减速时间+功率
]
uservo.send_sync_multiturnanglebyinterval(14, 2, command_data_list5)
time.sleep(2.02)

command_data_list6 = [
    ustruct.pack('<BlHHHH', 1, 1600, 3000, 100, 100, 10000)  ,# 同步命令多圈角度模式控制(基於速率的運動控制)
    ustruct.pack('<BlHHHH', 0, 1600 ,3000, 100, 100, 10000)  ,# id0+度数160+目标速度300dps+启动加速时间+运动减速时间+功率
]
uservo.send_sync_multiturnanglebyvelocity(15, 2, command_data_list6)
16.8 API - send_sync_monitor
Sync command - batch read servo operating status data.
Function Prototype
def send_sync_monitor(self,servo_ids) # 想要同步读取的舵机ID列表
Input Parameters
servo_ids: list of Servo IDs to read synchronously, for example servo_ids = [1,2,3,4,5]
Output Parameters
Parameters of each servo:
voltage: Servo voltagecurrent: Servo currentvoltage: Servo powertemp: Servo temperaturestatus: Servo statusangle: Servo angleturn: turns
16.9 Example Source Code
'''
总线伺服舵机
> MicroPython SDK同步命令 同步监控 Example <
--------------------------------------------------
 * 作者: 深圳市华馨京科技有限公司
 * 网站:https://fashionstar.com.hk/
 * 更新时间: 2024/12/23
--------------------------------------------------
'''
import ustruct
from machine import UART
from uservo import UartServoManager
import time


# 舵机ID编号: [0, 1, 2, ..., srv_num-1]
# 扫描舵机个数
servo_num = 4
# 舵机ID
#servo_id = 0
# 舵机是否有多圈模式的功能
#servo_has_mturn_func = False

# 创建串口对象 使用串口2作为控制对象
# 波特率: 115200
# RX: gpio 16
# TX: gpio 17
uart = UART(2, baudrate=115200)
# 创建舵机管理器
uservo = UartServoManager(uart, srv_num=servo_num)
servo_ids = [1,2,3]  # 想要同步读取的舵机ID列表
servo_monitor_data = uservo.send_sync_servo_monitor(servo_ids)
for servo_id, info in servo_monitor_data.items():
    if info:
        print("舵机ID: {}, 电压: {:.2f} V, 电流: {:.2f} A, 功率: {:.2f} W, 温度: {:.2f} °C, 状态: {}, 角度: {:.2f} °, 圈数: {:.0f}"
              .format(servo_id, info.voltage / 1000, info.current / 1000, info.power / 1000, info.temp, info.status, info.angle, info.turn))