Bus Servo SDK User Manual (Arduino STM32F103C8T6)
| 版本 | GitHub | 开发资源包 |
|---|---|---|
| v1.2026.0214 |  |
点击下载 |
1. Hardware Preparation
1.1 STM32F103C8T6 Serial Port Resources
| Function | Pin |
|---|---|
| USART1_TX | PA9 |
| USART1_RX | PA10 |
| USART2_TX | PA2 |
| USART2_RX | PA3 |
| USART3_TX | PB10 |
| USART3_RX | PB11 |
Use UART2 on STM32 as the control serial port for the bus servo.
1.2 Wiring Between STM32 and the Bus Servo Adapter Board
| STM32 | Bus Servo Adapter Board | Notes |
|---|---|---|
| PA3 (UART2 Rx) | Tx | |
| PA2 (UART2 Tx) | Rx | |
| VIN / 5V | 5V | Optional |
| GND | GND |
Notes
· The bus servo adapter board requires an external power supply during use.
· When the STM32 board is connected to the servo adapter board, the 5V wire can be left disconnected.
2. Arduino IDE Development Environment Configuration
2.1 Install the Third-Party STM32 Extension Package
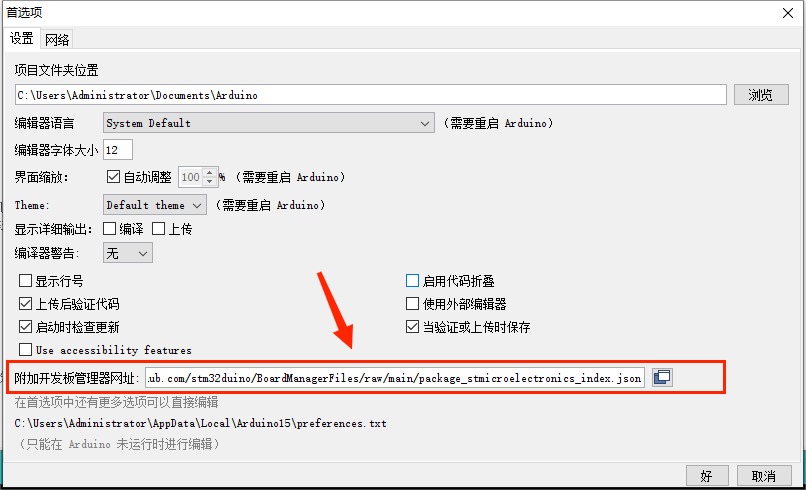
Go to File -> Preferences -> Additional Boards Manager URLs, then paste the URL.
https://github.com/stm32duino/BoardManagerFiles/raw/main/package_stmicroelectronics_index.json
Official documentation:
https://github.com/stm32duino/Arduino_Core_STM32/wiki/API
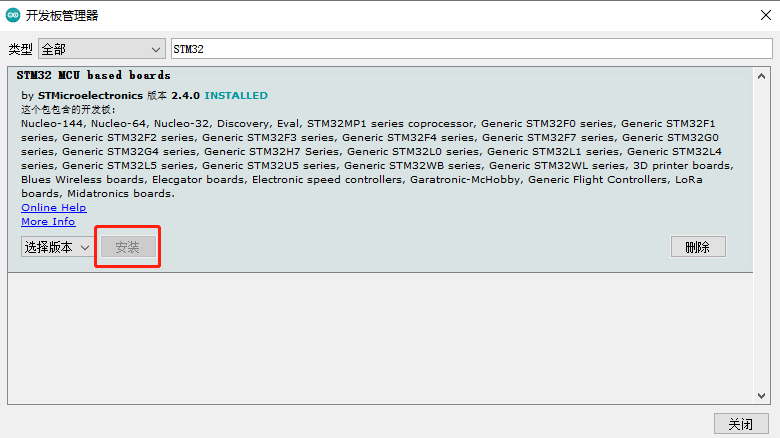
Go to Tools -> Board -> Boards Manager, then search for "STM32".
Find the corresponding third-party core library and install it.
2.2 Install the Arduino Library for Bus Servo
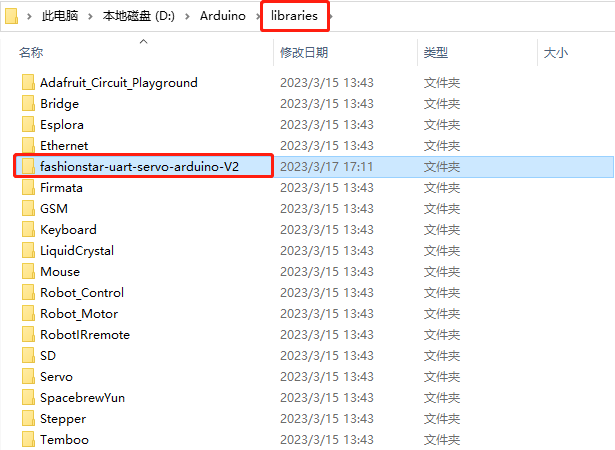
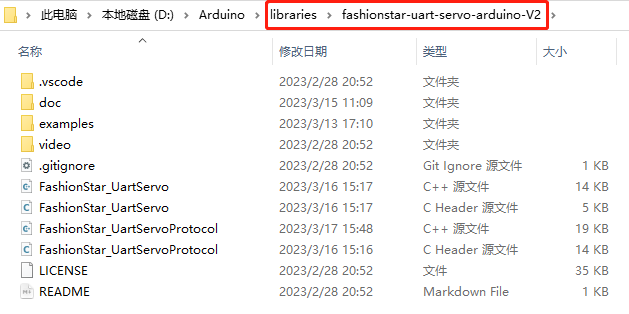
Copy the entire arduino-sdk project folder into the libraries folder shown in the path below.
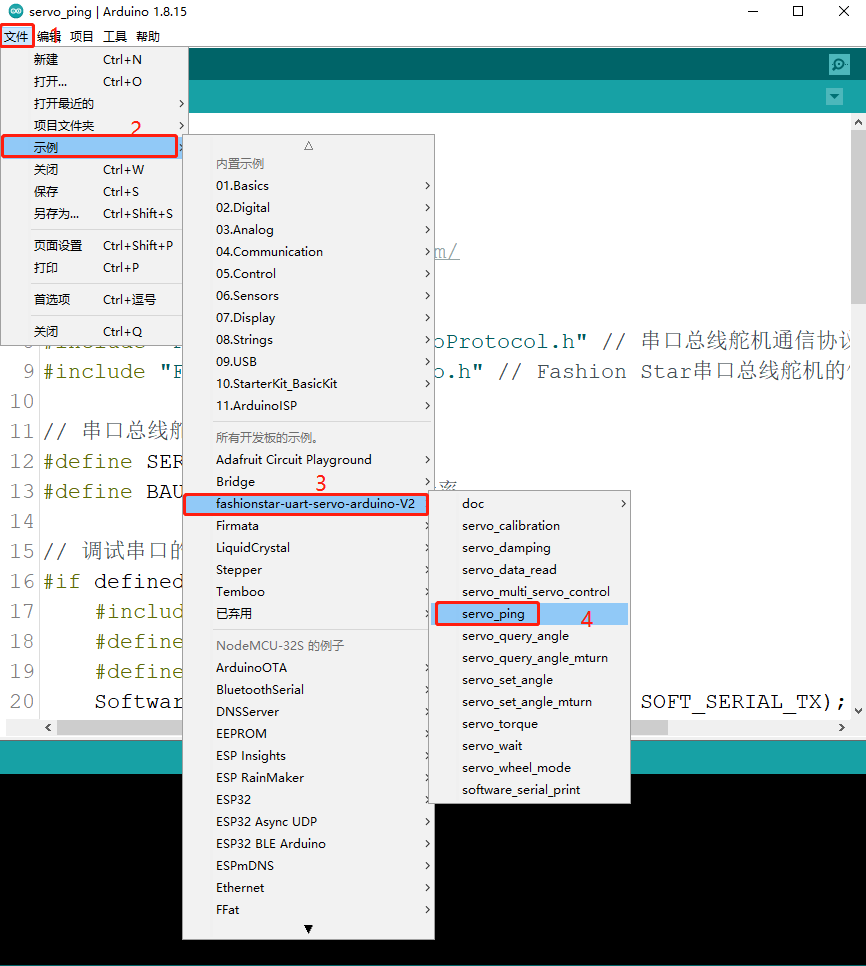
2.3 Open the Example Code
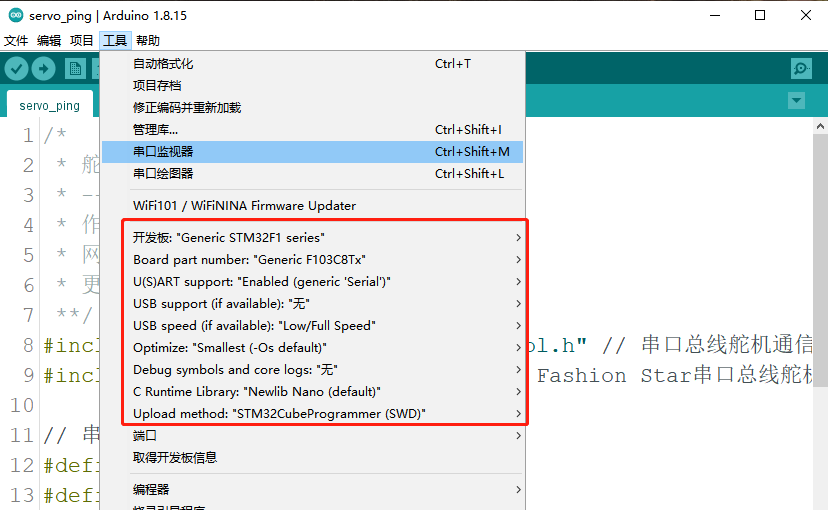
2.4 Select the Development Board
2.5 Demo Example Workflow
· Connect the STM32F103C8T6 board to PC using ST-LINK.
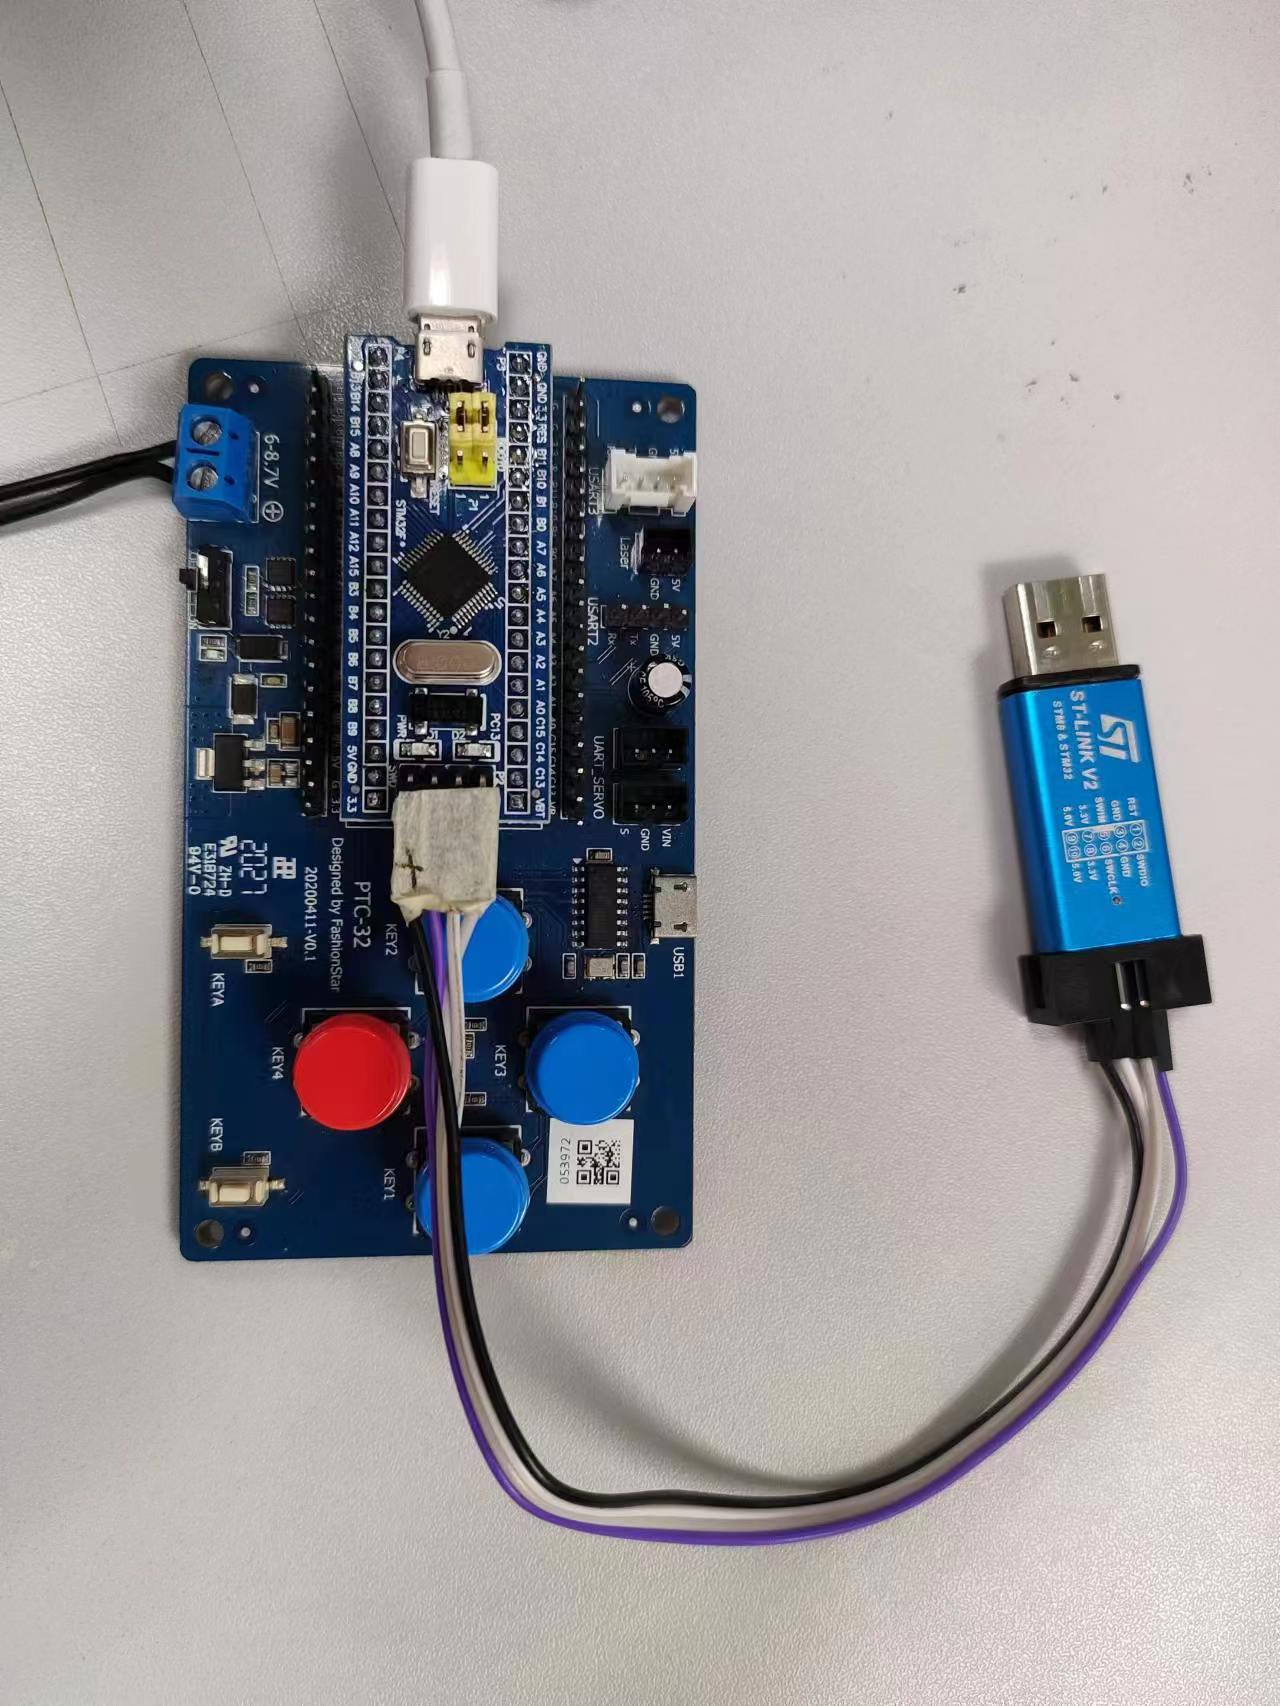
· Open Arduino IDE on the PC side and open the example file.
· Compile and upload the firmware to STM32F103C8T6 (using ST- LINK for upload).
· Connect the USB of the STM32F103C8T6 board to power.
· Check the result.
3. Creating and Initializing the Servo Object
#include "FashionStar_UartServoProtocol.h" // 总线伺服舵机通信协议
#include "FashionStar_UartServo.h" // 总线伺服舵机SDK
FashionStar_UartServoProtocolhandles the underlying communication protocol logic of the servo, such as data frame transmission/reception and data checksum.
FashionStar_UartServois the SDK of the servo, a higher-level wrapper above the protocol layer.
Create a bus servo communication protocol object FSUS_Protocol. In the constructor, fill in the baud rate for communication between Arduino and the bus servo. The default is 115200.
#define BAUDRATE 115200 // 波特率

FSUS_Protocol protocol(BAUDRATE); //协议
Create an FSUS_Servo servo object. When creating it, pass in the ID of the servo and the pointer &protocol to the communication protocol object. The ID range of the servo is 0-254.
#define SERVO_ID 0 //舵机ID号

FSUS_Servo uservo(SERVO_ID, &protocol); // 创建舵机
Next, initialize the communication protocol object and the servo object in the setup() function.
void setup(){
    ...
    protocol.init(); // 舵机通信协议初始化
    uservo.init(); // 总线伺服舵机初始化
    ...
}
4. Servo Communication Check
4.1 API - ping
Call the ping() function of servo to perform servo communication detection and determine whether the servo is online.
bool isOnline = uservo.ping(); // 舵机通信检测
4.2 Example Source Code
servo_ping.ino
/*
 * 舵机通信检测
 * --------------------------
 * 作者: 深圳市华馨京科技有限公司
 * 网站:https://fashionstar.com.hk/
 * 更新时间: 2023/03/13
 **/
#include "FashionStar_UartServoProtocol.h" // 总线伺服舵机通信协议
#include "FashionStar_UartServo.h" // Fashion Star总线伺服舵机的依赖

// 总线伺服舵机配置
#define SERVO_ID 0 //舵机ID号
#define BAUDRATE 115200 // 波特率

// 调试串口的配置
#if defined(ARDUINO_AVR_UNO)
    #include <SoftwareSerial.h>
    #define SOFT_SERIAL_RX 6
    #define SOFT_SERIAL_TX 7
    SoftwareSerial softSerial(SOFT_SERIAL_RX, SOFT_SERIAL_TX); // 创建软串口
    #define DEBUG_SERIAL softSerial
    #define DEBUG_SERIAL_BAUDRATE 4800

#elif defined(ARDUINO_AVR_MEGA2560)
    #define DEBUG_SERIAL Serial
    #define DEBUG_SERIAL_BAUDRATE 115200

#elif defined(ARDUINO_ARCH_ESP32)
    #define DEBUG_SERIAL Serial
    #define DEBUG_SERIAL_BAUDRATE 115200

#elif defined(ARDUINO_ARCH_STM32)
    #include <HardwareSerial.h>
    //                      RX    TX
    HardwareSerial Serial1(PA10, PA9);
    //HardwareSerial Serial2(PA3, PA2); //这里串口2不需要定义
    HardwareSerial Serial3(PB11, PB10);
    #define DEBUG_SERIAL Serial1
    #define DEBUG_SERIAL_BAUDRATE (uint32_t)115200

#endif

FSUS_Protocol protocol(BAUDRATE);       //协议
FSUS_Servo uservo(SERVO_ID, &protocol); // 创建舵机

void setup(){
    protocol.init(); // 舵机通信协议初始化
    uservo.init(); // 总线伺服舵机初始化
    // 打印例程信息
    DEBUG_SERIAL.begin(DEBUG_SERIAL_BAUDRATE);
    DEBUG_SERIAL.println("Start To Ping Servo\n");
}

void loop(){
    bool isOnline = uservo.ping(); // 舵机通信检测
    String message = "servo #"+String(uservo.servoId,DEC) + " is ";  // 日志输出
    if(isOnline){
        message += "online";
    }else{
        message += "offline";
    }
    // 调试串口初始化
    DEBUG_SERIAL.println(message);
    // 等待1s
    delay(1000);
}
Log output
Start To Ping Servo


servo #0 is online.

servo #0 is online.

servo #0 is online.

servo #0 is online.
5. Servo Damping Mode
5.1 API - setDamping
Set the servo to damping mode.
void FSUS_Servo::setDamping(FSUS_POWER_T power)
Input Parameters
· power: power of the servo, in mW. The higher the power value, the greater the damping force when rotating the servo.
Usage Example
#define DAMPING_POWER 800 // 阻尼模式下的功率(单位mW) 500,800,1000

uservo.setDamping(DAMPING_POWER);
5.2 Example Source Code
servo_damping.ino
/*
 * 设置舵机为阻尼模式
 * 调整参数`DAMPING_POWER`感受不同的阻尼力
 * --------------------------
 * 作者: 深圳市华馨京科技有限公司
 * 网站:https://fashionstar.com.hk/
 * 更新时间: 2023/03/13
 **/
#include "FashionStar_UartServoProtocol.h"
#include "FashionStar_UartServo.h" // Fashion Star总线伺服舵机的依赖

// 总线伺服舵机配置参数
#define SERVO_ID 0 //舵机ID号
#define BAUDRATE 115200 // 波特率
#define DAMPING_POWER 800 // 阻尼模式下的功率(单位mW) 500,800,1000

// 调试串口的配置
#if defined(ARDUINO_AVR_UNO)
    #include <SoftwareSerial.h>
    #define SOFT_SERIAL_RX 6
    #define SOFT_SERIAL_TX 7
    SoftwareSerial softSerial(SOFT_SERIAL_RX, SOFT_SERIAL_TX); // 创建软串口
    #define DEBUG_SERIAL softSerial
    #define DEBUG_SERIAL_BAUDRATE 4800

#elif defined(ARDUINO_AVR_MEGA2560)
    #define DEBUG_SERIAL Serial
    #define DEBUG_SERIAL_BAUDRATE 115200

#elif defined(ARDUINO_ARCH_ESP32)
    #define DEBUG_SERIAL Serial
    #define DEBUG_SERIAL_BAUDRATE 115200

#elif defined(ARDUINO_ARCH_STM32)
    #include <HardwareSerial.h>
    //                      RX    TX
    HardwareSerial Serial1(PA10, PA9);
    //HardwareSerial Serial2(PA3, PA2); //这里串口2不需要定义
    HardwareSerial Serial3(PB11, PB10);
    #define DEBUG_SERIAL Serial1
    #define DEBUG_SERIAL_BAUDRATE (uint32_t)115200

#endif

FSUS_Protocol protocol(BAUDRATE); //协议
FSUS_Servo uservo(SERVO_ID, &protocol); // 创建舵机

void setup(){

    protocol.init(); // 通信协议初始化
    uservo.init(); // 舵机初始化
    // 打印日志
    DEBUG_SERIAL.begin(DEBUG_SERIAL_BAUDRATE);
    DEBUG_SERIAL.println("Set Servo Mode To Damping");
    // 设置电机的阻尼系数
    uservo.setDamping(DAMPING_POWER);
}

void loop(){
    // TODO;
}
Log output
Set Servo Mode To Damping
6. Servo Angle Query
6.1 API - queryAngle
Query the current real angle of the servo, send an angle query command to the servo, and assign the angle value to the curAngle property of the servo object.
FSUS_SERVO_ANGLE_T FSUS_Servo::queryAngle()
Input Parameters
· <无>
Output Parameters
· curAngle: current real angle of the servo
Usage Example
Example 1
float curAngle = uservo.queryAngle()
Example 2
// 舵机角度查询 (更新角度)
uservo.queryAngle();
// 通过.curAngle访问当前的真实角度
uservo.curAngle
6.2 Example Source Code - Query Angle (Single-Turn)
servo_query_angle.ino
/*
 * 舵机角度回读实验
 * 用手掰动舵机, 角度回读并将角度读数通过SPI发送
 * --------------------------
 * 作者: 深圳市华馨京科技有限公司
 * 网站:https://fashionstar.com.hk/
 * 更新时间: 2023/03/13
 **/
#include "FashionStar_UartServoProtocol.h"
#include "FashionStar_UartServo.h" // Fashion Star总线伺服舵机的依赖

// 总线伺服舵机配置
#define SERVO_ID 0 //舵机ID号
#define DAMPING_POWER 800 // 阻尼模式下的功率(单位mW) 500,800,1000
#define BAUDRATE 115200 // 波特率

// 调试串口的配置
#if defined(ARDUINO_AVR_UNO)
    #include <SoftwareSerial.h>
    #define SOFT_SERIAL_RX 6
    #define SOFT_SERIAL_TX 7
    SoftwareSerial softSerial(SOFT_SERIAL_RX, SOFT_SERIAL_TX); // 创建软串口
    #define DEBUG_SERIAL softSerial
    #define DEBUG_SERIAL_BAUDRATE 4800

#elif defined(ARDUINO_AVR_MEGA2560)
    #define DEBUG_SERIAL Serial
    #define DEBUG_SERIAL_BAUDRATE 115200

#elif defined(ARDUINO_ARCH_ESP32)
    #define DEBUG_SERIAL Serial
    #define DEBUG_SERIAL_BAUDRATE 115200

#elif defined(ARDUINO_ARCH_STM32)
    #include <HardwareSerial.h>
    //                      RX    TX
    HardwareSerial Serial1(PA10, PA9);
    //HardwareSerial Serial2(PA3, PA2); //这里串口2不需要定义
    HardwareSerial Serial3(PB11, PB10);
    #define DEBUG_SERIAL Serial1
    #define DEBUG_SERIAL_BAUDRATE (uint32_t)115200

#endif


FSUS_Protocol protocol(BAUDRATE); //协议
FSUS_Servo uservo(SERVO_ID, &protocol); // 创建舵机


void setup(){
    protocol.init();                    // 通信协议初始化
    uservo.init();                      //舵机角度初始化
    uservo.setDamping(DAMPING_POWER);   // 舵机设置为阻尼模式
    // 打印例程信息
    DEBUG_SERIAL.begin(DEBUG_SERIAL_BAUDRATE);
    DEBUG_SERIAL.println("Query Servo Angle\n");
}

void loop(){
    // 舵机角度查询 (更新角度)
    uservo.queryRawAngle();
    // 日志输出
    String message = "Status Code: " + String(uservo.protocol->responsePack.recv_status, DEC) + " servo #"+String(uservo.servoId, DEC) + " , Current Angle = "+String(uservo.curRawAngle, 1)+" deg";
    DEBUG_SERIAL.println(message);
    // 等待1s
    delay(1000);
}
Log output
Query Servo Angle

Status Code: 0 servo #0 , Current Angle = -99.0

Status Code: 0 servo #0 , Current Angle = -99.0

Status Code: 0 servo #0 , Current Angle = -99.0
7. Servo Wheel Mode (Deprecated in Version 316 and Later)
7.1 API - wheelStop
Wheel mode: stop rotation.
Function Prototype
void FSUS_Servo::wheelStop()
Input Parameters
· <无>
7.2 API - wheelRun
The wheel rotates continuously.
Function Prototype
void FSUS_Servo::wheelRun(uint8_t is_cw)
Input Parameters
· is_cw: wheel rotation direction
0: counterclockwise
1: clockwise
7.3 API - wheelRunNTime
The wheel rotates for a specified time.
Function Prototype
void FSUS_Servo::wheelRunNTime(uint8_t is_cw, uint16_t time_ms)
Input Parameters
· is_cw: wheel rotation direction
0: counterclockwise
1: clockwise
· time_ms: duration of continuous rotation, in ms
7.4 API - wheelRunNCircle
The wheel rotates for a specified number of turns.
Function Prototype
void FSUS_Servo::wheelRunNCircle(uint8_t is_cw, uint16_t circle_num)
Input Parameters
· is_cw: wheel rotation direction
0: counterclockwise
1: clockwise
· circle_num: number of wheel turns
7.5 Example Source Code
servo_wheel_mode.ino
/*
 * 测试舵机轮式模式
 * 提示: 拓展板上电之后, 记得按下Arduino的RESET按键
 * --------------------------
 * 作者: 深圳市华馨京科技有限公司
 * 网站:https://fashionstar.com.hk/
 * 更新时间: 2023/03/13
 */
#include "FashionStar_UartServoProtocol.h"
#include "FashionStar_UartServo.h" // Fashion Star总线伺服舵机的依赖

// 配置参数
#define BAUDRATE 115200 // 波特率
#define SERVO_ID 0 //舵机ID号

FSUS_Protocol protocol(BAUDRATE); //协议
FSUS_Servo uservo(SERVO_ID, &protocol); // 创建舵机

/* 轮子持续旋转指令与停止指令测试 */
void testWheelRunAndStop(){
    uservo.wheelRun(FSUS_CCW); // 轮子持续旋转, 方向为逆时针
    delay(2000);            // 等待2s
    uservo.wheelStop();
    delay(2000);            // 等待2s
    uservo.wheelRun(FSUS_CW); // 轮子持续旋转
    delay(2000);            // 等待2s
    uservo.wheelStop();
    delay(2000);            // 等待2s
}

/* 测试轮子旋转特定的时间 */
void testWheelRunNTime(){
    uservo.wheelRunNTime(FSUS_CW, 5000); // 轮子持续旋转5s(顺时针)
    delay(5000);
    uservo.wheelRunNTime(FSUS_CCW, 5000); // 轮子持续旋转5s(逆时针)
    delay(5000);
}

/* 测试轮子旋转特定的圈数 */
void testWheelRunNCircle(){
    uint16_t nCircle = 2; // 旋转圈数
    uint16_t delayMsEstimate = (uint16_t)(360.0 * nCircle / uservo.speed * 1000); // 估计旋转的时间
    uservo.wheelRunNCircle(FSUS_CW, 2); // 轮子持续旋转2圈(顺时针)
    delay(delayMsEstimate);             // 等到轮子旋转到特定的位置

    uservo.wheelRunNCircle(FSUS_CCW, 2);// 轮子持续旋转2圈(逆时针)
    delay(delayMsEstimate);             // 等到轮子旋转到特定的位置}
}

void setup(){
    protocol.init();        // 通信协议初始化
    uservo.init();          //舵机角度初始化
    uservo.setSpeed(100);    // 设置转速为20°/s

    // 测试持续旋转与停止
    // testRunAndStop();

    // 测试旋转特定的时间
    // testWheelRunNTime();

    // 测试旋转特定的圈数
    testWheelRunNCircle();
}

void loop(){
}
8. Set Servo Angle
8.1 API - setAngle
Set the angle of the servo.
Function Prototype
/* 设置舵机的原始角度 */
void FSUS_Servo::setRawAngle(FSUS_SERVO_ANGLE_T rawAngle, FSUS_INTERVAL_T interval, FSUS_POWER_T power)
/* 设置舵机的原始角度 */
void FSUS_Servo::setRawAngle(FSUS_SERVO_ANGLE_T rawAngle, FSUS_INTERVAL_T interval)
/* 设置舵机的原始角度 */
void FSUS_Servo::setRawAngle(FSUS_SERVO_ANGLE_T rawAngle)
Input Parameters
· rawAngle: target angle of the servo, in degrees
· interval: rotation period of the servo, in ms
· power: maximum power, in mW
8.2 API - setRawAngleByInterval
Function Prototype
// 设置舵机的原始角度(指定周期)
void FSUS_Servo::setRawAngleByInterval(FSUS_SERVO_ANGLE_T rawAngle, FSUS_INTERVAL_T interval, FSUS_INTERVAL_T t_acc, FSUS_INTERVAL_T t_dec, FSUS_POWER_T power)
Input Parameters
· rawAngle: target angle of the servo, in degrees
· interval: rotation period of the servo, in ms
· t_acc: acceleration time
· t_dec: deceleration time
· power: maximum power, in mW
8.3 API - setRawAngleByVelocity
Function Prototype
// 设定舵机的原始角度(指定转速)
void FSUS_Servo::setRawAngleByVelocity(FSUS_SERVO_ANGLE_T rawAngle, FSUS_SERVO_SPEED_T velocity, FSUS_INTERVAL_T t_acc, FSUS_INTERVAL_T t_dec, FSUS_POWER_T power)
Input Parameters
· rawAngle: target angle of the servo, in degrees
· velocity: rotation speed of the servo, in °/s
· t_acc: acceleration time
· t_dec: deceleration time
· power: maximum power, in mW
8.4 API - isStop
Determine whether the servo is rotating or stationary.
When this function runs, it first queries the current angle of the servo, then returns whether the difference from the target angle targetAngle is smaller than the control deadband.
Function Prototype
bool FSUS_Servo::isStop()
Input Parameters
· <无>
Return Parameters
· is_stop:
true: the servo has reached the target angle and stopped
false: the servo has not reached the target angle and is still rotating
8.5 API - setRange
Set the angle range of the servo.
Function Prototype
void FSUS_Servo::setAngleRange(FSUS_SERVO_ANGLE_T minAngle, FSUS_SERVO_ANGLE_T maxAngle)
Input Parameters
· minAngle: lower angle limit of the servo
· maxAngle: upper angle limit of the servo
Output Parameters
· <无>
8.6 Example Source Code
servo_set_angle
/*
 * 设置舵机的角度(单圈模式)
 * 提示: 拓展板上电之后, 记得按下Arduino的RESET按键
 * --------------------------
 * 作者: 深圳市华馨京科技有限公司
 * 网站:https://fashionstar.com.hk/
 * 更新时间: 2023/03/13
 */

#include "FashionStar_UartServoProtocol.h"
#include "FashionStar_UartServo.h" // Fashion Star总线伺服舵机的依赖

// 总线伺服舵机配置参数
#define SERVO_ID 0 //舵机ID号
#define BAUDRATE 115200 // 波特率

// 调试串口的配置
#if defined(ARDUINO_AVR_UNO)
    #include <SoftwareSerial.h>
    #define SOFT_SERIAL_RX 6
    #define SOFT_SERIAL_TX 7
    SoftwareSerial softSerial(SOFT_SERIAL_RX, SOFT_SERIAL_TX); // 创建软串口
    #define DEBUG_SERIAL softSerial
    #define DEBUG_SERIAL_BAUDRATE 4800

#elif defined(ARDUINO_AVR_MEGA2560)
    #define DEBUG_SERIAL Serial
    #define DEBUG_SERIAL_BAUDRATE 115200

#elif defined(ARDUINO_ARCH_ESP32)
    #define DEBUG_SERIAL Serial
    #define DEBUG_SERIAL_BAUDRATE 115200

#elif defined(ARDUINO_ARCH_STM32)
    #include <HardwareSerial.h>
    //                      RX    TX
    HardwareSerial Serial1(PA10, PA9);
    //HardwareSerial Serial2(PA3, PA2); //这里串口2不需要定义
    HardwareSerial Serial3(PB11, PB10);
    #define DEBUG_SERIAL Serial1
    #define DEBUG_SERIAL_BAUDRATE (uint32_t)115200

#endif

FSUS_Protocol protocol(BAUDRATE); //协议
FSUS_Servo uservo(SERVO_ID, &protocol); // 创建舵机

uint16_t interval;  // 运行周期 单位ms
uint16_t t_acc;     // 加速时间 单位ms
uint16_t t_dec;     // 减速时间 单位ms
float velocity;         // 目标转速 单位°/s

/* 等待并报告当前的角度*/
void waitAndReport(){
    uservo.wait();          // 等待舵机旋转到目标角度
    DEBUG_SERIAL.println("Real Angle = " + String(uservo.curRawAngle, 1) + " Target Angle = "+String(uservo.targetRawAngle, 1));
    delay(2000); // 暂停2s

}

void setup(){
    protocol.init(); // 通信协议初始化
    uservo.init(); //舵机角度初始化
    // 打印例程信息
    DEBUG_SERIAL.begin(DEBUG_SERIAL_BAUDRATE); // 初始化软串口的波特率
    DEBUG_SERIAL.println("Set Servo Angle");
}

void loop(){
    DEBUG_SERIAL.println("Set Angle = 90°");
    uservo.setRawAngle(90.0);  // 设置舵机的角度
    waitAndReport();
    delay(2000);

    DEBUG_SERIAL.println("Set Angle = -90°");
    uservo.setRawAngle(-90);
    waitAndReport();
    delay(2000);

    DEBUG_SERIAL.println("Set Angle = 90° - Set Interval = 500ms");
    interval = 1000;
    t_acc = 100;
    t_dec = 100;
    uservo.setRawAngleByInterval(90, interval, t_acc, t_dec, 0);
    waitAndReport();
    delay(2000);

    DEBUG_SERIAL.println("Set Angle = -90° - Set Velocity = 200°/s");
    velocity = 200.0;
    t_acc = 100;
    t_dec = 100;
    uservo.setRawAngleByVelocity(-90, velocity, t_acc, t_dec, 0);
    waitAndReport();
    delay(2000);
}
Log output
Set Angle = 90°
Real Angle = 89.7 Target Angle = 90.0
Set Angle = -90°
Real Angle = -89.6 Target Angle = -90.0
Set Angle = 90° - Set Interval = 500ms
Real Angle = 89.7 Target Angle = 90.0
Set Angle = -90° - Set Velocity = 200°/s
Real Angle = -89.6 Target Angle = -90.0
9. Servo Blocking Wait
9.1 API - wait
Block and wait for the servo to rotate to the target angle.
Function Prototype
void FSUS_Servo::wait()
Input Parameters
· <无>
Output Parameters
· <无>
9.2 Example Source Code
servo_wait.ino
/*
 * 测试wait()函数,轮询角度直到舵机旋转到目标位置
 * 提示: 拓展板上电之后, 记得按下Arduino的RESET按键
 * --------------------------
 * 作者: 深圳市华馨京科技有限公司
 * 网站:https://fashionstar.com.hk/
 * 更新时间: 2023/03/13
 */
#include "FashionStar_UartServoProtocol.h"
#include "FashionStar_UartServo.h" // Fashion Star总线伺服舵机的依赖

// 总线伺服舵机配置参数
#define SERVO_ID 0 //舵机ID号
#define BAUDRATE 115200 // 波特率

// 调试串口的配置
#if defined(ARDUINO_AVR_UNO)
    #include <SoftwareSerial.h>
    #define SOFT_SERIAL_RX 6
    #define SOFT_SERIAL_TX 7
    SoftwareSerial softSerial(SOFT_SERIAL_RX, SOFT_SERIAL_TX); // 创建软串口
    #define DEBUG_SERIAL softSerial
    #define DEBUG_SERIAL_BAUDRATE 4800

#elif defined(ARDUINO_AVR_MEGA2560)
    #define DEBUG_SERIAL Serial
    #define DEBUG_SERIAL_BAUDRATE 115200

#elif defined(ARDUINO_ARCH_ESP32)
    #define DEBUG_SERIAL Serial
    #define DEBUG_SERIAL_BAUDRATE 115200

#elif defined(ARDUINO_ARCH_STM32)
    #include <HardwareSerial.h>
    //                      RX    TX
    HardwareSerial Serial1(PA10, PA9);
    //HardwareSerial Serial2(PA3, PA2); //这里串口2不需要定义
    HardwareSerial Serial3(PB11, PB10);
    #define DEBUG_SERIAL Serial1
    #define DEBUG_SERIAL_BAUDRATE (uint32_t)115200

#endif

FSUS_Protocol protocol(BAUDRATE); //协议
FSUS_Servo uservo(SERVO_ID, &protocol); // 创建舵机

void setup(){

    protocol.init(); // 通信协议初始化
    uservo.init(); //舵机初始化
    // 打印例程信息
    DEBUG_SERIAL.begin(DEBUG_SERIAL_BAUDRATE);
    DEBUG_SERIAL.println("Test Wait");
}

void loop(){
    DEBUG_SERIAL.println("Set Angle = 90.0");
    uservo.setAngle(90.0); // 设置舵机的角度
    uservo.wait();
    DEBUG_SERIAL.println("Real Angle = "+String(uservo.curRawAngle, 2));

    DEBUG_SERIAL.println("Set Angle = -90.0");
    uservo.setAngle(-90);
    uservo.wait();
    DEBUG_SERIAL.println("Real Angle = "+String(uservo.curRawAngle, 2));
}
Log output
Set Angle = -90.0
Real Angle = -89.00
Set Angle = 90.0
Real Angle = 89.80
Set Angle = -90.0
Real Angle = -89.00
Set Angle = 90.0
Real Angle = 89.80
Set Angle = -90.0
Real Angle = -89.00
Set Angle = 90.0
Real Angle = 89.80
Set Angle = -90.0
Real Angle = -89.00
10. Set Servo Angle - Multi-Turn Mode
10.1 API - setRawAngleMTurn
Function Prototype
// 设定舵机的原始角度(多圈)
void FSUS_Servo::setRawAngleMTurn(FSUS_SERVO_ANGLE_T rawAngle, FSUS_INTERVAL_T_MTURN interval, FSUS_POWER_T power)
// 设定舵机的原始角度(多圈)
void FSUS_Servo::setRawAngleMTurn(FSUS_SERVO_ANGLE_T rawAngle, FSUS_INTERVAL_T_MTURN interval)
// 设定舵机的原始角度(多圈)
void FSUS_Servo::setRawAngleMTurn(FSUS_SERVO_ANGLE_T rawAngle)
Input Parameters
· rawAngle: target angle of the servo, in degrees
· interval: rotation period of the servo, in ms
· power: maximum power, in mW
Output Parameters
· <无>
10.2 API - setRawAngleByInterval
Function Prototype
// 设定舵机的原始角度(多圈+指定周期)
void FSUS_Servo::setRawAngleMTurnByInterval(FSUS_SERVO_ANGLE_T rawAngle, FSUS_INTERVAL_T_MTURN interval, FSUS_INTERVAL_T t_acc, FSUS_INTERVAL_T t_dec, FSUS_POWER_T power)
Input Parameters
· rawAngle: target angle of the servo, in degrees
· interval: rotation period of the servo, in ms
· t_acc: acceleration time, in ms
· t_dec: deceleration time, in ms
· power: maximum power, in mW
Output Parameters
· <无>
10.3 API - setRawAngleMTurnByVelocity
Function Prototype
// 设定舵机的原始角度(多圈+指定转速)
void FSUS_Servo::setRawAngleMTurnByVelocity(FSUS_SERVO_ANGLE_T rawAngle, FSUS_SERVO_SPEED_T velocity, FSUS_INTERVAL_T t_acc, FSUS_INTERVAL_T t_dec, FSUS_POWER_T power)
Input Parameters
· rawAngle: target angle of the servo, in degrees
· velocity: rotation speed of the servo, in °/s
· t_acc: acceleration time, in ms
· t_dec: deceleration time, in ms
· power: maximum power, in mW
Output Parameters
· <无>
10.4 Example Source Code
servo_set_angle_mturn.ino
/*
 * 设置舵机的角度(多圈模式)
 * 提示: 拓展板上电之后, 记得按下Arduino的RESET按键
 * --------------------------
 * 作者: 深圳市华馨京科技有限公司
 * 网站:https://fashionstar.com.hk/
 * 更新时间: 2023/03/13
 */

#include "FashionStar_UartServoProtocol.h"
#include "FashionStar_UartServo.h" // Fashion Star总线伺服舵机的依赖


// 总线伺服舵机配置参数
#define SERVO_ID 0 //舵机ID号
#define BAUDRATE 115200 // 波特率

// 调试串口的配置
#if defined(ARDUINO_AVR_UNO)
    #include <SoftwareSerial.h>
    #define SOFT_SERIAL_RX 6
    #define SOFT_SERIAL_TX 7
    SoftwareSerial softSerial(SOFT_SERIAL_RX, SOFT_SERIAL_TX); // 创建软串口
    #define DEBUG_SERIAL softSerial
    #define DEBUG_SERIAL_BAUDRATE 4800

#elif defined(ARDUINO_AVR_MEGA2560)
    #define DEBUG_SERIAL Serial
    #define DEBUG_SERIAL_BAUDRATE 115200

#elif defined(ARDUINO_ARCH_ESP32)
    #define DEBUG_SERIAL Serial
    #define DEBUG_SERIAL_BAUDRATE 115200

#elif defined(ARDUINO_ARCH_STM32)
    #include <HardwareSerial.h>
    //                      RX    TX
    HardwareSerial Serial1(PA10, PA9);
    //HardwareSerial Serial2(PA3, PA2); //这里串口2不需要定义
    HardwareSerial Serial3(PB11, PB10);
    #define DEBUG_SERIAL Serial1
    #define DEBUG_SERIAL_BAUDRATE (uint32_t)115200

#endif

FSUS_Protocol protocol(BAUDRATE); //协议
FSUS_Servo uservo(SERVO_ID, &protocol); // 创建舵机

uint32_t interval;  // 运行周期 单位ms
uint16_t t_acc;     // 加速时间 单位ms
uint16_t t_dec;     // 减速时间 单位ms
float velocity;         // 目标转速 单位°/s

/* 等待并报告当前的角度*/
void waitAndReport(){
    uservo.wait();          // 等待舵机旋转到目标角度
    DEBUG_SERIAL.println("Real Angle = " + String(uservo.curRawAngle, 1) + " Target Angle = "+String(uservo.targetRawAngle, 1));
    delay(2000); // 暂停2s
}

void setup(){
    protocol.init(); // 通信协议初始化
    uservo.init(); //舵机角度初始化
    // 打印例程信息
    DEBUG_SERIAL.begin(DEBUG_SERIAL_BAUDRATE); // 初始化软串口的波特率
    DEBUG_SERIAL.println("Set Servo Angle");
}

void loop(){
    DEBUG_SERIAL.println("Set Angle = 900°");
    uservo.setRawAngleMTurn(900.0);  // 设置舵机的角度
    waitAndReport();

    DEBUG_SERIAL.println("Set Angle = -900.0°");
    uservo.setRawAngleMTurn(-900.0);
    waitAndReport();

    DEBUG_SERIAL.println("Set Angle = 900° - Set Interval = 10s");
    interval = 10000;
    t_acc = 100;
    t_dec = 100;
    uservo.setRawAngleMTurnByInterval(900, interval, t_acc, t_dec, 0);
    waitAndReport();

    DEBUG_SERIAL.println("Set Angle = -900° - Set Velocity = 200°/s");
    velocity = 200.0;
    t_acc = 100;
    t_dec = 100;
    uservo.setRawAngleMTurnByVelocity(-900, velocity, t_acc, t_dec, 0);
    waitAndReport();
}
Log output
Set Angle = 900°
Set Servo Angle
Set Angle = 900°
Real Angle = 899.0 Target Angle = 900.0
Set Angle = -900.0°
Real Angle = -899.0 Target Angle = -900.0
Set Angle = 900° - Set Interval = 10s
Real Angle = 899.0 Target Angle = 900.0
Set Angle = -900° - Set Velocity = 200°/s
Real Angle = -899.0 Target Angle = -900.0
11. Servo Torque Switch
11.1 API - setTorque
Function Prototype
void FSUS_Servo::setTorque(bool enable)
Input Parameters
· enable: whether torque is enabled
true: enable torque
false: disable torque
Usage Example
uservo.setTorque(true); // 开启扭力
11.2 Example Source Code
servo_torque.ino
/*
 * 测试舵机扭力开关
 * 提示: 拓展板上电之后, 记得按下Arduino的RESET按键
 * --------------------------
 * 作者: 深圳市华馨京科技有限公司
 * 网站:https://fashionstar.com.hk/
 * 更新时间: 2023/03/13
 */
#include "FashionStar_UartServoProtocol.h"
#include "FashionStar_UartServo.h" // Fashion Star总线伺服舵机的依赖

// 配置参数
#define BAUDRATE 115200 // 波特率
#define SERVO_ID 0 //舵机ID号

FSUS_Protocol protocol; //协议
FSUS_Servo uservo(SERVO_ID, &protocol); // 创建舵机
void setup(){
    protocol.init(); // 通信协议初始化
    uservo.init(); //舵机初始

    uservo.setTorque(true); // 开启扭力
    // uservo.setTorque(false); // 开启扭力
}

void loop(){

}
12. Servo Calibration
12.1 API - calibration
In the FSUS_Servo class, there are two calibration-related parameters:
class FSUS_Servo{
public:
    ...
    float kAngleReal2Raw; // 舵机标定数据-舵机角度与位置之间的比例系数
    float bAngleReal2Raw; // 舵机标定数据-舵机角度与位置转换过程中的偏移量
    ...
}
The mapping relationship between the real angle and raw angle of the servo is:
$$ angleRaw = kAngleReal2Raw \cdot angleReal + bAngleReal2Raw $$
Function Prototype
void FSUS_Servo::calibration(FSUS_SERVO_ANGLE_T rawA, FSUS_SERVO_ANGLE_T realA, FSUS_SERVO_ANGLE_T rawB, FSUS_SERVO_ANGLE_T realB)
Input Parameters
· rawA: raw angle of the servo at position A
· realA: real angle of the servo at position A
· rawB: raw angle of the servo at position B
· realB: real angle of the servo at position B
Usage Example
// 设置舵机的标定点
// 样本1
#define SERVO_REAL_ANGLE_A 90 // 舵机真实角度
#define SERVO_RAW_ANGLE_A -86.2 // 舵机原始角度
// 样本2
#define SERVO_REAL_ANGLE_B -90 // 舵机真实角度
#define SERVO_RAW_ANGLE_B 91.9 // 舵机原始角度


// 输入舵机标定数据
uservo.calibration(
    SERVO_RAW_ANGLE_A,SERVO_REAL_ANGLE_A,\
    SERVO_RAW_ANGLE_B,SERVO_REAL_ANGLE_B);
Function Prototype
void FSUS_Servo::calibration(float kAngleReal2Raw, float bAngleReal2Raw);
Input Parameters
· kAngleReal2Raw: servo calibration data - scale coefficient between servo angle and position
· bAngleReal2Raw: servo calibration data - offset in angle and position conversion for the servo
12.2 API - angleReal2Raw
Convert the real angle of the servo to the raw angle of the servo.
Function Prototype
// 真实角度转化为原始角度
FSUS_SERVO_ANGLE_T FSUS_Servo::angleReal2Raw(FSUS_SERVO_ANGLE_T realAngle);
Input Parameters
· realAngle: real angle of the servo
Return Parameters
· rawAngle: raw angle of the servo
12.3 API - angleRaw2Real
Convert the raw angle of the servo to the real angle.
Function Prototype
 // 原始角度转换为真实角度
FSUS_SERVO_ANGLE_T FSUS_Servo::angleRaw2Real(FSUS_SERVO_ANGLE_T rawAngle);
Input Parameters
· rawAngle: raw angle of the servo
Return Parameters
· realAngle: real angle of the servo
12.4 Example Source Code
servo_calibration
/*
 * 测试舵机标定
 * 提示: 拓展板上电之后, 记得按下Arduino的RESET按键
 * --------------------------
 * 作者: 深圳市华馨京科技有限公司
 * 网站:https://fashionstar.com.hk/
 * 更新时间: 2023/03/13
 */

#include "FashionStar_UartServoProtocol.h"
#include "FashionStar_UartServo.h" // Fashion Star总线伺服舵机的依赖


// 总线伺服舵机配置参数
#define SERVO_ID 0 //舵机ID号
#define BAUDRATE 115200 // 波特率

// 设置舵机的标定点
// 样本1
#define SERVO_REAL_ANGLE_A 90 // 舵机真实角度
#define SERVO_RAW_ANGLE_A -86.2 // 舵机原始角度
// 样本2
#define SERVO_REAL_ANGLE_B -90 // 舵机真实角度
#define SERVO_RAW_ANGLE_B 91.9 // 舵机原始角度

// 调试串口的配置
#if defined(ARDUINO_AVR_UNO)
    #include <SoftwareSerial.h>
    #define SOFT_SERIAL_RX 6
    #define SOFT_SERIAL_TX 7
    SoftwareSerial softSerial(SOFT_SERIAL_RX, SOFT_SERIAL_TX); // 创建软串口
    #define DEBUG_SERIAL softSerial
    #define DEBUG_SERIAL_BAUDRATE 4800

#elif defined(ARDUINO_AVR_MEGA2560)
    #define DEBUG_SERIAL Serial
    #define DEBUG_SERIAL_BAUDRATE 115200

#elif defined(ARDUINO_ARCH_ESP32)
    #define DEBUG_SERIAL Serial
    #define DEBUG_SERIAL_BAUDRATE 115200

#elif defined(ARDUINO_ARCH_STM32)
    #include <HardwareSerial.h>
    //                      RX    TX
    HardwareSerial Serial1(PA10, PA9);
    //HardwareSerial Serial2(PA3, PA2); //这里串口2不需要定义
    HardwareSerial Serial3(PB11, PB10);
    #define DEBUG_SERIAL Serial1
    #define DEBUG_SERIAL_BAUDRATE (uint32_t)115200
#endif

FSUS_Protocol protocol(BAUDRATE); //协议
FSUS_Servo uservo(SERVO_ID, &protocol); // 创建舵机

void setup(){
    protocol.init(); // 通信协议初始化
    uservo.init(); //舵机角度初始化
    // 调试串口初始化
    DEBUG_SERIAL.begin(DEBUG_SERIAL_BAUDRATE); // 初始化软串口的波特率
    DEBUG_SERIAL.println("Set Servo Angle");
    // 输入舵机标定数据
    uservo.calibration(
        SERVO_RAW_ANGLE_A,SERVO_REAL_ANGLE_A,\
        SERVO_RAW_ANGLE_B,SERVO_REAL_ANGLE_B);

    // 打印舵机标定数据
    DEBUG_SERIAL.println("kAngleReal2Raw = "+String(uservo.kAngleReal2Raw,2) + \
        "; bAngleReal2Raw = " + String(uservo.bAngleReal2Raw, 2));
}

void loop(){
    DEBUG_SERIAL.println("Set Angle = 90°");
    uservo.setAngle(90.0); // 设置舵机的角度
    uservo.wait();
    delay(2000);

    DEBUG_SERIAL.println("Set Angle = -90°");
    uservo.setAngle(-90);
    uservo.wait();
    delay(2000);
}
Log output
Set Servo Angle

kAngleReal2Raw = -0.99; bAngleReal2Raw = 2.85

Set Angle = 90

Set Angle = -90
13. Servo Speed Setting
13.1 API - setSpeed
Function Prototype
void FSUS_Servo::setSpeed(FSUS_SERVO_SPEED_T speed)
Input Parameters
· speed: average speed of the servo, in °/s
Return Parameters
· <无>
14. Servo Data Read
14.1 API
Function Prototype
uint16_t FSUS_Servo::queryVoltage()// 查询舵机的电压(单位mV)

uint16_t FSUS_Servo::queryCurrent()// 查询舵机的电流(单位mA)

uint16_t FSUS_Servo::queryPower()// 查询舵机的功率(单位mW)

uint16_t FSUS_Servo::queryTemperature()// 查询舵机的温度(单位 ADC)

uint8_t FSUS_Servo::queryStatus()// 查询舵机状态
Input Parameters
· <无>
Return Parameters
Data of the servo
14.2 Example Source Code
servo_data_read.ino
/*
 * 舵机数据读取实验
 * --------------------------
 * 作者: 深圳市华馨京科技有限公司
 * 网站:https://fashionstar.com.hk/
 * 更新时间: 2024/08/14
 **/
#include "FashionStar_UartServoProtocol.h" // 总线伺服舵机通信协议
#include "FashionStar_UartServo.h"         // Fashion Star总线伺服舵机的依赖

// 配置
#define SERVO_ID 0      // 舵机ID号
#define BAUDRATE 115200 // 波特率

// 调试串口的配置
#if defined(ARDUINO_AVR_UNO)
#include <SoftwareSerial.h>
#define SOFT_SERIAL_RX 6
#define SOFT_SERIAL_TX 7
SoftwareSerial softSerial(SOFT_SERIAL_RX, SOFT_SERIAL_TX); // 创建软串口
#define DEBUG_SERIAL softSerial
#define DEBUG_SERIAL_BAUDRATE 4800

#elif defined(ARDUINO_AVR_MEGA2560)
#define DEBUG_SERIAL Serial
#define DEBUG_SERIAL_BAUDRATE 115200

#elif defined(ARDUINO_ARCH_ESP32)
#define DEBUG_SERIAL Serial
#define DEBUG_SERIAL_BAUDRATE 115200

#elif defined(ARDUINO_ARCH_STM32)
#include <HardwareSerial.h>
//                      RX    TX
HardwareSerial Serial1(PA10, PA9);
// HardwareSerial Serial2(PA3, PA2); //这里串口2不需要定义
HardwareSerial Serial3(PB11, PB10);
#define DEBUG_SERIAL Serial1
#define DEBUG_SERIAL_BAUDRATE (uint32_t)115200

#endif

FSUS_Protocol protocol(BAUDRATE);       // 协议
FSUS_Servo uservo(SERVO_ID, &protocol); // 创建舵机

// 读取数据
uint16_t voltage;     // 电压 mV
uint16_t current;     // 电流 mA
uint16_t power;       // 功率 mW
uint16_t temperature; // 温度 ADC
uint8_t status;       // 状态

void setup()
{

    protocol.init(); // 舵机通信协议初始化
    uservo.init();   // 总线伺服舵机初始化
    // 打印例程信息
    DEBUG_SERIAL.begin(DEBUG_SERIAL_BAUDRATE);
    DEBUG_SERIAL.println("Start To Test Servo Data Read \n"); // 打印日志

    // uservo.setAngle(-25.0,  1000, 200); // 设置舵机角度(限制功率)
}

void loop()
{
    // 读取电压数据
    voltage = uservo.queryVoltage();
    DEBUG_SERIAL.println("voltage: " + String((float)voltage, 1) + " mV");
    delay(100);
    // 读取电流数据
    current = uservo.queryCurrent();
    DEBUG_SERIAL.println("current: " + String((float)current, 1) + " mA");
    delay(100);
    // 读取功率数据
    power = uservo.queryPower();
    DEBUG_SERIAL.println("power: " + String((float)power, 1) + " mW");
    delay(100);
    // 读取温度数据,需要做ADC转℃
    temperature = uservo.queryTemperature();
    temperature = 1 / (log(temperature / (4096.0f - temperature)) / 3435.0f + 1 / (273.15 + 25)) - 273.15;
    DEBUG_SERIAL.println("temperature: " + String((float)temperature, 1) + " Celsius");

    // 读取工作状态数据
    /*
        BIT[0] - 执行指令置1,执行完成后清零。
        BIT[1] - 执行指令错误置1,在下次正确执行后清零。
        BIT[2] - 堵转错误置1,解除堵转后清零。
        BIT[3] - 电压过高置1,电压恢复正常后清零。
        BIT[4] - 电压过低置1,电压恢复正常后清零。
        BIT[5] - 电流错误置1,电流恢复正常后清零。
        BIT[6] - 功率错误置1,功率恢复正常后清零。
        BIT[7] - 温度错误置1,温度恢复正常后清零。
    */
    status = uservo.queryStatus();
    char binStr[9]; // 8位二进制字符串加上终止符
    for (int i = 7; i >= 0; i--) {
        binStr[7 - i] = (status & (1 << i)) ? '1' : '0';
    }
    binStr[8] = '\0'; // 字符串终止符
    DEBUG_SERIAL.print("WorkState: ");
    DEBUG_SERIAL.println(binStr);
    int bitValue = bitRead(status, 3);
    //判断电压错误标志是否触发
    if (bitValue)
    {
        DEBUG_SERIAL.println("voltage_high");
    }
    bitValue = bitRead(status, 4);
    if (bitValue)
    {
        DEBUG_SERIAL.println("voltage_low");
    }
    delay(100);

    delay(1000);
}
15. Multi-Serial Port Operation
15.1 Set Servo Angle
Example Source Code
arduino_STM32C8T6
/*
 * 设置舵机的角度(单圈模式)
 * 提示: PCB板上电之后, 记得按下的RESET按键
 * --------------------------
 * 作者: 深圳市华馨京科技有限公司
 * 网站:https://fashionstar.com.hk/
 * 更新时间: 2023/03/13
 */

#include <HardwareSerial.h>

//                      RX    TX
HardwareSerial Serial1(PA10, PA9);
//HardwareSerial Serial2(PA3, PA2); //这里串口2不需要定义
HardwareSerial Serial3(PB11, PB10);

#include "FashionStar_UartServoProtocol.h" // 总线伺服舵机通信协议
#include "FashionStar_UartServo.h" // Fashion Star总线伺服舵机的依赖

// 总线伺服舵机配置
#define USERVO_BAUDRATE (uint32_t)115200 // 波特率

// 调试串口的配置
#define DEBUG_SERIAL Serial
#define DEBUG_SERIAL_BAUDRATE (uint32_t)115200

//多串口版本主要区别在于:串口舵机管理器&舵机挂载在串口上,2个部分//
// 串口1舵机管理器
FSUS_Protocol protocol_ch1(&Serial1, USERVO_BAUDRATE);
// 串口2舵机管理器
FSUS_Protocol protocol_ch2(&Serial2, USERVO_BAUDRATE);
// 串口3舵机管理器
FSUS_Protocol protocol_ch3(&Serial3, USERVO_BAUDRATE);

// 舵机 #0 挂载在串口1上
FSUS_Servo uservo_0(0, &protocol_ch1); // 创建舵机
// 舵机 #1 挂载在串口2上
FSUS_Servo uservo_1(1, &protocol_ch2); // 创建舵机
// 舵机 #2 挂载在串口3上
FSUS_Servo uservo_2(2, &protocol_ch3); // 创建舵机
///////////////////*请以上面串口1,2范例为标准*////////////////

void setup() {

    // 总线伺服舵机 #0 初始化
    uservo_0.init();
    // 总线伺服舵机 #1 初始化
    uservo_1.init();
    // 总线伺服舵机 #2 初始化
    uservo_2.init();

    // 打印例程信息
    DEBUG_SERIAL.begin(DEBUG_SERIAL_BAUDRATE);
    //DEBUG_SERIAL.println("Start To Ping Servo\n");
}

void loop() {


    uservo_0.setRawAngle(90.0);  // 设置舵机的角度
    uservo_1.setRawAngle(90.0);  // 设置舵机的角度
    uservo_2.setRawAngle(90.0);  // 设置舵机的角度
    delay(2000);

    uservo_0.setRawAngle(-90);
    uservo_1.setRawAngle(-90);
    uservo_2.setRawAngle(-90);
    delay(2000);
}
16. Origin Setting
|
Notes:
|
16.1 API - SetOriginPoint
Function Prototype
void FSUS_Servo::SetOriginPoint();
Input Parameters
- <无>
Return Parameters
- <无>
16.2 Example Source Code
servo_set_origin_point.ino
/*
 * 设置舵机原点
 * --------------------------
 * 作者: 深圳市华馨京科技有限公司
 * 网站:https://fashionstar.com.hk/
 * 更新时间: 2024/08/14
 **/
#include "FashionStar_UartServoProtocol.h" // 总线伺服舵机通信协议
#include "FashionStar_UartServo.h"         // Fashion Star总线伺服舵机的依赖

// 总线伺服舵机配置
#define SERVO_ID 0      // 舵机ID号
#define BAUDRATE 115200 // 波特率

// 调试串口的配置
#if defined(ARDUINO_AVR_UNO)
#include <SoftwareSerial.h>
#define SOFT_SERIAL_RX 6
#define SOFT_SERIAL_TX 7
SoftwareSerial softSerial(SOFT_SERIAL_RX, SOFT_SERIAL_TX); // 创建软串口
#define DEBUG_SERIAL softSerial
#define DEBUG_SERIAL_BAUDRATE 4800

#elif defined(ARDUINO_AVR_MEGA2560)
#define DEBUG_SERIAL Serial
#define DEBUG_SERIAL_BAUDRATE 115200

#elif defined(ARDUINO_ARCH_ESP32)
#define DEBUG_SERIAL Serial
#define DEBUG_SERIAL_BAUDRATE 115200

#elif defined(ARDUINO_ARCH_STM32)
#include <HardwareSerial.h>
//                      RX    TX
HardwareSerial Serial1(PA10, PA9);
// HardwareSerial Serial2(PA3, PA2); //这里串口2不需要定义
HardwareSerial Serial3(PB11, PB10);
#define DEBUG_SERIAL Serial1
#define DEBUG_SERIAL_BAUDRATE (uint32_t)115200

#endif

FSUS_Protocol protocol(BAUDRATE);       // 协议
FSUS_Servo uservo(SERVO_ID, &protocol); // 创建舵机

void setup()
{
    protocol.init(); // 舵机通信协议初始化
    uservo.init();   // 总线伺服舵机初始化
    // 打印例程信息
    DEBUG_SERIAL.begin(DEBUG_SERIAL_BAUDRATE);

    uservo.setTorque(0);
    uservo.queryRawAngle();
    // 输出查询信息
    DEBUG_SERIAL.println("Before Set Origin Point: Servo Angle: " + String(uservo.curRawAngle, 1) + " deg");
    uservo.SetOriginPoint();
    delay(1000);
    uservo.queryRawAngle();
    DEBUG_SERIAL.println("After Set Origin Point: Servo Angle: " + String(uservo.curRawAngle, 1) + " deg");
}

void loop()
{
    uservo.queryRawAngle();
    String message = "Status Code: " + String(uservo.protocol->responsePack.recv_status, DEC) + " servo #" + String(uservo.servoId, DEC) + " , Current Angle = " + String(uservo.curRawAngle, 1) + " deg";
    DEBUG_SERIAL.println(message);
    delay(1000);
}
17. Clear Current Turn Count
|
Notes:
|
17.1 API - ResetMultiTurnAngle
Function Prototype
void FSUS_Servo::ResetMultiTurnAngle();
Input Parameters
- <无>
Return Parameters
- <无>
17.2 Example Source Code
servo_reset_multiturn_angle.ino
/*
 * 舵机重设多圈角度
 * 提示: 拓展板上电之后, 记得按下Arduino的RESET按键
 * --------------------------
 * 作者: 深圳市华馨京科技有限公司
 * 网站:https://fashionstar.com.hk/
 * 更新时间: 2024/12/17
 */

#include "FashionStar_UartServoProtocol.h"
#include "FashionStar_UartServo.h" // Fashion Star总线伺服舵机的依赖


// 串口总线舵机配置参数
#define SERVO_ID 0 //舵机ID号
#define BAUDRATE 115200 // 波特率

// 调试串口的配置
#if defined(ARDUINO_AVR_UNO)
    #include <SoftwareSerial.h>
    #define SOFT_SERIAL_RX 6
    #define SOFT_SERIAL_TX 7
    SoftwareSerial softSerial(SOFT_SERIAL_RX, SOFT_SERIAL_TX); // 创建软串口
    #define DEBUG_SERIAL softSerial
    #define DEBUG_SERIAL_BAUDRATE 115200


    #elif defined(ARDUINO_AVR_MEGA2560)
    #define DEBUG_SERIAL Serial
    #define DEBUG_SERIAL_BAUDRATE 115200

#elif defined(ARDUINO_ARCH_ESP32)
    #define DEBUG_SERIAL Serial
    #define DEBUG_SERIAL_BAUDRATE 115200

#elif defined(ARDUINO_ARCH_STM32)
    #include <HardwareSerial.h>
    //                      RX    TX
    HardwareSerial Serial1(PA10, PA9);
    //HardwareSerial Serial2(PA3, PA2); //这里串口2不需要定义
    HardwareSerial Serial3(PB11, PB10);
    #define DEBUG_SERIAL Serial1
    #define DEBUG_SERIAL_BAUDRATE (uint32_t)115200

#endif

FSUS_Protocol protocol(BAUDRATE); //协议
FSUS_Servo uservo(SERVO_ID, &protocol); // 创建舵机

uint32_t interval;  // 运行周期 单位ms
uint16_t t_acc;     // 加速时间 单位ms
uint16_t t_dec;     // 减速时间 单位ms
float velocity;         // 目标转速 单位°/s

/* 等待并报告当前的角度*/
void waitAndReport(){          // 等待舵机旋转到目标角度
    DEBUG_SERIAL.println("Real Angle = " + String(uservo.curRawAngle, 1) + " Target Angle = "+String(uservo.targetRawAngle, 1));
    delay(5000); // 暂停2s
}

void setup(){
    protocol.init(); // 通信协议初始化
    uservo.init(); //舵机角度初始化
    // 打印例程信息
   DEBUG_SERIAL.begin(DEBUG_SERIAL_BAUDRATE); // 初始化软串口的波特率
   DEBUG_SERIAL.println("Set Servo Angle");
}

void loop(){

   uservo.setRawAngleMTurn(1000.0);  // 设置舵机的角度
   delay(7000);
   uservo.queryRawAngleMTurn();      //读取角度
    // 日志输出
    String message = "Status Code: " + String(uservo.protocol->responsePack.recv_status, DEC) + " servo #"+String(uservo.servoId, DEC) + " , Current Angle = "+String(uservo.curRawAngle, 1)+" deg";
    DEBUG_SERIAL.println(message);
    // 等待1s
    delay(1000);
    uservo.StopOnControlUnloading(); //停止舵机(重置多圈需要在舵机停止状态)
    delay(10);
    uservo.ResetMultiTurnAngle();   //重置多圈
    delay(10);
    uservo.queryRawAngleMTurn();    //读取角度
    message = "Status Code: " + String(uservo.protocol->responsePack.recv_status, DEC) + " servo #"+String(uservo.servoId, DEC) + " , Current Angle = "+String(uservo.curRawAngle, 1)+" deg";
    DEBUG_SERIAL.println(message);
    // 等待1s
    delay(1000);

    uservo.setRawAngleMTurn(-1000.0);  // 设置舵机的角度
    delay(7000);
    uservo.queryRawAngleMTurn();
    // 日志输出
    message = "Status Code: " + String(uservo.protocol->responsePack.recv_status, DEC) + " servo #"+String(uservo.servoId, DEC) + " , Current Angle = "+String(uservo.curRawAngle, 1)+" deg";
    DEBUG_SERIAL.println(message);
    // 等待1s
    delay(1000);
    uservo.StopOnControlUnloading();
    delay(10);
    uservo.ResetMultiTurnAngle();
    delay(10);
    uservo.queryRawAngleMTurn();
    message = "Status Code: " + String(uservo.protocol->responsePack.recv_status, DEC) + " servo #"+String(uservo.servoId, DEC) + " , Current Angle = "+String(uservo.curRawAngle, 1)+" deg";
    DEBUG_SERIAL.println(message);
    // 等待1s
    delay(1000);

}
18. Async Commands
|
Notes:
|
18.1 API
Function Prototype
void FSUS_Servo::BeginAsync();  //开始异步指令

void FSUS_Servo::EndAsync(uint8_t cancel);  // 结束异步指令
Input Parameters
· cancel: 0 execute; 1 cancel
Return Parameters
- <无>
18.2 Example Source Code
servo_async.ino
/*
 * 舵机异步命令
 * 提示: 拓展板上电之后, 记得按下Arduino的RESET按键
 * --------------------------
 * 作者: 深圳市华馨京科技有限公司
 * 网站:https://fashionstar.com.hk/
 * 更新时间: 2024/12/17
 */

#include "FashionStar_UartServoProtocol.h"
#include "FashionStar_UartServo.h" // Fashion Star总线伺服舵机的依赖


// 串口总线舵机配置参数
#define SERVO_ID 3 //舵机ID号
#define BAUDRATE 115200 // 波特率

// 调试串口的配置
#if defined(ARDUINO_AVR_UNO)
    #include <SoftwareSerial.h>
    #define SOFT_SERIAL_RX 6
    #define SOFT_SERIAL_TX 7
    SoftwareSerial softSerial(SOFT_SERIAL_RX, SOFT_SERIAL_TX); // 创建软串口
    #define DEBUG_SERIAL softSerial
    #define DEBUG_SERIAL_BAUDRATE 115200


    #elif defined(ARDUINO_AVR_MEGA2560)
    #define DEBUG_SERIAL Serial
    #define DEBUG_SERIAL_BAUDRATE 115200

#elif defined(ARDUINO_ARCH_ESP32)
    #define DEBUG_SERIAL Serial
    #define DEBUG_SERIAL_BAUDRATE 115200

#elif defined(ARDUINO_ARCH_STM32)
    #include <HardwareSerial.h>
    //                      RX    TX
    HardwareSerial Serial1(PA10, PA9);
    //HardwareSerial Serial2(PA3, PA2); //这里串口2不需要定义
    HardwareSerial Serial3(PB11, PB10);
    #define DEBUG_SERIAL Serial1
    #define DEBUG_SERIAL_BAUDRATE (uint32_t)115200

#endif

FSUS_Protocol protocol(BAUDRATE); //协议
FSUS_Servo uservo(SERVO_ID, &protocol); // 创建舵机

/* 等待并报告当前的角度*/
void waitAndReport(){
    uservo.wait();          // 等待舵机旋转到目标角度
    DEBUG_SERIAL.println("Real Angle = " + String(uservo.curRawAngle, 1) + " Target Angle = "+String(uservo.targetRawAngle, 1));
    delay(2000); // 暂停2s
}

void setup(){
    protocol.init(); // 通信协议初始化
    uservo.init(); //舵机角度初始化
    // 打印例程信息
   DEBUG_SERIAL.begin(DEBUG_SERIAL_BAUDRATE); // 初始化软串口的波特率
   DEBUG_SERIAL.println("Set Servo Angle");
}

void loop(){

    float angle;
    uservo.setRawAngle(0.0);    // 设置舵机的角度
    uservo.BeginAsync();        //开始异步指令
    delay(1000);
    uservo.setRawAngle(90.0);   // 存入设置舵机角度
    /*支持存入命令:
     设置舵机原始角度
     设置舵机的原始角度(指定周期)
     设定舵机的原始角度(指定转速)
     设定舵机的原始角度(多圈)
     设定舵机的原始角度(多圈+指定周期)
     设定舵机的原始角度(多圈+指定转速)
    */
    delay(1000);
    uservo.EndAsync(0);         //结束异步,执行存入的指令
    delay(1000);

    uservo.BeginAsync();        //开始异步指令
    delay(1000);
    uservo.setRawAngle(180.0);   // 存入设置舵机角度
    delay(1000);
    uservo.EndAsync(1);         //结束异步,执行存入的指令
    delay(1000);

}
19. Data Monitoring
|
Notes:
|
19.1 API
Function Prototype
ServoMonitorData FSUS_Servo::ServoMonitor();
Input Parameters
- <无>
Return Parameters
Data of the servo
19.2 Example Source Code
servo_monitor.ino
/*
 * 舵机数据监控
 * 提示: 拓展板上电之后, 记得按下Arduino的RESET按键
 * --------------------------
 * 作者: 深圳市华馨京科技有限公司
 * 网站:https://fashionstar.com.hk/
 * 更新时间: 2024/12/17
 */

#include "FashionStar_UartServoProtocol.h"
#include "FashionStar_UartServo.h" // Fashion Star总线伺服舵机的依赖


// 串口总线舵机配置参数
#define SERVO_ID 0 //舵机ID号
#define BAUDRATE 115200 // 波特率

// 调试串口的配置
#if defined(ARDUINO_AVR_UNO)
    #include <SoftwareSerial.h>
    #define SOFT_SERIAL_RX 6
    #define SOFT_SERIAL_TX 7
    SoftwareSerial softSerial(SOFT_SERIAL_RX, SOFT_SERIAL_TX); // 创建软串口
    #define DEBUG_SERIAL softSerial
    #define DEBUG_SERIAL_BAUDRATE 115200


    #elif defined(ARDUINO_AVR_MEGA2560)
    #define DEBUG_SERIAL Serial
    #define DEBUG_SERIAL_BAUDRATE 115200

#elif defined(ARDUINO_ARCH_ESP32)
    #define DEBUG_SERIAL Serial
    #define DEBUG_SERIAL_BAUDRATE 115200

#elif defined(ARDUINO_ARCH_STM32)
    #include <HardwareSerial.h>
    //                      RX    TX
    HardwareSerial Serial1(PA10, PA9);
    //HardwareSerial Serial2(PA3, PA2); //这里串口2不需要定义
    HardwareSerial Serial3(PB11, PB10);
    #define DEBUG_SERIAL Serial1
    #define DEBUG_SERIAL_BAUDRATE (uint32_t)115200

#endif

FSUS_Protocol protocol(BAUDRATE); //协议
FSUS_Servo uservo(SERVO_ID, &protocol); // 创建舵机


uint16_t Voltage;
uint16_t Current;
uint16_t Power;
uint16_t Temperature;
uint8_t Status;
float Angle;
uint8_t Turns;

/* 等待并报告当前的角度*/
void waitAndReport(){
    uservo.wait();          // 等待舵机旋转到目标角度
    DEBUG_SERIAL.println("Real Angle = " + String(uservo.curRawAngle, 1) + " Target Angle = "+String(uservo.targetRawAngle, 1));
    delay(2000); // 暂停2s
}

void setup(){
    protocol.init(); // 通信协议初始化
    uservo.init(); //舵机角度初始化
    // 打印例程信息
   DEBUG_SERIAL.begin(DEBUG_SERIAL_BAUDRATE); // 初始化软串口的波特率
   DEBUG_SERIAL.println("Set Servo Angle");
}

void loop(){

ServoMonitorData data = uservo.ServoMonitor();

    // 打印舵机监控数据
    if (data.isValid) {
        DEBUG_SERIAL.println("Servo Monitor Data (Valid):");
        DEBUG_SERIAL.print("Servo ID: ");
        DEBUG_SERIAL.println(data.servoId);
        DEBUG_SERIAL.print("Voltage: ");
        DEBUG_SERIAL.println(data.voltage);
        DEBUG_SERIAL.print("Current: ");
        DEBUG_SERIAL.println(data.current);
        DEBUG_SERIAL.print("Power: ");
        DEBUG_SERIAL.println(data.power);
        DEBUG_SERIAL.print("Temperature: ");
        DEBUG_SERIAL.println(data.temperature);
        DEBUG_SERIAL.print("Status: ");
        DEBUG_SERIAL.println(data.status);
        DEBUG_SERIAL.print("Angle: ");
        DEBUG_SERIAL.println(data.angle);
        DEBUG_SERIAL.print("Turns: ");
        DEBUG_SERIAL.println(data.turns);
        delay(2000);
    } else {
        DEBUG_SERIAL.println("Failed to receive valid servo data.");
        delay(2000);
    }
}
Log output
Servo Monitor Data (Valid):
Servo ID: 0
Voltage: 12051.00
Current: 30.00
Power: 361.00
Temperature: 2015.00
Status: 0
Angle: 4999.90
Turns: 13.00
20. Stop Command
|
Notes:
|
20.1 API
Function Prototype
void StopOnControlMode(uint8_t method, uint16_t power);// 控制模式停止指令

void StopOnControlUnloading();// 控制模式停止指令-卸力(失锁)

void StopOnControlKeep(uint16_t power); // 控制模式停止指令-锁力

void StopOnControlDammping(uint16_t power);// 控制模式停止指令-阻尼
Input Parameters
· method: stop command execution mode
0x10 - release torque after stopping (torque released)
0x11 - hold torque after stopping
0x12 - enter damping state after stopping
· power: power after torque switch
Unit: mW. If it is 0 or greater than the power protection value, the power protection value is used.
Return Parameters
- <无>
20.2 Example Source Code
servo_stop.ino
/*
 * 设置舵机的角度(多圈)-停止
 * 提示: 拓展板上电之后, 记得按下Arduino的RESET按键
 * --------------------------
 * 作者: 深圳市华馨京科技有限公司
 * 网站:https://fashionstar.com.hk/
 * 更新时间: 2024/12/17
 */

#include "FashionStar_UartServoProtocol.h"
#include "FashionStar_UartServo.h" // Fashion Star总线伺服舵机的依赖


// 串口总线舵机配置参数
#define SERVO_ID 1 //舵机ID号
#define BAUDRATE 115200 // 波特率

// 调试串口的配置
#if defined(ARDUINO_AVR_UNO)
    #include <SoftwareSerial.h>
    #define SOFT_SERIAL_RX 6
    #define SOFT_SERIAL_TX 7
    SoftwareSerial softSerial(SOFT_SERIAL_RX, SOFT_SERIAL_TX); // 创建软串口
    #define DEBUG_SERIAL softSerial
    #define DEBUG_SERIAL_BAUDRATE 115200

#elif defined(ARDUINO_AVR_MEGA2560)
    #define DEBUG_SERIAL Serial
    #define DEBUG_SERIAL_BAUDRATE 115200

#elif defined(ARDUINO_ARCH_ESP32)
    #define DEBUG_SERIAL Serial
    #define DEBUG_SERIAL_BAUDRATE 115200

#elif defined(ARDUINO_ARCH_STM32)
    #include <HardwareSerial.h>
    //                      RX    TX
    HardwareSerial Serial1(PA10, PA9);
    //HardwareSerial Serial2(PA3, PA2); //这里串口2不需要定义
    HardwareSerial Serial3(PB11, PB10);
    #define DEBUG_SERIAL Serial1
    #define DEBUG_SERIAL_BAUDRATE (uint32_t)115200

#endif

FSUS_Protocol protocol(BAUDRATE); //协议
FSUS_Servo uservo(SERVO_ID, &protocol); // 创建舵机

uint32_t interval;  // 运行周期 单位ms
uint16_t t_acc;     // 加速时间 单位ms
uint16_t t_dec;     // 减速时间 单位ms
float velocity;         // 目标转速 单位°/s

/* 等待并报告当前的角度*/
void waitAndReport(){
    uservo.wait();          // 等待舵机旋转到目标角度
    DEBUG_SERIAL.println("Real Angle = " + String(uservo.curRawAngle, 1) + " Target Angle = "+String(uservo.targetRawAngle, 1));
    delay(2000); // 暂停2s
}

void setup(){
    protocol.init(); // 通信协议初始化
    uservo.init(); //舵机角度初始化
    // 打印例程信息
    DEBUG_SERIAL.begin(DEBUG_SERIAL_BAUDRATE); // 初始化软串口的波特率
    DEBUG_SERIAL.println("Set Servo Angle");
}

void loop(){

    DEBUG_SERIAL.println("Set Angle = 10000° ,StopOnControlUnloading\r\n");
    interval = 500;
    t_acc = 100;
    t_dec = 100;
    uservo.setRawAngleMTurnByInterval(10000, interval, t_acc, t_dec, 0);
    delay(2000); // 暂停2s
    uservo.StopOnControlUnloading();//停止失锁,可掰动
    delay(5000);

    DEBUG_SERIAL.println("Set Angle = -10000° ,StopOnControlKeep\r\n");
    interval = 500;
    t_acc = 100;
    t_dec = 100;
    uservo.setRawAngleMTurnByInterval(-10000, interval, t_acc, t_dec, 0);
    delay(2000); // 暂停2s
    uservo.StopOnControlKeep(100);//停止锁止,无法掰动
    delay(5000);

    DEBUG_SERIAL.println("Set Angle = 10000° ,StopOnControlKeep\r\n");
    interval = 500;
    t_acc = 100;
    t_dec = 100;
    uservo.setRawAngleMTurnByInterval(10000, interval, t_acc, t_dec, 0);
    delay(2000); // 暂停2s
    uservo.StopOnControlDammping(500);//停止阻尼,可掰动(有阻尼感)
    delay(5000);

    DEBUG_SERIAL.println("Set Angle = -10000° ,StopOnControlKeep\r\n");
    interval = 500;
    t_acc = 100;
    t_dec = 100;
    uservo.setRawAngleMTurnByInterval(-10000, interval, t_acc, t_dec, 0);
    delay(6000); // 暂停2s

}
21. Sync Commands / Sync Data Monitoring
|
Notes:
|
21.1 API
Function Prototype
void FSUS_Servo::SyncCommand(uint8_t servocount, uint8_t syncmode, FSUS_sync_servo servoSync[]);    //同步控制

void FSUS_Servo::SyncMonitorCommand(uint8_t servocount, FSUS_sync_servo servoSync[],ServoMonitorData* data);    // 同步数据监控
Input Parameters
- <无>
Return Parameters
Data of the servo
21.2 Example Source Code
servo_sync_command.ino
/*
 * 同步控制/同步监控
 * 提示: 拓展板上电之后, 记得按下Arduino的RESET按键
 * --------------------------
 * 作者: 深圳市华馨京科技有限公司
 * 网站:https://fashionstar.com.hk/
 * 更新时间: 2024/12/30
 */

#include "FashionStar_UartServoProtocol.h"
#include "FashionStar_UartServo.h" // Fashion Star总线伺服舵机的依赖

// 串口总线舵机配置参数
#define SERVO_ID 0 //舵机ID号
#define BAUDRATE 115200 // 波特率

// 调试串口的配置
#if defined(ARDUINO_AVR_UNO)
    #include <SoftwareSerial.h>
    #define SOFT_SERIAL_RX 6
    #define SOFT_SERIAL_TX 7
    SoftwareSerial softSerial(SOFT_SERIAL_RX, SOFT_SERIAL_TX); // 创建软串口
    #define DEBUG_SERIAL softSerial
    #define DEBUG_SERIAL_BAUDRATE 115200

#elif defined(ARDUINO_AVR_MEGA2560)
    #define DEBUG_SERIAL Serial
    #define DEBUG_SERIAL_BAUDRATE 115200

#elif defined(ARDUINO_ARCH_ESP32)
    #define DEBUG_SERIAL Serial
    #define DEBUG_SERIAL_BAUDRATE 115200

#elif defined(ARDUINO_ARCH_STM32)
    #include <HardwareSerial.h>
    //                      RX    TX
    HardwareSerial Serial1(PA10, PA9);
    //HardwareSerial Serial2(PA3, PA2); //这里串口2不需要定义
    HardwareSerial Serial3(PB11, PB10);
    #define DEBUG_SERIAL Serial1
    #define DEBUG_SERIAL_BAUDRATE (uint32_t)115200

#endif

FSUS_Protocol protocol(BAUDRATE); //协议
FSUS_Servo uservo(SERVO_ID, &protocol); // 创建舵机

FSUS_sync_servo servoSyncArray[18]; //

void setup(){
    protocol.init(); // 通信协议初始化
    uservo.init(); //舵机角度初始化
    // 打印例程信息
    DEBUG_SERIAL.begin(DEBUG_SERIAL_BAUDRATE); // 初始化软串口的波特率
}
int mode;
int count;
ServoMonitorData servodata[1];
void loop(){
    mode = 1;
    /*  mode 1:单圈角度控制
        mode 2:单圈角度模式-指定时间
        mode 3:单圈角度模式-指定速度
        mode 4:多圈角度模式
        mode 5:多圈角度模式-指定时间
        mode 5:多圈角度模式-指定速度
        注意:Arduino UNO板子的RAM只有2k,目前只支持12个舵机同步
    */
    count = 4;
 for (int i = 0; i < count; i++) {
    servoSyncArray[i].servoId = i;
    servoSyncArray[i].angle = 90;
    servoSyncArray[i].interval = 1000;
    servoSyncArray[i].interval_multiturn = 1000;
    servoSyncArray[i].velocity = 360;
    servoSyncArray[i].t_acc = 100;
    servoSyncArray[i].t_dec = 100;
    servoSyncArray[i].power = 0;
}
    uservo.SyncCommand(count,mode, servoSyncArray);
    delay(2000);

    uservo.SyncMonitorCommand(count, servoSyncArray,servodata);
    delay(2000);
        for (int i = 0; i < count; i++) {
        DEBUG_SERIAL.println("id:");  // 打印每个 syncmonitorData
        DEBUG_SERIAL.println(servodata[i].servoId);

        DEBUG_SERIAL.println("voltage:");  // 打印每个 syncmonitorData
        DEBUG_SERIAL.println(servodata[i].voltage);

        DEBUG_SERIAL.println("current:");  // 打印每个 syncmonitorData
        DEBUG_SERIAL.println(servodata[i].current);

        DEBUG_SERIAL.println("power:");  // 打印每个 syncmonitorData
        DEBUG_SERIAL.println(servodata[i].power);

        DEBUG_SERIAL.println("temperature:");  // 打印每个 syncmonitorData
        DEBUG_SERIAL.println(servodata[i].temperature);

        DEBUG_SERIAL.println("status:");  // 打印每个 syncmonitorData
        DEBUG_SERIAL.println(servodata[i].status);

        DEBUG_SERIAL.println("angle:");  // 打印每个 syncmonitorData
        DEBUG_SERIAL.println(servodata[i].angle);

        DEBUG_SERIAL.println("turns:");  // 打印每个 syncmonitorData
        DEBUG_SERIAL.println(servodata[i].turns);
        delay(1000);
    }
    delay(2000);

    mode = 1;
    count = 4;
 for (int i = 0; i < count; i++) {
    servoSyncArray[i].servoId = i;
    servoSyncArray[i].angle = 0;
    servoSyncArray[i].interval = 1000;
    servoSyncArray[i].interval_multiturn = 1000;
    servoSyncArray[i].velocity = 360;
    servoSyncArray[i].t_acc = 100;
    servoSyncArray[i].t_dec = 100;
    servoSyncArray[i].power = 0;
}
    uservo.SyncCommand(count,mode, servoSyncArray);
    delay(2000);
    uservo.SyncMonitorCommand(count,servoSyncArray,servodata);
    delay(2000);
        for (int i = 0; i < count; i++) {
        DEBUG_SERIAL.println("id:");  // 打印每个 syncmonitorData
        DEBUG_SERIAL.println(servodata[i].servoId);

        DEBUG_SERIAL.println("voltage:");  // 打印每个 syncmonitorData
        DEBUG_SERIAL.println(servodata[i].voltage);

        DEBUG_SERIAL.println("current:");  // 打印每个 syncmonitorData
        DEBUG_SERIAL.println(servodata[i].current);

        DEBUG_SERIAL.println("power:");  // 打印每个 syncmonitorData
        DEBUG_SERIAL.println(servodata[i].power);

        DEBUG_SERIAL.println("temperature:");  // 打印每个 syncmonitorData
        DEBUG_SERIAL.println(servodata[i].temperature);

        DEBUG_SERIAL.println("status:");  // 打印每个 syncmonitorData
        DEBUG_SERIAL.println(servodata[i].status);

        DEBUG_SERIAL.println("angle:");  // 打印每个 syncmonitorData
        DEBUG_SERIAL.println(servodata[i].angle);

        DEBUG_SERIAL.println("turns:");  // 打印每个 syncmonitorData
        DEBUG_SERIAL.println(servodata[i].turns);
        delay(1000);
    }
    delay(2000);

}
Log output
id:
0
voltage:
11427.00
current:
30.00
power:
342.00
temperature:
2035.00
status:
0
angle:
0.10
turns:
0.00

id:
1
voltage:
11654.00
current:
30.00
power:
349.00
temperature:
2053.00
status:
0
angle:
0.10
turns:
0.00

id:
2
voltage:
11553.00
current:
30.00
power:
346.00
temperature:
2108.00
status:
0
angle:
0.10
turns:
0.00

id:
3
voltage:
11543.00
current:
30.00
power:
346.00
temperature:
2041.00
status:
0
angle:
0.10
turns:
0.00